
新月图床
2.56M · 2026-04-06

书接上回,时隔一个多月,终于可以有点时间来聊聊工作流的内容了,这部分是我觉得本次MAF作为SemanticKernel和AutoGen的继任者,最有价值的一个特性之一。
它的核心思想就是将 AI 能力封装为“执行器(Executor)”,通过“边(Edge)”连接成有向图,实现条件分支、状态共享和异步流式执行。
这次,我分别在本地改造实现了官方文档里,关于WorkFlow的前四个章节里案例,咱们看看这个工作流到底是怎么个事儿!
这是官方第一个案例,这个例子里,并没有用到AI的能力,单纯体现的是MAF的原生框架能力。也就是说,我们使用MAF的场景,也可以是一些简单重复的有序场景,比如你原有业务系统里一些分步骤操作的模块,可以考虑接入MAF,改造成自动化的模块,提高效率。
这部分代码我贴一下,但更推荐官网的案例,它是分步骤一点点讲解的,对初学者更友好一点。
public class SequentialFlow
{
    public async Task Run()
    {
        // 创建执行器,Func这种委托写法有时候很有效
        Func<string, string> uppercaseFunc = s => s.ToUpperInvariant();
        var uppercase = uppercaseFunc.BindAsExecutor("UppercaseExecutor");

        ReverseTextExecutor reverse = new();

        // 生成和连接工作流
        WorkflowBuilder builder = new(uppercase);
        builder.AddEdge(uppercase, reverse).WithOutputFrom(reverse);
        var workflow = builder.Build();

        // 灌测试数据执行工作流(异步输出)
        await using StreamingRun run = await InProcessExecution.StreamAsync(workflow, input: "Yo,老铁!");
        await foreach (WorkflowEvent evt in run.WatchStreamAsync())
        {
            if (evt is ExecutorCompletedEvent executorCompleted)
            {
                Console.WriteLine($"{executorCompleted.ExecutorId}: {executorCompleted.Data}");
            }
        }
    }
}

/// <summary>
/// 反转输入文本并完成工作流。
/// </summary>
public sealed class ReverseTextExecutor() : Executor<string, string>("ReverseTextExecutor")
{
    public override ValueTask<string> HandleAsync(string message, IWorkflowContext context, CancellationToken cancellationToken = default)
    {
        return ValueTask.FromResult(string.Concat(message.Reverse()));
    }
}
注意,这里官网的案例是为了尽可能展现实现工作流的方式,本例中2个执行程序分别通过定义了不可继承方法和委托的方式实现,实际上是可以变通的,比如上面定义工作流部分的代码也可以写成下面这样
 Func<string, string> uppercaseFunc = s => s.ToUpperInvariant();
 var uppercase = uppercaseFunc.BindAsExecutor("UppercaseExecutor");

 Func<string, string> reverseFunc = s => string.Concat(s.Reverse());
 var reversecase = reverseFunc.BindAsExecutor("ReversecaseExecutor");

 WorkflowBuilder builder = new(uppercase);
 builder.AddEdge(uppercase, reversecase).WithOutputFrom(reversecase);
 var workflow = builder.Build();
// ...省略
他们的输出结果都是一样的,效果如下
基本就是以下几个步骤
还是根据官方文档,复现它的案例,并了解一下如何创建一个并发工作流。这一趴,文档写的挺有逻辑的,我按照文档的思路,复现一下官方的案例
internal sealed class RoleExecutor : Executor<ChatMessage>
{
    private readonly string _instructions;
    private readonly IChatClient _ch@tClient;
    public RoleExecutor(string id, IChatClient ch@tClient, string instructions) : base(id)
    {
        _ch@tClient = ch@tClient;
        _instructions = instructions;
    }
    public override async ValueTask HandleAsync(ChatMessage message, IWorkflowContext context, CancellationToken cancellationToken = default)
    {
        var messages = new List<ChatMessage>
        {
            new(ChatRole.System, _instructions),
            message
        };
        var response = await _ch@tClient.GetResponseAsync(messages, cancellationToken: cancellationToken);
        var replyMessage = new ChatMessage(ChatRole.Assistant, response.Text ?? string.Empty)
        { AuthorName = this.Id };
        await context.SendMessageAsync(replyMessage, cancellationToken: cancellationToken);
        AnsiConsole.MarkupLine($"[green] {this.Id},任务接受完毕[/]");

    }
internal sealed partial class ConcurrentStartExecutor() : Executor<string>(nameof(ConcurrentStartExecutor))
{
    public override async ValueTask HandleAsync(string message, IWorkflowContext context, CancellationToken cancellationToken = default)
    {
        var userPrompt = $"问题:{message}";
        // 广播用户消息给所有者(通常是多个 Agent)
        await context.SendMessageAsync(new ChatMessage(ChatRole.User, userPrompt), cancellationToken: cancellationToken);

        // 发送 TurnToken 触发所有者开始处理
        await context.SendMessageAsync(new TurnToken(emitEvents: true), cancellationToken: cancellationToken);

        AnsiConsole.MarkupLine("[yellow]  广播已发送 [/]");
    }

}
internal sealed class ConcurrentAggregationExecutor() :
    Executor<ChatMessage>("ConcurrentAggregationExecutor")
{
    private readonly List<ChatMessage> _messages = [];

    public override async ValueTask HandleAsync(ChatMessage message, IWorkflowContext context, CancellationToken cancellationToken = default)
    {
        this._messages.Add(message);
        AnsiConsole.MarkupLine($"[cyan] 已收集 {_messages.Count}个问题数据 - 来自 {message.AuthorName} [/]");
        if (this._messages.Count == 2)
        {
            var formattedMessages = string.Join(Environment.NewLine, this._messages.Select(m => $"{m.AuthorName}: {m.Text}"));
            await context.YieldOutputAsync(formattedMessages, cancellationToken);
        }

    }
}
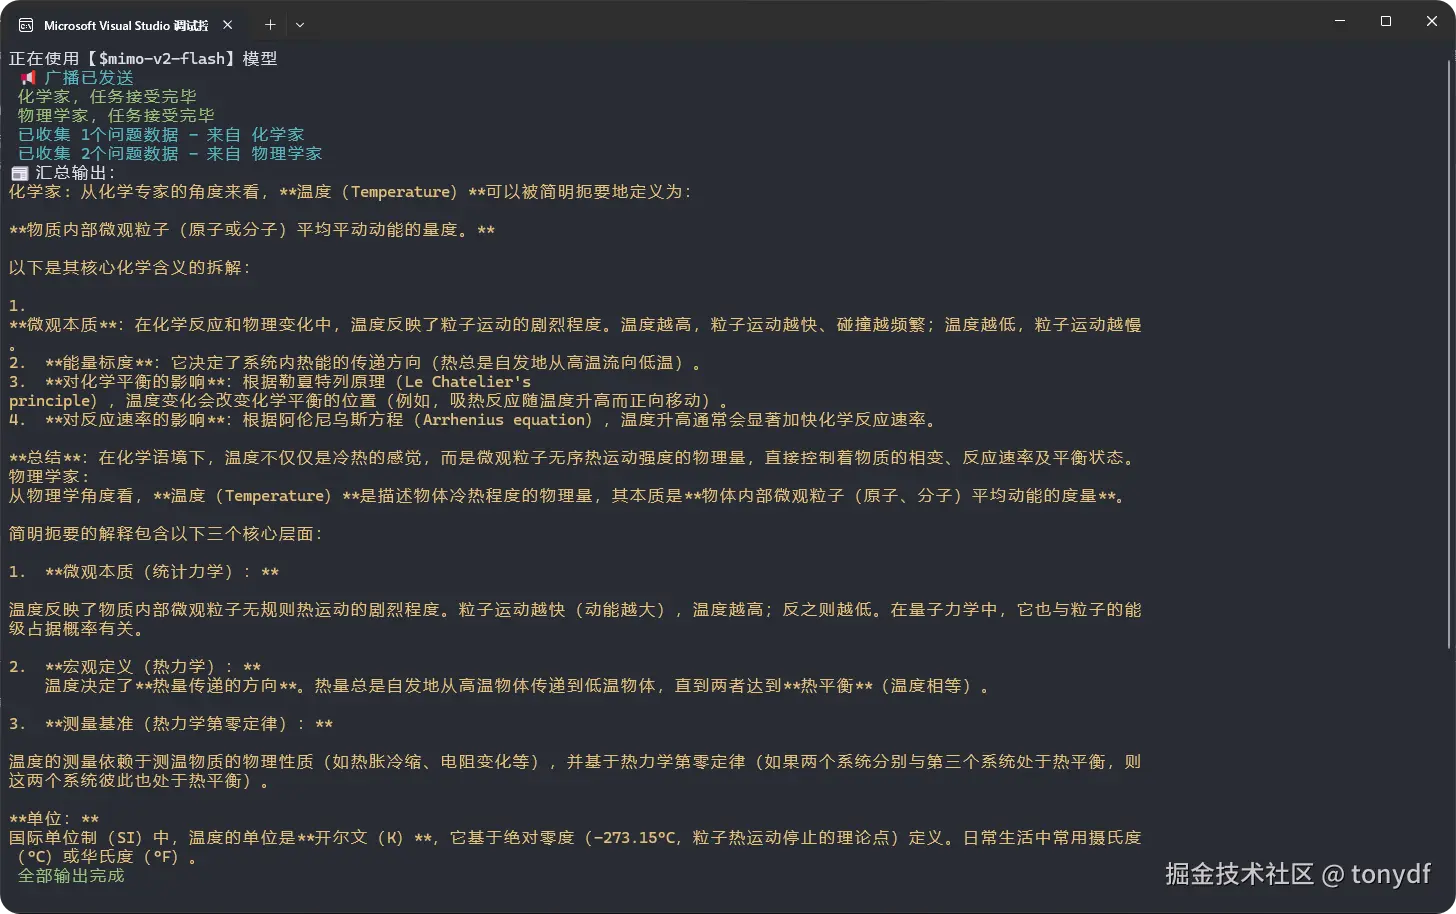
这点代码里,那个count是根据实际情况,因为我这里就定义了2个角色,一个化学家一个物理学家,message的总数就是2,全部收集齐以后,就可以聚合执行了。
var physicist = new RoleExecutor (
    "物理学家",
    ch@tClient,
     "你是物理学专家。你从物理角度回答问题."
);
var chemist = new RoleExecutor(
    "化学家",
    ch@tClient,
     "你是化学专家。你从化学角度回答问题."
);
这一步,如果是在控制台里,可以像官方案例一样写到Main函数里,也可以自己定一个方法。
 var startExecutor = new ConcurrentStartExecutor();
 var aggregationExecutor = new ConcurrentAggregationExecutor();

 var workflow = new WorkflowBuilder(startExecutor)
     .AddFanOutEdge(startExecutor, [physicist, chemist])
     .AddFanInEdge([physicist, chemist], aggregationExecutor)
     .WithOutputFrom(aggregationExecutor)
     .Build();
这里用到了特殊的链接方法“AddFanOutEdge”和“AddFanInEdge”,实际上这两个方法底层的实现就是AddEdge,而这个写法完全可以改造成用AddEdge,但代码行数就多了一些,像这样2个代理的情况改造起来还好,如果再多,用AddEdge就看不过来了。
await using StreamingRun run = await InProcessExecution.StreamAsync(workflow, "什么是温度");
await foreach (WorkflowEvent evt in run.WatchStreamAsync())
{
    if (evt is WorkflowOutputEvent output)
    {
        AnsiConsole.WriteLine(" 汇总输出:");
        AnsiConsole.MarkupLine($"[yellow]{output.Data} [/]");
    }
}
AnsiConsole.MarkupLine($"[green] 全部输出完成[/]");
看下执行效果
文档的介绍在这一前面还有一个“工作流中的代理”,和分支逻辑这一节实际上是包含关系,所以就跳过了,感兴趣的可以到官网看一下:learn.microsoft.com/en-us/agent…
这一趴是介绍使用MAF通过分支逻辑创建工作流。 分支逻辑使工作流能够根据某些条件进行决策,从而实现更复杂和动态的行为。
这里篇幅限制,我就聊一下条件边缘的实现方式,这也是最简单,最容易理解,甚至可能是最常用的方式。官网的描述是:条件边缘允许工作流根据流经工作流的消息的内容或属性做出路由决策。 这使动态分支能够基于运行时条件执行不同的执行路径。
来看一下代码
 public sealed class DetectionResult
 {
     [JsonPropertyName("is_spam")]
     public bool IsSpam { get; set; }

     [JsonPropertyName("reason")]
     public string Reason { get; set; } = string.Empty;

     // Email ID is generated by the executor, not the agent
     [JsonIgnore]
     public string EmailId { get; set; } = string.Empty;
 }

 internal sealed class Email
 {
     [JsonPropertyName("email_id")]
     public string EmailId { get; set; } = string.Empty;

     [JsonPropertyName("email_content")]
     public string EmailContent { get; set; } = string.Empty;
 }

 public sealed class EmailResponse
 {
     [JsonPropertyName("response")]
     public string Response { get; set; } = string.Empty;
 }

 internal static class EmailStateConstants
 {
     public const string EmailStateScope = "EmailState";
 }
这些,就是上一趴我聊到的,为了给执行器的继承方法传入指定的数据类型做的准备,前面我们是直接传入了一个字符串,这里正好用到自定义的类型。
private static Func<object?, bool> GetCondition(bool expectedResult) =>
detectionResult => detectionResult is DetectionResult result && result.IsSpam == expectedResult;
条件函数的作用是评估垃圾邮件的检测结果,然后确定工作流应该采用的路径。
private static ChatClientAgent GetSpamDetectionAgent(IChatClient ch@tClient) =>
    new(ch@tClient, new ChatClientAgentOptions()
    {
        ChatOptions = new()
        {
            Instructions= "You are a spam detection assistant that identifies spam emails.",
            ResponseFormat = Microsoft.Extensions.AI.ChatResponseFormat.ForJsonSchema(AIJsonUtilities.CreateJsonSchema(typeof(DetectionResult)))
        }
    });

private static ChatClientAgent GetEmailAssistantAgent(IChatClient ch@tClient) =>
    new(ch@tClient, new ChatClientAgentOptions()
    {
        ChatOptions = new()
        {
            Instructions = "You are an email assistant that helps users draft professional responses to emails.",
            ResponseFormat = Microsoft.Extensions.AI.ChatResponseFormat.ForJsonSchema(AIJsonUtilities.CreateJsonSchema(typeof(EmailResponse)))
        }
    });
定义两个不同的代理,这个就和官网案例保持一致了
创建处理电子邮件处理不同阶段的工作流执行程序,这个是核心的步骤,
注意,这里官网的案例写法有的部分是过时的,我这里进行了一点调整。
internal sealed class SpamDetectionExecutor : Executor<Microsoft.Extensions.AI.ChatMessage, DetectionResult>
{
    private readonly AIAgent _spamDetectionAgent;

    public SpamDetectionExecutor(AIAgent spamDetectionAgent) : base("SpamDetectionExecutor")
    {
        this._spamDetectionAgent = spamDetectionAgent;
    }

    public override async ValueTask<DetectionResult> HandleAsync(Microsoft.Extensions.AI.ChatMessage message, IWorkflowContext context, CancellationToken cancellationToken = default)
    {
        AnsiConsole.MarkupLine("[cyan] 垃圾邮件检测开始处理邮件内容:[/]{0}", message.Text);
        var newEmail = new Email
        {
            EmailId = Guid.NewGuid().ToString("N"),
            EmailContent = message.Text
        };
        await context.QueueStateUpdateAsync(newEmail.EmailId, newEmail, scopeName: EmailStateConstants.EmailStateScope, cancellationToken);
        AnsiConsole.MarkupLine("[cyan] 状态存储已保存邮件到共享状态,ID:[dim]{0}[/][/]", newEmail.EmailId);
        var response = await this._spamDetectionAgent.RunAsync(message, cancellationToken: cancellationToken);

        AnsiConsole.MarkupLine("[yellow] AI 响应 垃圾邮件检测模型原始输出:[/]{0}", response.Text);

        var detectionResult = JsonSerializer.Deserialize<DetectionResult>(response.Text);
        detectionResult!.EmailId = newEmail.EmailId;

        string spamStatus = detectionResult.IsSpam ? "[red]是[/]" : "[green]否[/]";
        AnsiConsole.MarkupLine(" [yellow]检测结果 是否为垃圾邮件:{0},原因:{1}[/]", spamStatus, detectionResult.Reason);
        return detectionResult;
    }
}


internal sealed class EmailAssistantExecutor : Executor<DetectionResult, EmailResponse>
{
    private readonly AIAgent _emailAssistantAgent;

    public EmailAssistantExecutor(AIAgent emailAssistantAgent) : base("EmailAssistantExecutor")
    {
        this._emailAssistantAgent = emailAssistantAgent;
    }

    public override async ValueTask<EmailResponse> HandleAsync(DetectionResult message, IWorkflowContext context, CancellationToken cancellationToken = default)
    {
        if (message.IsSpam)
        {
            throw new InvalidOperationException("This executor should only handle non-spam messages.");
        }
        AnsiConsole.MarkupLine("[cyan] 邮件助手正在处理非垃圾邮件,ID:{0}[/]", message.EmailId);

        var email = await context.ReadStateAsync<Email>(message.EmailId, scopeName: EmailStateConstants.EmailStateScope, cancellationToken)
            ?? throw new InvalidOperationException("Email not found.");

        AnsiConsole.MarkupLine("[cyan] 邮件内容读取到原始邮件:[/]{0}", email.EmailContent);

        var response = await this._emailAssistantAgent.RunAsync(email.EmailContent, cancellationToken: cancellationToken);
        AnsiConsole.MarkupLine("[blue] AI 响应邮件助手生成的回复草稿:[/]{0}", response.Text);

        var emailResponse = JsonSerializer.Deserialize<EmailResponse>(response.Text);

        return emailResponse!;
    }
}

internal sealed class SendEmailExecutor() : Executor<EmailResponse>("SendEmailExecutor")
{
    public override async ValueTask HandleAsync(EmailResponse message, IWorkflowContext context, CancellationToken cancellationToken = default)
    {
        AnsiConsole.MarkupLine("[green] 发送邮件准备发送回复:[/]{0}", message.Response);
        await context.YieldOutputAsync($"邮件已发送:{message.Response}", cancellationToken);
    }
}


internal sealed class HandleSpamExecutor() : Executor<DetectionResult>("HandleSpamExecutor")
{
    public override async ValueTask HandleAsync(DetectionResult message, IWorkflowContext context, CancellationToken cancellationToken = default)
    {
        if (!message.IsSpam)
        {
            throw new InvalidOperationException("此执行器仅处理垃圾邮件。");
        }

        AnsiConsole.MarkupLine("[red]️ 垃圾邮件处理标记邮件为垃圾邮件,原因:[italic]{0}[/][/]", message.Reason);
        await context.YieldOutputAsync($"邮件被标记为垃圾邮件:{message.Reason}", cancellationToken);
    }
}
AIAgent spamDetectionAgent = GetSpamDetectionAgent(ch@tClient.GetChatClient(_modelProvider.ModelId).AsIChatClient());
AIAgent emailAssistantAgent = GetEmailAssistantAgent(ch@tClient.GetChatClient(_modelProvider.ModelId).AsIChatClient());
var spamDetectionExecutor = new SpamDetectionExecutor(spamDetectionAgent);
var emailAssistantExecutor = new EmailAssistantExecutor(emailAssistantAgent);
var sendEmailExecutor = new SendEmailExecutor();
var handleSpamExecutor = new HandleSpamExecutor();
var workflow = new WorkflowBuilder(spamDetectionExecutor)
.AddEdge(spamDetectionExecutor, emailAssistantExecutor, condition: GetCondition(expectedResult: false))
.AddEdge(emailAssistantExecutor, sendEmailExecutor)
.AddEdge(spamDetectionExecutor, handleSpamExecutor, condition: GetCondition(expectedResult: true))
.WithOutputFrom(handleSpamExecutor, sendEmailExecutor)
.Build();
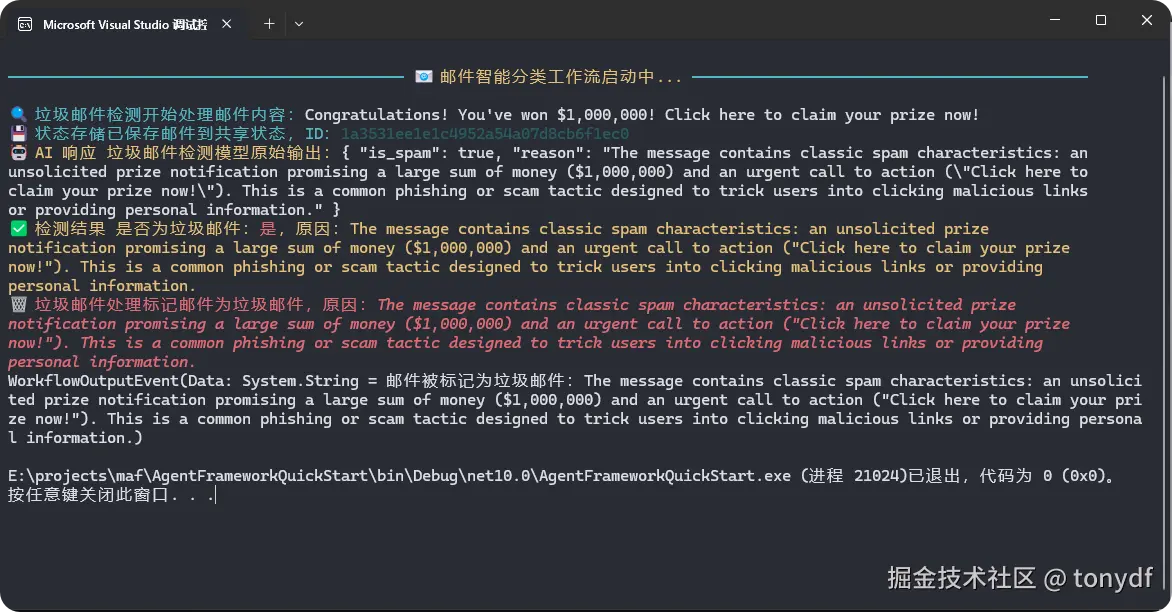
string email = "Congratulations! You've won $1,000,000! Click here to claim your prize now!";
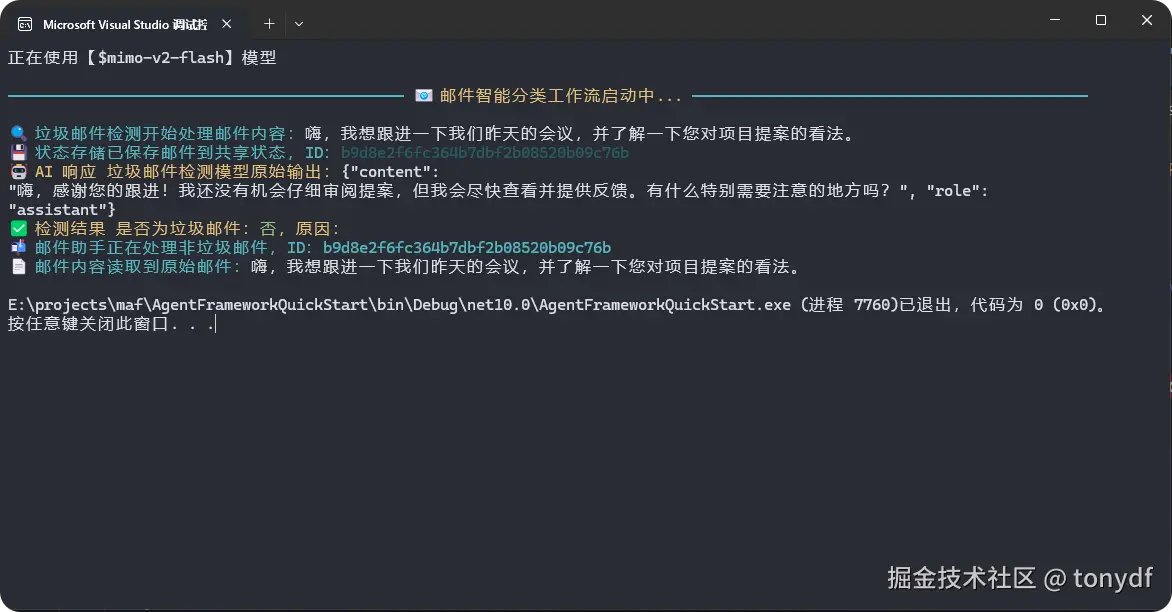
//string email = "嗨,我想跟进一下我们昨天的会议,并了解一下您对项目提案的看法。";
await using StreamingRun run = await InProcessExecution.StreamAsync(workflow, new Microsoft.Extensions.AI.ChatMessage(ChatRole.User, email));
await run.TrySendMessageAsync(new TurnToken(emitEvents: true));
await foreach (WorkflowEvent evt in run.WatchStreamAsync())
{
if (evt is WorkflowOutputEvent outputEvent)
{
AnsiConsole.MarkupLine($"[cyan]{outputEvent}[/]");
}
}
这里的工作原理也介绍一下
对条件边缘的特性,官网还有以下描述,我这里翻译了一下贴出来
好了,概念性的内容,大家直接到官网看吧,地址:learn.microsoft.com/en-us/agent…
来看下上面代码的执行效果,我在案例里放了2个测试输入,一个是垃圾邮件,一个是正常的邮件,看看不同输出效果如下
垃圾邮件
常规邮件,还按我们的预期为我们生成了一份专业的回复
好了,至此,工作流的部分就先告一段落,实际上我们也只是聊了MAF工作流部分的冰山一角,后面还有很多精彩的特性没聊到,一是受篇幅限制,再一个是我也还没怎么弄明白呢,哈哈,等下次有机会再继续聊。
对了,马上就是农历春节了,这应该也是年前最后一更了,祝大家春节快乐,阖家幸福。

