纳铁福
5.78M · 2026-03-26

0x00 摘要
0x01 GUI-MCP
0x02 示例
0x03 差异
0x04 GUI-MCP 整体架构
0x05 实现
0xFF 参考
25年底,阶跃星辰升级发布了全新的AI Agent系列模型Step-GUI,包括云端模型Step-GUI、首个面向GUI Agent的MCP协议:GUI-MCP(Graphical User Interface - Model Context Protocol),这是首个专为图形用户界面自动化而设计的 MCP 实现,兼顾标准化与隐私保护。因此,我们就来解读这个MCP协议,顺便看看端侧Agent的实现架构。
本文是第四篇,主要是介绍GUI-MCP 整体架构。
因为是反推解读,而且时间有限,所以可能会有各种错误,还请大家不吝指出。
在Function Calling的框架下,每个既有系统都需要单独集成到应用中。每个组织或公司都有自己的API、认证方式、数据格式,开发者需要为每个组织或公司编写对应的函数实现。这就是MCP产生的原因:提供一个服务,可以让既有系统快速集成到LLM中。
MCP(Model Context Protocol)是一种用于规范大模型与外部能力交互方式的协议。如果说 Tools 解决的是“模型如何调用一个函数”,那么 MCP 解决的是“模型如何与一个长期存在、可复用的能力服务交互”。
MCP的核心是解决与既有系统的接驳问题,MCP的价值在于它提供了一套标准化的接驳协议,让不同的工具和数据源能够以统一的方式被LLM使用。本质上,MCP更偏重是一套接驳标准(只是在Function Calling的基础上,增加了一层JSON-RPC协议转换),而不是唯一的接驳方式。
或者说,MCP 更像是 API,Agent 只关心提交什么「参数」、得到什么「结果」。
尽管大语言模型进展显著,其在 GUI 自动化中的应用仍因缺乏跨平台设备控制的标准化接口而受阻。现有方案往往平台限定,且与不同语言模型及设备集成需大量工程投入。一个强大的GUI模型训练出来后,如何让各种大模型都能方便、安全地使用它来控制设备?
为弥补这一缺口,StepFun团队借鉴了“模型上下文协议(MCP)”的思想,提出了 GUI-MCP(Graphical User Interface - Model Context Protocol),这是首个专为 GUI 操作任务设计的 MCP 实现。它像一个翻译器和安全过滤器,标准化了LLM与设备间的交互。
GUI-MCP 提供标准化工具包,无缝连接多种语言模型与多设备平台(Ubuntu、macOS、Windows、Android、iOS),使语言模型能通过统一协议控制移动与桌面设备,执行 GUI 操作任务。
GUI-MCP 的差异化优势如下:
针对移动设备控制的专门优化设备管理:
list_connected_devices() 函数屏幕操作GUI Agent 集成任务执行:
ask_agent() 工具提供专门的 GUI 代理任务执行能力会话管理移动设备特定功能状态检测:
丰富的参数控制详细配置:
enable_intermediate_logs、enable_intermediate_image_caption 等错误处理以下是代码示例。这段代码是基于 fastmcp 库实现的异步客户端程序,核心功能是连接本地运行的 MCP服务,代码使 Client 异步连接到本地 MCP 服务器(),完成两个核心操作:
list_tools);ask_agent 工具执行指定任务的异步函数;整体采用 Python 异步编程范式(asyncio),适配 MCP 服务的异步通信特性。
import asyncio
from fastmcp import Client

client = Client("http://localhost:8704/mcp")

import json

from tqdm import tqdm

async def ask_agent(task: str):
    async with client:
        result = await client.call_tool("ask_agent", {"task": task, "reset_environment": False, "kill_app_when_awake": False, "max_steps": 1})
        print(result)

# async
async def async_list_tools():
    async with client:
        tools = await client.list_tools()
        print("Supported tools:n", json.dumps(tools, indent=4, ensure_ascii=False))

asyncio.run(async_list_tools())
具体业务逻辑如下:
依赖导入与客户端初始化
import asyncio:导入 Python 内置的异步 I/O 库,是实现异步编程的核心依赖,用于管理异步任务、事件循环等。from fastmcp import Client:从 fastmcp 库导入 Client 类,fastmcp 是适配 MCP 协议的客户端 / 服务端工具库,Client 用于创建与 MCP 服务端通信的客户端实例。client = Client("http://localhost:8704/mcp"):创建 MCP 客户端实例,指定服务端地址为 import json:导入 JSON 处理库,用于格式化输出工具列表(美化打印)。from tqdm import tqdm:导入进度条库,但代码中未实际使用,属于冗余导入(可删除)。调用 ask_agent 工具
以下是定义调用 ask_agent 工具的异步函数
async def ask_agent(task: str):定义异步函数 ask_agent,接收一个字符串类型的参数 task(表示要执行的任务)。async 关键字标识这是异步函数,可在内部使用 await 调用其他异步操作。
async with client::异步上下文管理器,自动管理客户端的连接生命周期(自动建立 / 关闭连接),避免手动处理连接的创建与释放,是 fastmcp.Client 推荐的使用方式。
await client.call_tool(...)
await:等待异步操作完成(此处是等待服务端返回调用结果),只能在异步函数内使用。
client.call_tool:调用 MCP 服务端的指定工具,参数说明:
第一个参数 "ask_agent":要调用的服务端工具名称(MCP 服务端需预先注册该工具)。
第二个参数(字典):调用工具的入参,包含 4 个关键配置:
"task": task:传递具体的任务内容(由函数参数 task 传入)。"reset_environment": False:调用工具时不重置运行环境(如 Agent 的上下文、运行的应用等)。"kill_app_when_awake": False:唤醒 Agent 时不终止已运行的应用。"max_steps": 1:限制 Agent 执行任务的最大步骤数为 1(仅执行一步操作)。print(result):打印服务端返回的 ask_agent 工具调用结果。
列出服务端所有工具
以下是定义列出服务端所有工具的异步函数
async def async_list_tools():定义异步函数 async_list_tools,无入参,用于获取并打印服务端支持的所有工具列表。
async with client:同样使用异步上下文管理器管理客户端连接。
tools = await client.list_tools():调用 list_tools 异步方法,获取服务端注册的所有工具信息(返回值通常是包含工具名称、描述、入参等的列表 / 字典)。
json.dumps(tools, indent=4, ensure_ascii=False)
:格式化 JSON 输出:
indent=4:缩进 4 个空格,让输出更易读。ensure_ascii=False:支持中文等非 ASCII 字符正常显示(避免被转义为 uXXXX 格式)。print(...):打印 “Supported tools:” 前缀 + 格式化后的工具列表。
执行异步任务
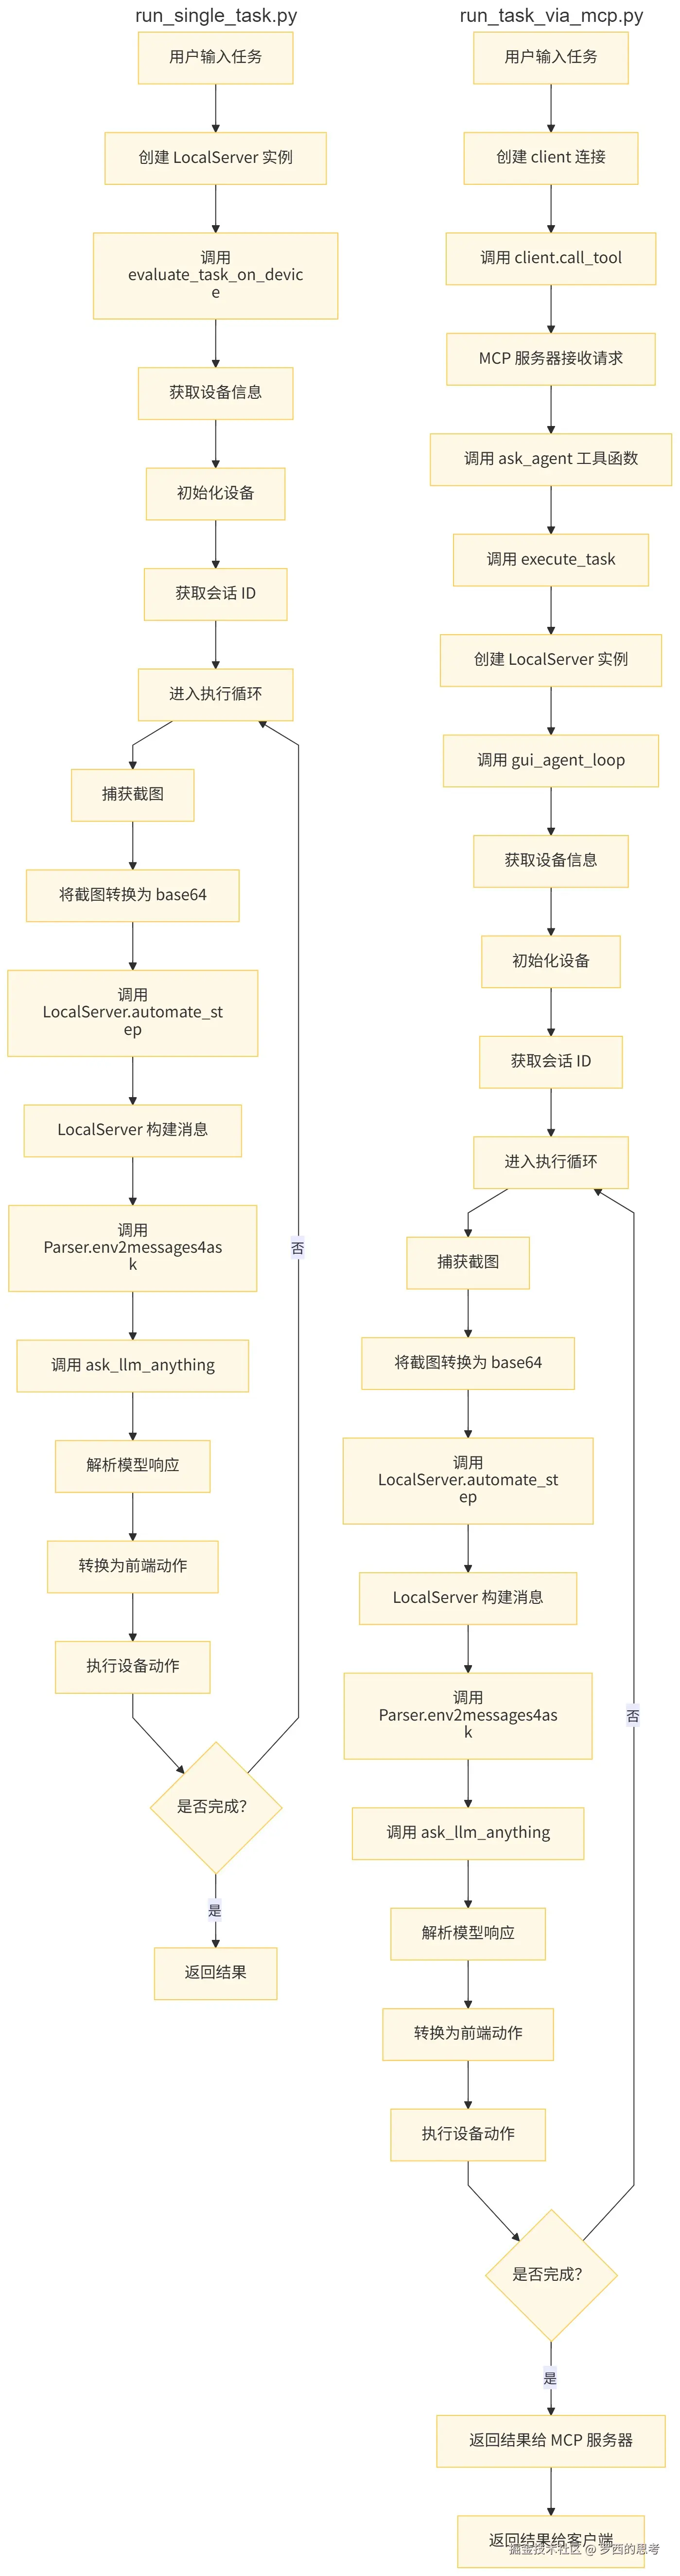
asyncio.run(...):启动 Python 异步事件循环,执行 async_list_tools 异步函数,是 Python 3.7+ 启动异步程序的标准方式。运行后会触发:连接 MCP 服务端 → 获取工具列表 → 格式化打印 → 关闭连接。ask_agent 函数仅定义未调用,若要执行,可将最后一行改为:asyncio.run(ask_agent("你的具体任务内容"))run_single_task.py(非MCP) 与 run_task_via_mcp.py 的差异如下:
run_task差异
详细对比分析如下。
流程和数据流的区别
run_single_task.py 的流程和数据流
run_task_via_mcp.py 的流程和数据流
架构模式差异
设备管理差异
服务器初始化对比
错误处理差异
任务执行函数对比
MCP 本质是「标准化能力调用协议 / 服务」,LLM 是「语义理解与决策核心」,Agent 是「统筹执行的主体」,
三者的角色组合决定了交互方式。
个人能想到的,LLM 与 MCP 的交互核心有 3 种模式,核心差异是「谁发起调用」和「MCP 的角色(LLM 网关 / 工具执行器)」 。这三种模式如下:
模式 1:Agent → LLM → MCP → 具体操作(LLM 驱动 MCP 执行工具)
Agent(用户指令:“计算 100+200”)→ LLM(解析意图:需调用计算器工具)→ MCP Client → MCP Server(执行计算器操作)→ 具体设备/工具(返回结果 300)→ MCP Server → LLM(整理结果)→ Agent(反馈给用户)
模式 2:Agent → MCP → LLM(MCP 作为 LLM 调用网关)。即,Agent 调用 MCP 告知任务需求,再由 MCP 调用 LLM 完成规划的流程。这种架构结合了 Agent 的自主性、MCP 的协议标准化能力以及 LLM 的强大规划与推理能力。
Agent(用户指令)→ MCP Client → MCP Server(解析协议,调用指定 LLM)→ LLM(生成响应)→ MCP Server(标准化响应)→ Agent
模式 3:LLM 内置 MCP 能力(MCP 作为 LLM 的原生扩展),这是更深度的集成模式,MCP 能力被封装为 LLM 的 “插件 / 函数”,LLM 可直接调用 MCP 服务,无需外部 Agent 中转。
用户指令 → LLM(解析意图+触发 MCP 调用)→ MCP Server(执行文件复制)→ LLM(生成“操作完成”的响应)→ 用户
stepFunc GUI-MCP 的模式类似第二种模式。MCP 在流程中作为对外服务接口层,介于外部客户端和内部核心执行逻辑之间,起到封装和暴露功能的作用。流程关系总结如下:
这不是“纯 MCP”,而是 MCP + 内嵌 LLM 的混合架构,相当于把“规划+执行”封装在 MCP 内部。
MCP 相关的系统架构层次如下:
外部接口层
业务逻辑层(操作流程框架)
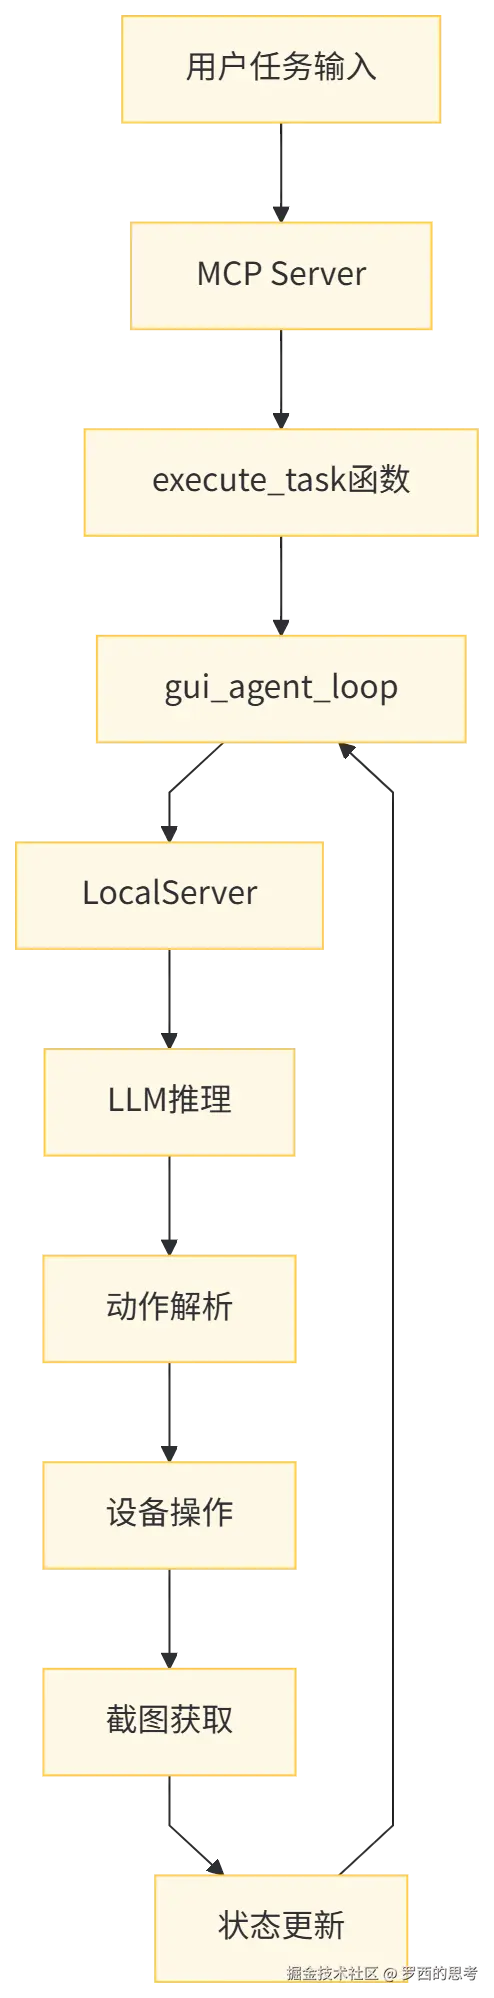
mcp_backend_implements.py中的execute_task函数处理核心逻辑mcp_agent_loop.py实现 GUI 代理循环模型服务层
local_server.py提供本地模型服务ask_llm_v2.py实现与语言模型的通信parser_0920_summary.py处理动作解析设备控制层
mobile_action_helper.py提供设备操作接口pu_frontend_executor.py实现动作格式转换,执行具体动作用户任务 → MCP Server → execute_task → gui_agent_loop → LocalServer → LLM 推理
会话管理数据流
设备交互数据流
数据流向总结:
3-1
图像数据转换
动作数据转换
消息数据转换
INFO 动作处理
中间日志处理
最终结果处理
关键数据结构如下:
任务数据结构
状态数据结构
模型交互数据结构
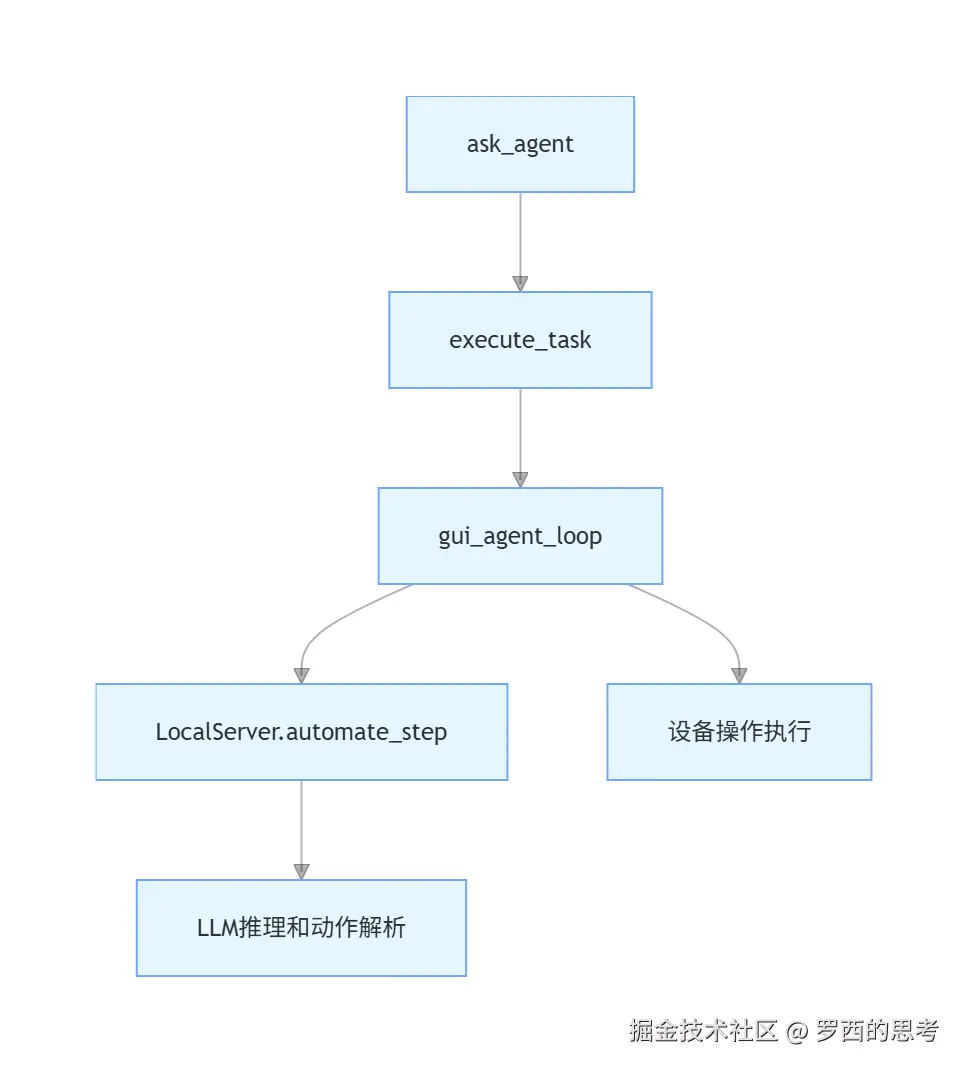
ask_agent、execute_task、gui_agent_loop 这三个函数构成了 GELab-Zero 系统的层次化架构,各自承担不同的职责。
函数职责和层级关系如下:
A[MCP层 - ask_agent] --> B[任务管理层 - execute_task]
B --> C[执行循环层 - gui_agent_loop]
详细数据流程如下:
ask_agent(MCP 接口层)
职责:提供给外部 MCP 客户端的接口
输入参数:
核心处理:
execute_task(任务管理层,注:论文中,execute_task 是高级MCP接口,但是实际上execute_task应该只是任务执行的中间管理层):
职责:任务执行的中间管理层,负责配置和初始化
输入参数:
核心处理:
gui_agent_loop(执行循环层)
职责:实际的任务执行循环
输入参数:
各种执行控制参数
核心处理:
初始化设备和屏幕
获取或创建会话 ID
进入主执行循环:
返回最终执行结果
依赖关系图如下:
3-2
项目支持模型分发功能。架构设计允许:
同时使用本地模型和云端模型;
图像处理任务与任务规划任务使用不同模型;
通过配置文件灵活指定各功能模块使用的模型;
支持混合部署策略,优化性能与成本。
具体配置如下:
agent_loop_config: {
    # the gui agent protocol, e.g., parser_0922_summary
    "task_type": "parser_0922_summary",

    # the gui main model config
    "model_config": {
        "model_name": "gelab-zero-4b-preview",
        "model_provider": "local",

        "args": {
            "temperature": 0.1,
            "top_p": 0.95,
            "frequency_penalty": 0.0,
            "max_tokens": 4096,
        },

        # optional to resize image
        "image_preprocess": {
            "is_resize": True,
            "target_image_size": [728, 728]
        }
    },

    # the maximum steps for the agent loop
    "max_steps": 400,

    # the delay time after each action to next capture screenshot
    "delay_after_capture": 2,

    # debug mode if True will print more logs
    "debug": False,

    # reply_config:
    # optional, the config for auto reply with llm
    # if auto reply is enabled in the agent loop, if this config is not provided,
    # the main model_config will be used for auto reply
    # if provided, will use this config for auto reply
    "reply_config": {
        "model_config": {
            "model_name": "gelab-zero-4b-preview",
            "model_provider": "local",

            "args": {
                "temperature": 0.5,
                "top_p": 0.95,
                "frequency_penalty": 0.0,
                "max_tokens": 512,
            },

            # optional to resize image
            "image_preprocess": {
                "is_resize": True,
                "target_image_size": [728, 728]
            }
        }
    },

    # caption config:
    # optional, the config for image captioning
    # if image captioning is enabled in the agent loop, this config will be used
    # to caption the image before sending to the model
    "caption_config": {
        "model_config": {
            "model_name": "gelab-zero-4b-preview",
            "model_provider": "local",

            "args": {
                "temperature": 0.5,
                "top_p": 0.95,
                "frequency_penalty": 0.0,
                "max_tokens": 512,
            },

            # optional to resize image
            "image_preprocess": {
                "is_resize": True,
                "target_image_size": [728, 728]
            }
        }
    },

}

server_config : {
    "mcp_server_port": 8704,
    "log_dir": "running_log/server_log/os-copilot-local-eval-logs/traces",
    "image_dir": "running_log/server_log/os-copilot-local-eval-logs/images",
    "debug": False
}
在 mcp_agent_loop.py 中,图像摘要与任务规划可分离模型
调用代码位于 gui_agent_loop 中,
def gui_agent_loop(
        if enable_intermediate_image_caption:
            # to start a thread to caption the image while the agent is thinking
            caption_result_container = {}
            caption_thread = threading.Thread(
                target=lambda: caption_current_screenshot( # 图像摘要
                    current_task=task,
                    current_image_url=image_b64_url,
                    model_config=agent_loop_config['caption_config'].get('model_config', agent_loop_config['model_config']),
                    result_container=caption_result_container
                )
            )
            caption_thread.start()

    # 忽略其他代码

    server_return = agent_server.automate_step(payload) # 任务规划
具体摘要代码如下:
def caption_current_screenshot(current_task, current_image_url, model_config, result_container=None):
    """
    Caption the current screenshot using the caption model specified in model_config.
    """

    model_name = model_config['model_name']
    model_provider = model_config.get('model_provider', 'eval')

    messages_to_ask = [
        {
            "role": "user",
            "content": [
                {
                    'type': "image_url",
                    'image_url': {
                        'url': current_image_url
                    }
                },
                {
                    "type": "text",
                    "text": f"当前的任务是:{current_task}。n请根据任务需求,详细描述出当前截图和任务相关的部分。如果有列表,请列出所有选项。"
                },
            ]
        }
    ]

    response = ask_llm_anything(
        model_provider=model_provider,
        model_name=model_name,
        messages=messages_to_ask,
        args={
            "max_tokens": 256,
            "temperature": 0.5,
            "top_p": 1.0,
            "frequency_penalty": 0.0,
        },
        resize_config=model_config.get('image_preprocess', None)
    )

    if result_container is not None:
        result_container['caption'] = response

    return response
具体代码如下:
   def automate_step(self, payload: dict) -> dict:
        """
        Automate a step in the Copilot service.
        """
        model_name = model_config['model_name']
        model_provider = model_config.get('model_provider', 'eval')

        args = model_config.get('args', {
            "temperature": 0.1,
            "top_p": 1.0,
            "frequency_penalty": 0.0,
            "max_tokens": 512,
        })

        response = ask_llm_anything(
            model_provider=model_provider,
            model_name=model_name,
            messages=messages_to_ask,
            args=args
        )

        action = parser.str2action(response)
从 豆包手机 - 技术分析篇 摘录豆包手机的使用如下,我们互相印证:
会话状态映射
执行控制
max_steps参数控制执行步数reset_environment参数控制是否重置设备环境reply_mode参数控制 INFO 动作处理方式action_assertion 函数验证:
验证必需参数的存在性和类型正确性
execute_task 函数验证:验证 task 和 session_id 不能同时提供验证 device_id 在连接的设备列表中gui_agent_loop 函数验证:验证 reply_mode 为允许的值之一验证 max_steps 不超过配置的最大值环境约束
reset_environment 逻辑:为 True 时按 Home 键重置到初始状态为 True 时重新启动目标应用执行约束
max_steps 参数控制实际最大步骤为 max_steps 与配置文件中默认值的最小值从豆包手机谈起:端侧智能的愿景与路线图
豆包手机 - 技术分析篇
本文使用 markdown.com.cn 排版

