


二次元绘画创作
56.21M · 2026-02-04

Ooder A2UI(Annotation to UI)是Ooder框架的核心组件之一,负责将Java类通过注解驱动的方式自动转换为UI组件。这一机制是Ooder实现"配置即代码"理念的关键技术,也是外界最质疑的地方:究竟是什么逻辑让它能够完成拆解?如何保证确定性?组织类方法的原则规则是什么?
本文将从第一性原理出发,深入剖析A2UI的核心设计,还原作者的设计思考过程。
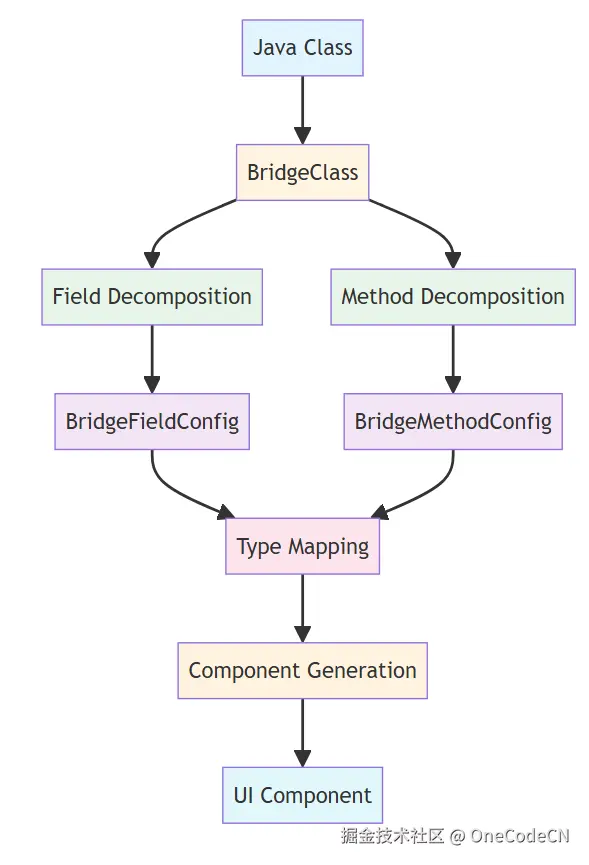
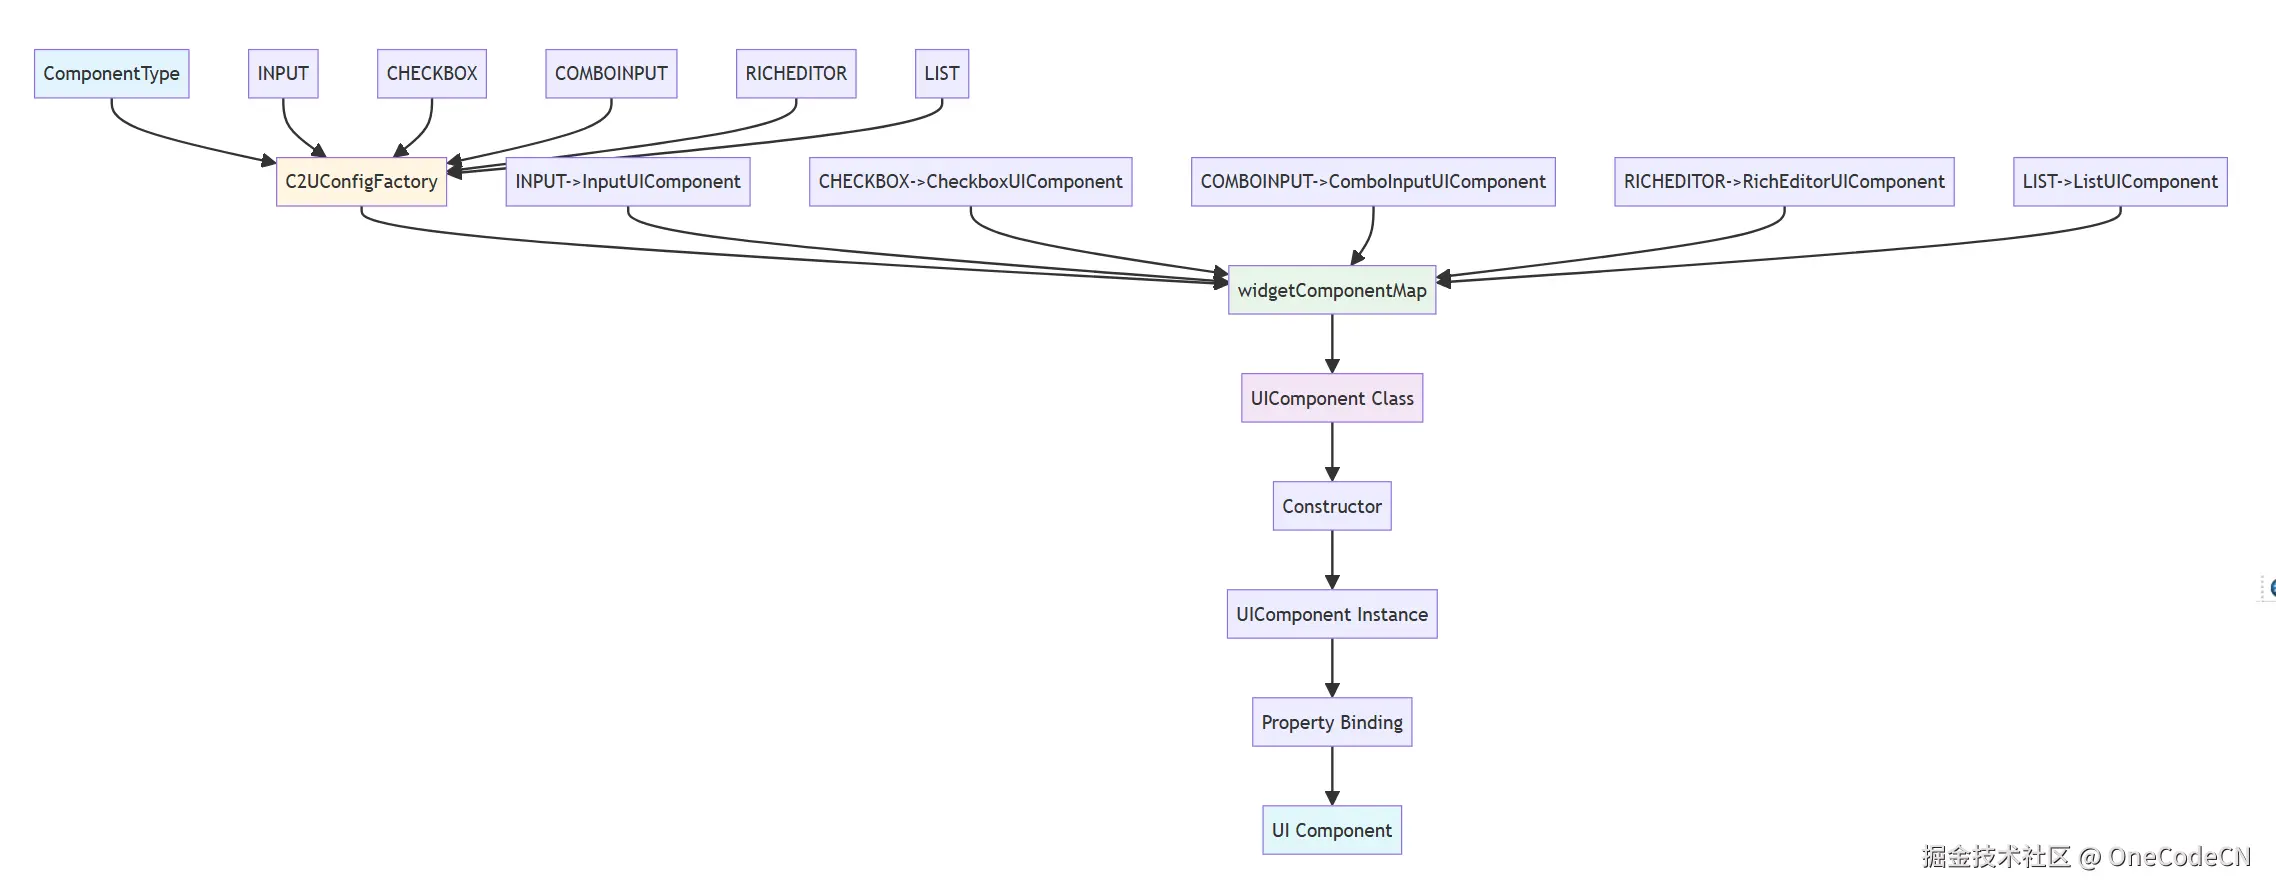
A2UI的拆解机制基于注解驱动的反射分析,通过多层次的抽象和映射,将Java类转换为UI组件。整体架构如下:
A2UI的拆解过程分为六个明确的阶段,每个阶段都有其特定的职责和确定性保障。
ReflectionClassLoaderBridgeClassUserReflectionClassLoaderBridgeClassUser创建BridgeClass加载Java类获取类信息返回类信息返回类对象获取所有字段返回字段列表获取所有方法返回方法列表返回BridgeClass实例
核心代码分析:
void init(Class ctClass) {
    this.ctClass = ctClass;
    this.allCtFields = new ArrayList<>();

    // 获取声明的字段(非静态、非内部类字段)
    for (Field field : ctClass.getDeclaredFields()) {
        if (!Modifier.isStatic(field.getModifiers())
                && !skipClassSet.contains(field.getDeclaringClass())
                && !field.getName().startsWith("this$")) {
            allCtFields.add(field);
        }
    }

    // 获取公共字段
    for (Field field : ctClass.getFields()) {
        if (field.getDeclaringClass().equals(ctClass)
                && !field.getName().startsWith("this$")
                && !skipClassSet.contains(field.getDeclaringClass())
                && !field.getDeclaringClass().equals(Object.class)) {
            allCtFields.add(field);
        }
    }

    // 获取声明的方法(非静态)
    this.allCtMethods = new ArrayList<>();
    List<String> methodNames = new ArrayList<>();
    for (Method method : ctClass.getDeclaredMethods()) {
        if (!Modifier.isStatic(method.getModifiers())
                && !skipClassSet.contains(method.getDeclaringClass())) {
            allCtMethods.add(method);
            methodNames.add(method.getName());
        }
    }

    // 获取公共方法(去重)
    for (Method method : ctClass.getMethods()) {
        if (!Modifier.isStatic(method.getModifiers())
                && !methodNames.contains(method.getName())
                && !skipClassSet.contains(method.getDeclaringClass())
                && !method.getDeclaringClass().equals(ctClass)
                && !method.getDeclaringClass().equals(Enum.class)
                && !method.getDeclaringClass().equals(Object.class)) {
            allCtMethods.add(method);
        }
    }
}
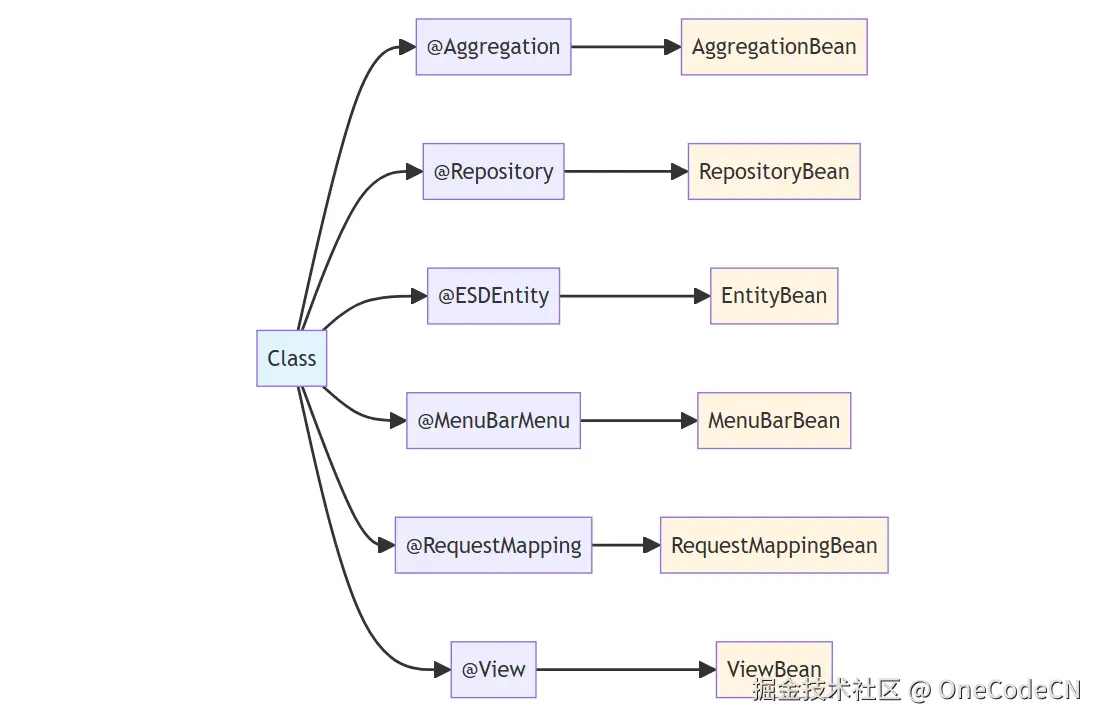
核心代码分析:
MethodChinaName chinaName = AnnotationUtil.getClassAnnotation(ctClass, MethodChinaName.class);
if (chinaName != null) {
    this.methodChinaBean = new MethodChinaMeta(chinaName);
}

RepositoryAnnotation repository = AnnotationUtil.getClassAnnotation(ctClass, RepositoryAnnotation.class);
if (repository != null) {
    repositoryBean = new RepositoryMeta(repository);
}

Aggregation aggregationClass = AnnotationUtil.getClassAnnotation(ctClass, Aggregation.class);
if (aggregationClass != null) {
    aggregationBean = new AggregationBean(aggregationClass);
}

ESDEntity dsmEntityClass = AnnotationUtil.getClassAnnotation(ctClass, ESDEntity.class);
if (dsmEntityClass != null) {
    entityBean = new EntityBean(dsmEntityClass);
}

MenuBarMenu menuBarMenu = AnnotationUtil.getClassAnnotation(ctClass, MenuBarMenu.class);
if (menuBarMenu != null) {
    menuBarBean = new MenuBarMeta(menuBarMenu);
}

DBTable dbTable = AnnotationUtil.getClassAnnotation(ctClass, DBTable.class);

RequestMapping requestMapping = AnnotationUtil.getClassAnnotation(ctClass, RequestMapping.class);
if (requestMapping != null) {
    requestMappingBean = new RequestMappingBean(requestMapping);
}

View view = AnnotationUtil.getClassAnnotation(ctClass, View.class);
if (view != null) {
    viewBean = new ViewBean(view);
}
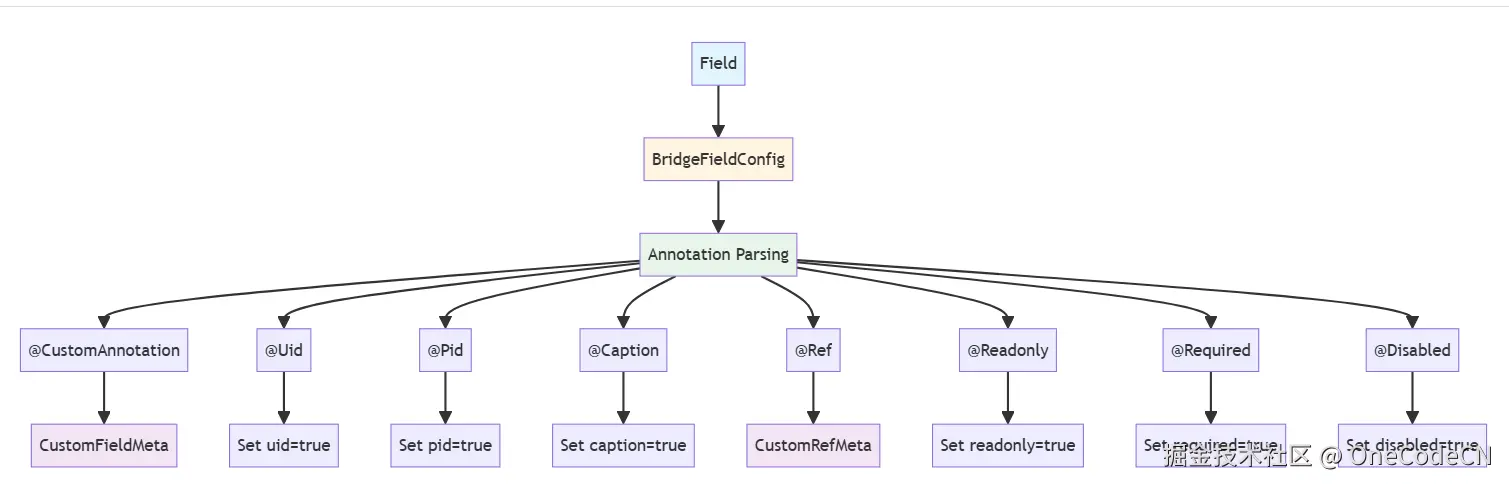
核心代码分析:
void initField() {
    Map<String, BridgeField> fieldMap = new LinkedHashMap<>();
    Map<String, BridgeField> disableFieldMap = new LinkedHashMap<>();
    Map<String, CustomAnnotation> customAnnotationMap = new LinkedHashMap<>();
    int index = 0;

    // 并行处理字段初始化
    List<Callable<BridgeFieldConfig>> fieldTasks = new ArrayList<>();
    for (Field field : allCtFields) {
        fieldTasks.add(new InitFieldTask<>(field, index, this));
        index++;
    }
    List<BridgeFieldConfig> fields = this.invokFieldTasks(className, fieldTasks);

    for (BridgeFieldConfig fieldInfo : fields) {
        Field field = fieldInfo.field;
        if (fieldInfo.isSerialize()) {
            fieldMap.put(field.getName().toLowerCase(), fieldInfo);
            esdFieldMap.put(fieldInfo.getFieldName(), fieldInfo);
            fieldNameList.add(fieldInfo.getFieldName());
        } else {
            disableFieldMap.put(field.getName().toLowerCase(), fieldInfo);
            disableFieldList.add(fieldInfo);
        }

        if (fieldInfo.isUid()) {
            this.uid = field.getName();
        }

        if (fieldInfo.isCaptionField()) {
            this.captionField = fieldInfo;
        }
    }
}
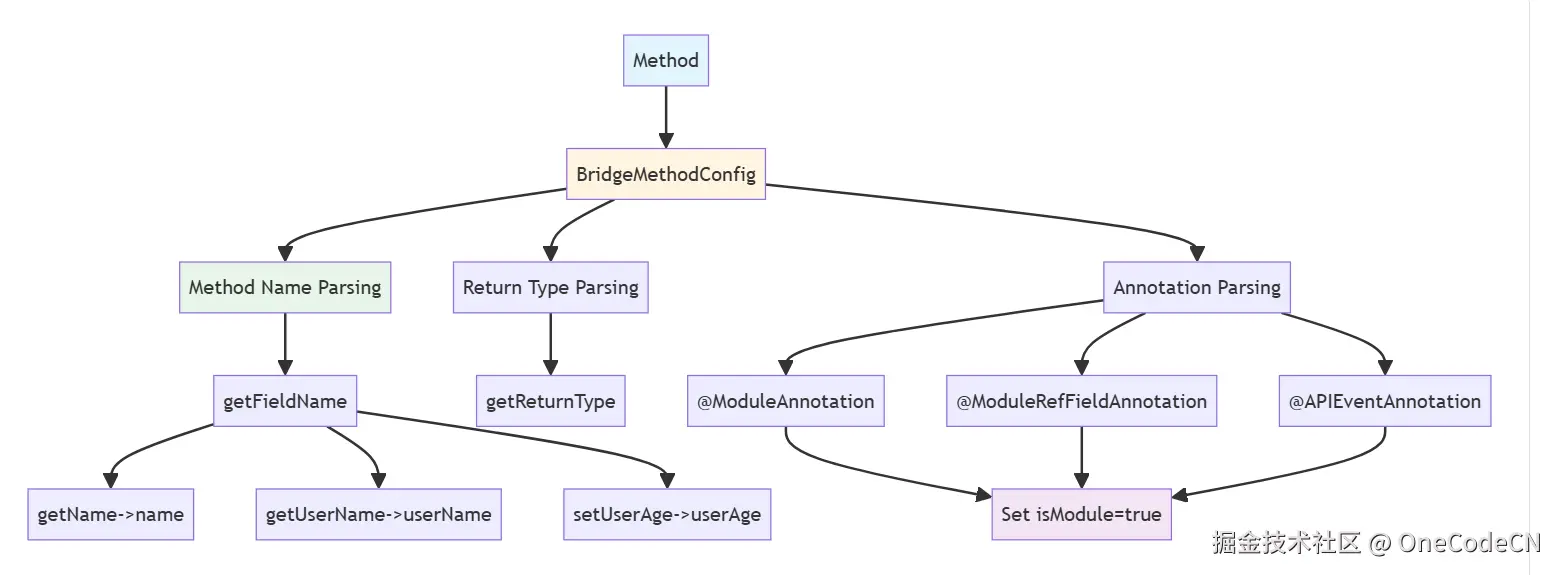
核心代码分析:
public BridgeMethodConfig(Method method, BridgeClass bridgeClass) {
    this.innerMethod = method;
    this.returnType = method.getReturnType();
    this.domainId = bridgeClass.getDomainId();
    this.bridgeClass = bridgeClass;
    this.methodName = method.getName();
    this.fieldName = MethodUtil.getFieldName(method);
    this.innerMethod = method;
    this.name = fieldName;
    this.id = fieldName;

    String fieldName = MethodUtil.getFieldName(method);

    // 查找对应的字段
    for (Field fieldInfo : this.bridgeClass.getAllCtFields()) {
        if (fieldInfo.getName().equals(fieldName)) {
            this.field = fieldInfo;
            continue;
        }
    }

    try {
        if (returnType.isArray() || Collection.class.isAssignableFrom(returnType)) {
            Class innerClass = JSONGenUtil.getInnerReturnType(method);
            if (innerClass != null) {
                returnType = innerClass;
            }
        }
        init(index, bridgeClass);
        if (this.getRefBean() != null) {
            CustomRefMeta ref = this.getRefBean();
            if (ref.getView() != null && ref.getView().equals(ViewType.DIC)) {
                componentType = ComponentType.COMBOINPUT;
            }
            this.refType = ref.getRef();
            this.viewType = ref.getView();
        }

        if (componentType == null) {
            componentType = ComponentType.COMBOINPUT;
        }
    } catch (Exception e) {
        e.printStackTrace();
    }

    // 检查是否为模块方法
    ModuleAnnotation annotation = AnnotationUtil.getMethodAnnotation(method, ModuleAnnotation.class);
    if (annotation != null) {
        isModule = true;
    }

    ModuleRefFieldAnnotation comboModuleAnnotation = AnnotationUtil.getMethodAnnotation(method, ModuleRefFieldAnnotation.class);
    if (comboModuleAnnotation != null) {
        isModule = true;
    }

    APIEventAnnotation apiEventAnnotation = AnnotationUtil.getMethodAnnotation(method, APIEventAnnotation.class);
    if (apiEventAnnotation != null) {
        for (CustomMenuItem menuItem : apiEventAnnotation.bindMenu()) {
            if (!menuItem.getReturnView().equals(ModuleViewType.NONE) && menuItem.getDefaultView()) {
                isModule = true;
            }
        }
    }
}
核心代码分析:
public static ComponentType getComponentType(Class typeClass, Type type) {
    Class clazz = JSONGenUtil.getInnerType(type);

    if (Enumstype.class.isAssignableFrom(clazz) || clazz.isEnum()) {
        return ComponentType.COMBOINPUT;
    }

    if (typeClass != null && (typeClass.isArray() || Collection.class.isAssignableFrom(typeClass))) {
        if (Arrays.asList(customClass).contains(clazz) || typeClass.equals(clazz)) {
            return ComponentType.LIST;
        }
    }

    if (java.sql.Date.class.isAssignableFrom(clazz)) {
        return ComponentType.COMBOINPUT;
    }

    if (clazz.equals(short.class) || clazz.equals(Short.class)) {
        return ComponentType.COMBOINPUT;
    }

    if (clazz.equals(int.class) || clazz.equals(Integer.class)) {
        return ComponentType.COMBOINPUT;
    }

    if (clazz.equals(boolean.class) || clazz.equals(Boolean.class)) {
        return ComponentType.CHECKBOX;
    }

    if (clazz.equals(long.class) || clazz.equals(Long.class)) {
        return ComponentType.COMBOINPUT;
    }

    if (clazz.equals(float.class) || clazz.equals(Float.class)) {
        return ComponentType.COMBOINPUT;
    }

    if (clazz.equals(BigDecimal.class)) {
        return ComponentType.COMBOINPUT;
    }

    if (clazz.equals(BigInteger.class)) {
        return ComponentType.COMBOINPUT;
    }

    if (clazz.equals(Date.class)) {
        return ComponentType.COMBOINPUT;
    }

    if (clazz.equals(Reader.class)) {
        return ComponentType.RICHEDITOR;
    }

    if (clazz.equals(StringBuffer.class)) {
        return ComponentType.RICHEDITOR;
    }

    return ComponentType.INPUT;
}
核心代码分析:
public C2UConfigFactory() {
    Map<String, Class?>> allClassMap = new HashMap<>();
    allClassMap.putAll(EsbBeanFactory.getInstance().getAllClass());
    Set<Map.Entry<String, Class?>>> allClass = allClassMap.entrySet();
    for (Map.Entry<String, Class?>> clazzEntry : allClass) {
        Class clazz = clazzEntry.getValue();
        try {
            initClass(clazz);
        } catch (Throwable e) {
            // 忽略初始化失败的类
        }
    }
}

void initClass(Class beanClazz) {
    CustomClass customClass = (CustomClass) beanClazz.getAnnotation(CustomClass.class);
    if (CustomBean.class.isAssignableFrom(beanClazz) && customClass != null) {
        AnnotationType ann = (AnnotationType) beanClazz.getAnnotation(AnnotationType.class);
        viewTypeAnnMap.put(ann.clazz(), customClass);
        if (UIComponent.class.isAssignableFrom(customClass.clazz())) {
            switch (customClass.viewType()) {
                case COMPONENT:
                    WidgetMetaMap.put(customClass.componentType(), beanClazz);
                    widgetComponentMap.put(customClass.componentType(), customClass.clazz());
                    if (ann != null) {
                        widgetClass.add(ann.clazz());
                        widgetAnnMap.put(customClass.componentType(), ann.clazz());
                    }
                    break;
                case COMBOBOX:
                    if (ann != null) {
                        for (ComboInputType inputType : customClass.inputType()) {
                            comboBoxAnnMap.put(inputType, ann.clazz());
                            comboBoxComponentMap.put(inputType, customClass.clazz());
                        }
                        widgetClass.add(ann.clazz());
                        widgetAnnMap.put(customClass.componentType(), ann.clazz());
                    }

                    for (ComboInputType inputType : customClass.inputType()) {
                        comboBoxBeanMap.put(inputType, beanClazz);
                    }
                    break;
            }
        }
    }
}
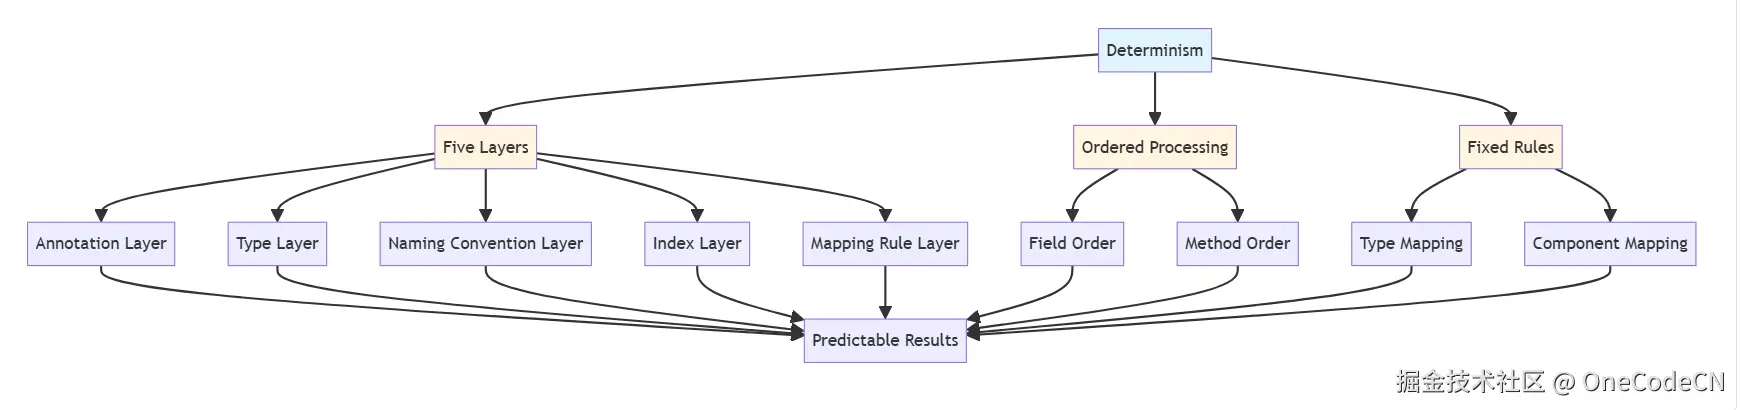
A2UI的确定性来自以下五个层次,每个层次都有其特定的确定性保障机制。
注解是A2UI确定性的第一层保障,通过注解提供明确的元数据。
注解确定性示例:
@CustomAnnotation(
    caption = "用户名",
    uid = true,
    readonly = true,
    required = true
)
private String username;

// 确定性分析:
// 1. caption明确字段的显示名称
// 2. uid明确字段为主键
// 3. readonly明确字段为只读
// 4. required明确字段为必填
Java类型系统是A2UI确定性的第二层保障,通过类型映射提供组件选择的确定性。
类型确定性示例:
private Boolean isActive;  // -> CHECKBOX
private Integer age;      // -> COMBOINPUT
private Date birthday;    // -> COMBOINPUT
private UserStatus status; // -> COMBOINPUT (Enum)
private List<String> tags; // -> LIST

// 确定性分析:
// 1. Boolean类型必然映射到CHECKBOX
// 2. Integer类型必然映射到COMBOINPUT
// 3. Date类型必然映射到COMBOINPUT
// 4. Enum类型必然映射到COMBOINPUT
// 5. Collection类型必然映射到LIST
Java Bean命名约定是A2UI确定性的第三层保障,通过命名约定提供方法识别的确定性。
命名约定确定性示例:
public String getName() {
    return name;
}  // -> fieldName = "name"

public String getUserName() {
    return userName;
}  // -> fieldName = "userName"

public boolean isActive() {
    return active;
}  // -> fieldName = "active"

public void setAge(Integer age) {
    this.age = age;
}  // -> fieldName = "age"

// 确定性分析:
// 1. getName()必然对应name字段
// 2. getUserName()必然对应userName字段
// 3. isActive()必然对应active字段
// 4. setAge()必然对应age字段
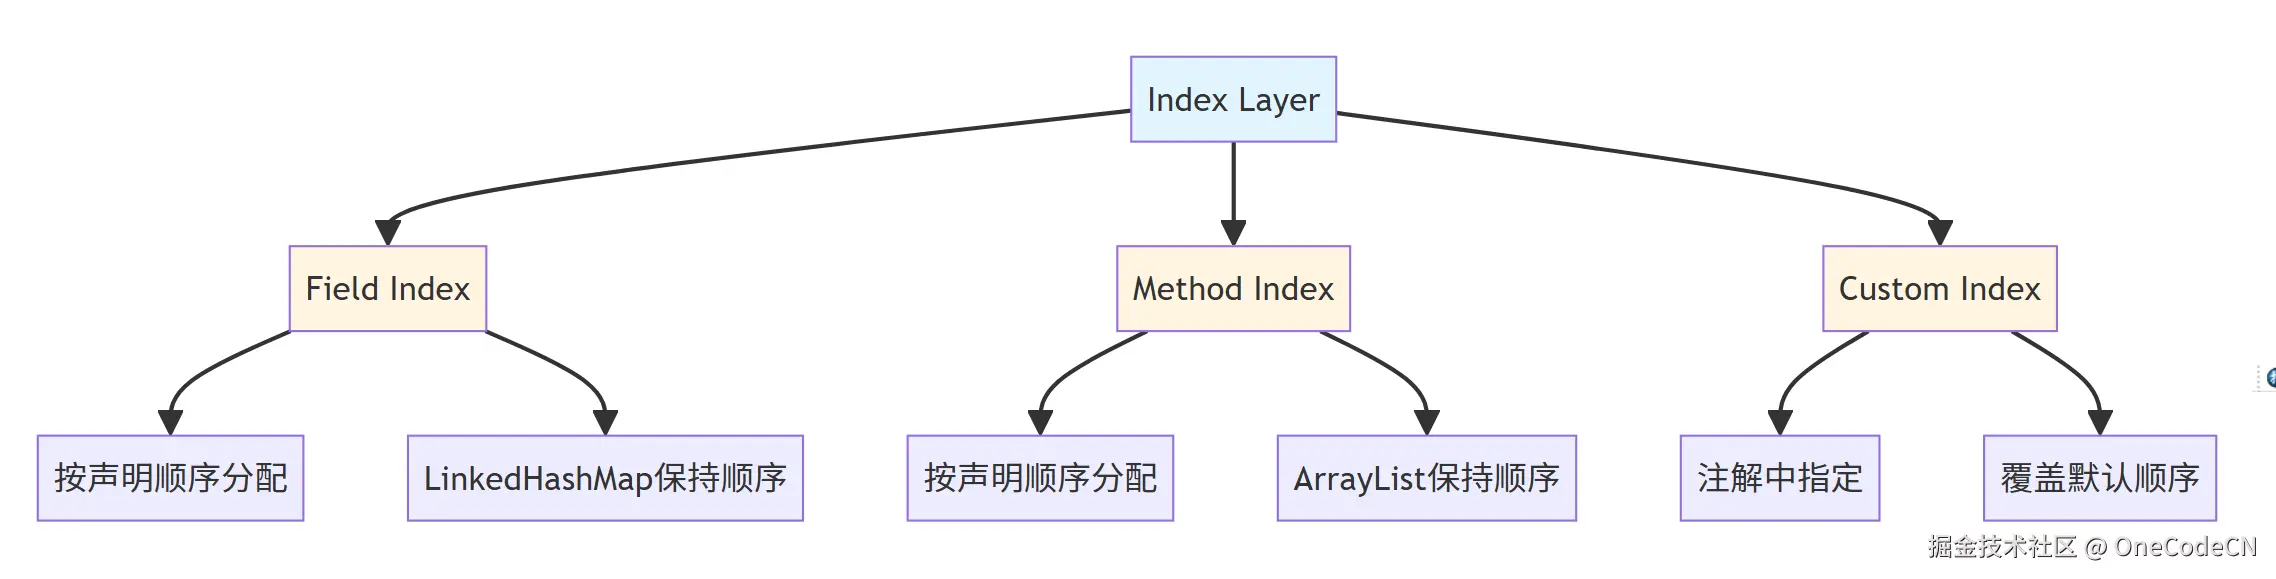
索引属性是A2UI确定性的第四层保障,通过索引保证字段顺序的确定性。
索引确定性示例:
public class UserForm {
    private String name;        // index = 0
    private Integer age;       // index = 1
    private Date birthday;     // index = 2
    private Boolean active;    // index = 3

    @CustomAnnotation(index = 10)
    private String email;      // index = 10 (自定义索引)
}

// 确定性分析:
// 1. name字段必然在第一个位置
// 2. age字段必然在第二个位置
// 3. birthday字段必然在第三个位置
// 4. active字段必然在第四个位置
// 5. email字段必然在第十个位置(自定义索引)
映射规则是A2UI确定性的第五层保障,通过映射规则提供组件选择的确定性。
映射规则确定性示例:
// ComponentType -> UIComponent
INPUT -> InputUIComponent
CHECKBOX -> CheckboxUIComponent
COMBOINPUT -> ComboInputUIComponent
RICHEDITOR -> RichEditorUIComponent

// ComboInputType -> ComboBoxMeta
number -> NumberComboBoxMeta
date -> DateComboBoxMeta
checkbox -> CheckboxComboBoxMeta
listbox -> ListboxComboBoxMeta

// ColType -> ComponentType
BOOLEAN -> CHECKBOX
TEXT -> MULTILINES
DATETIME -> COMBOINPUT

// 确定性分析:
// 1. INPUT必然映射到InputUIComponent
// 2. CHECKBOX必然映射到CheckboxUIComponent
// 3. number必然映射到NumberComboBoxMeta
// 4. BOOLEAN必然映射到CHECKBOX
A2UI组织类方法遵循六大原则,每个原则都有其特定的设计目的和实现方式。
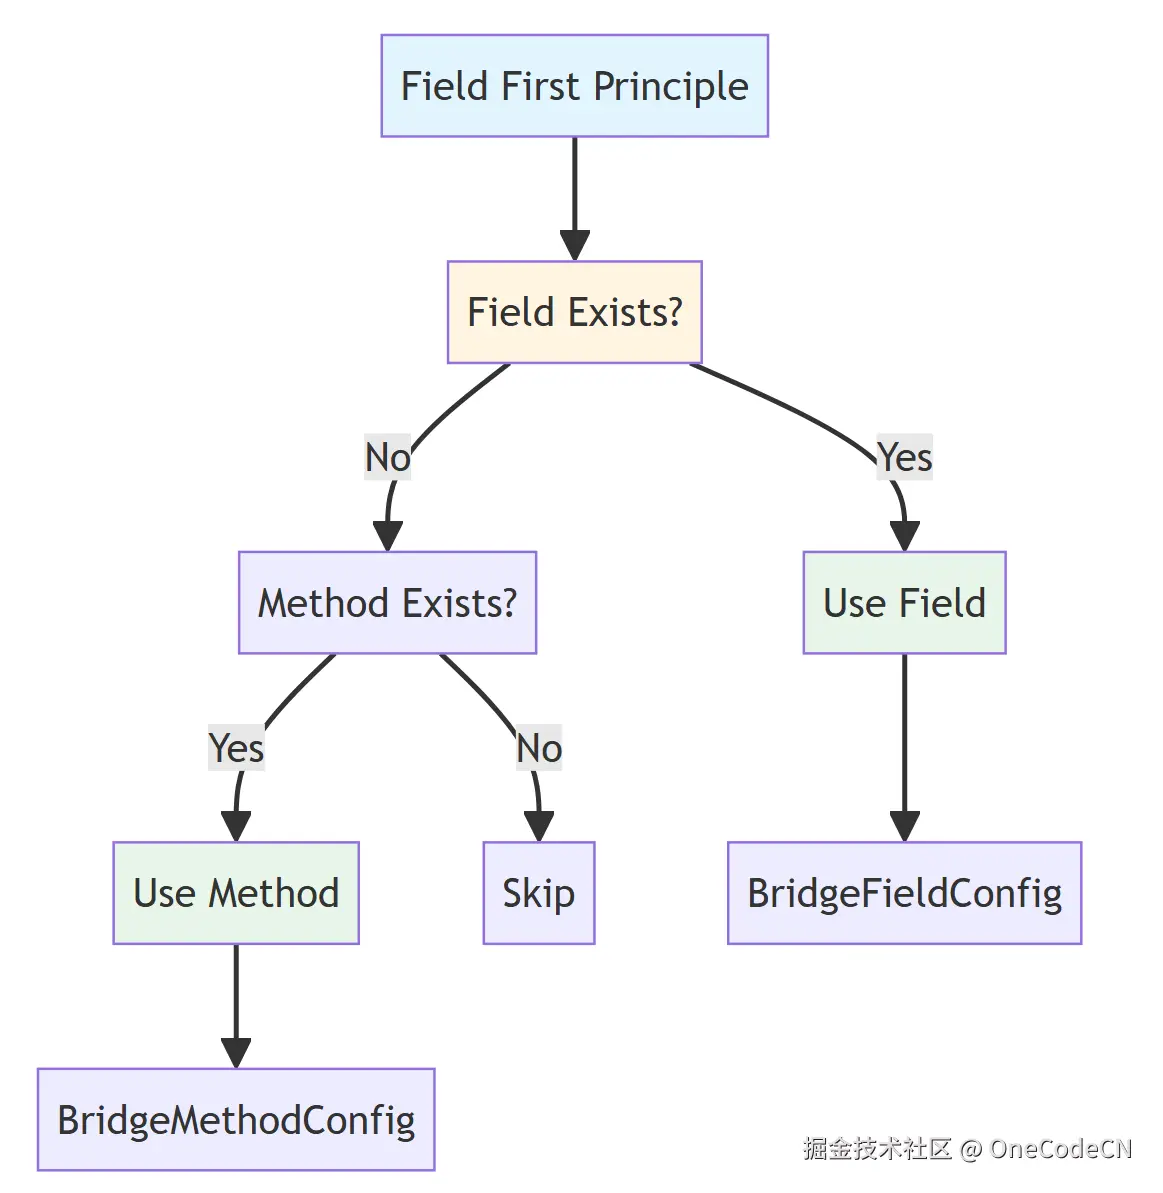
字段优先原则是指在字段和方法都存在时,优先使用字段的定义。
核心代码分析:
for (BridgeMethodConfig methodInfo : methodInfos) {
    if (methodInfo.isSerialize()) {
        if (MethodUtil.isGetMethod(methodInfo.getInnerMethod()) || methodInfo.isModule()) {
            String fieldName = methodInfo.getFieldName();
            CustomAnnotation allmapping = customAnnotationMap.get(fieldName);

            // 字段必须可见
            if (!disableFieldMap.containsKey(methodInfo.getFieldName())) {
                // 如果字段未定义或为默认字段,才使用方法
                BridgeField field = fieldMap.get(fieldName.toLowerCase());
                if (field == null
                        || !(field instanceof BridgeFieldConfig)
                        || ((BridgeFieldConfig) fieldMap.get(fieldName.toLowerCase())).isDefault()) {
                    fieldMap.put(fieldName.toLowerCase(), methodInfo);
                    esdFieldMap.put(methodInfo.getFieldName(), methodInfo);
                    if (!fieldNameList.contains(methodInfo.getFieldName())) {
                        fieldNameList.add(methodInfo.getFieldName());
                    }
                } else {
                    if (allmapping == null && (methodInfo.isCustomFiled() || methodInfo.isDynLoad())) {
                        // 优先使用字段注解
                        fieldMap.put(fieldName.toLowerCase(), methodInfo);
                    }
                }
            }
        }
    }
}
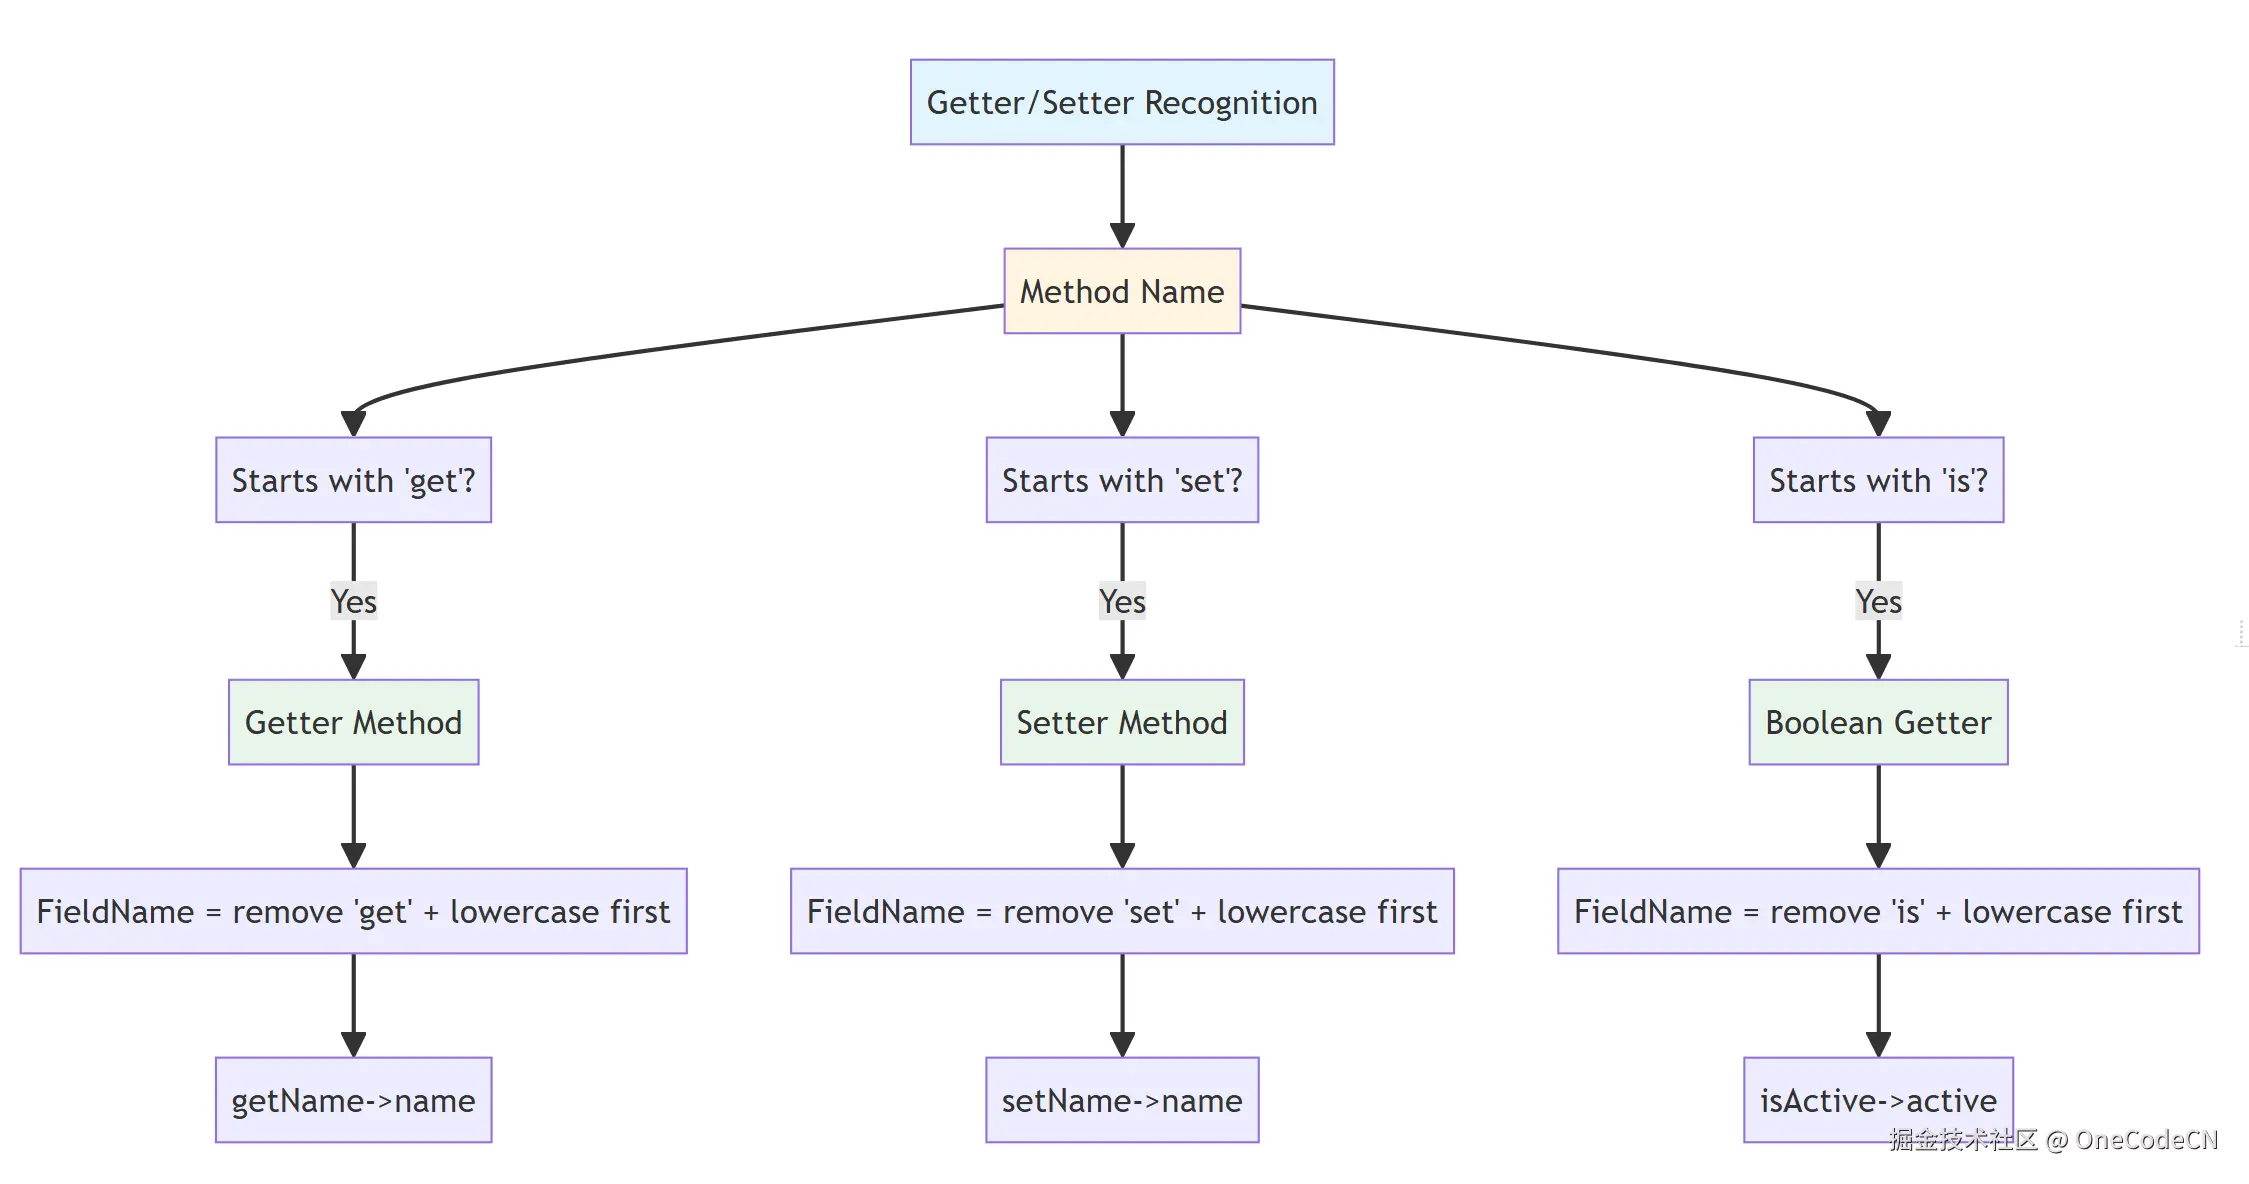
Getter/Setter识别原则是指通过方法名识别Getter和Setter方法。
核心代码分析:
this.fieldName = MethodUtil.getFieldName(method);

// MethodUtil.getFieldName() 实现逻辑
public static String getFieldName(Method method) {
    String methodName = method.getName();
    if (methodName.startsWith("get")) {
        return OODUtil.formatJavaName(methodName.substring(3), false);
    } else if (methodName.startsWith("set")) {
        return OODUtil.formatJavaName(methodName.substring(3), false);
    } else if (methodName.startsWith("is")) {
        return OODUtil.formatJavaName(methodName.substring(2), false);
    }
    return methodName;
}
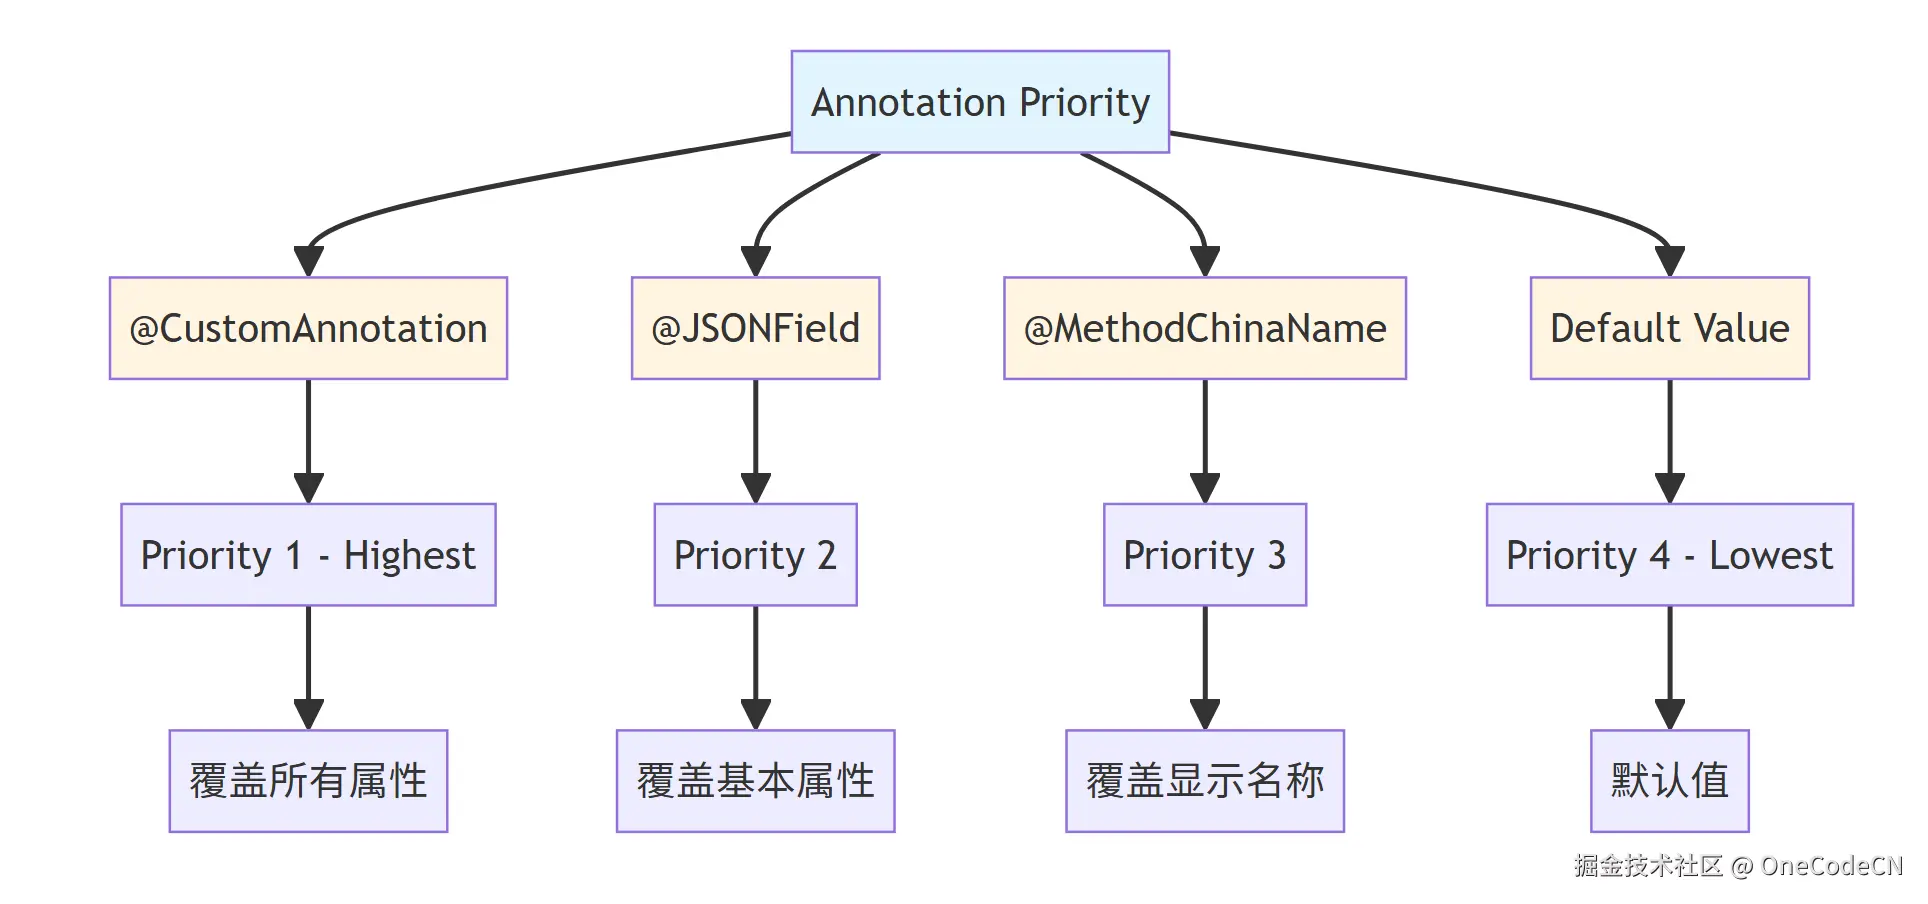
注解优先级原则是指不同注解之间有明确的优先级顺序。
核心代码分析:
void init(Integer index, BridgeClass bridgeClass) {
    // ...

    // CustomAnnotation - 最高优先级
    if (customAnnotation != null) {
        this.customBean = new CustomFieldMeta(customAnnotation);
        this.index = customBean.getIndex();
        this.target = customBean.getTarget();
        if (customAnnotation.hidden()) {
            componentType = ComponentType.HIDDENINPUT;
            this.hidden = true;
        }
        this.isCaption = customAnnotation.captionField();
        this.uid = customAnnotation.uid();
        // ...
    }

    // JSONField - 覆盖基本属性
    if (jsonField != null) {
        this.serialize = jsonField.serialize();
        if (!jsonField.name().equals("")) {
            this.fieldName = jsonField.name();
            this.name = jsonField.name();
        }
        if (!jsonField.name().equals("")) {
            id = jsonField.name();
        }
    }

    // 中文注解 - 最后覆盖
    if (caption == null || caption.equals("")) {
        if (methodChinaName != null) {
            caption = methodChinaName.cname();
        } else {
            if (caption.equals("")) {
                this.caption = name;
            }
        }
    }
}
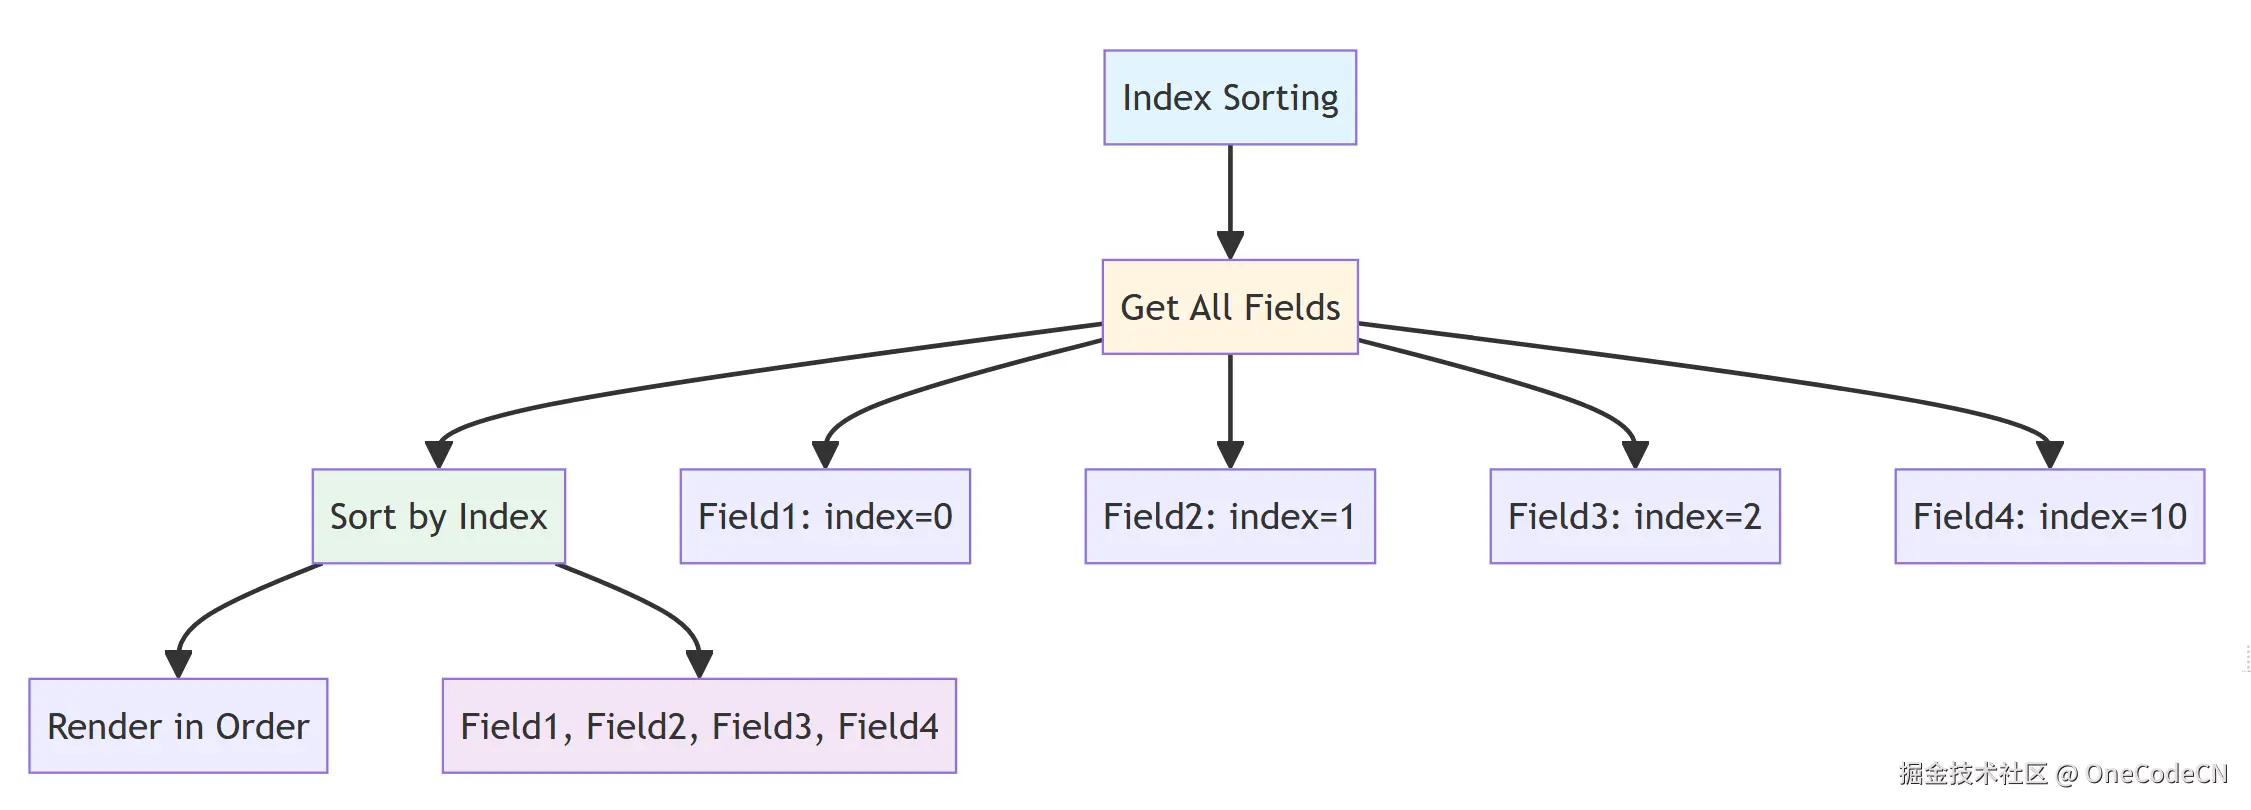
索引排序原则是指按照索引值对字段进行排序。
Index Sorting
Get All Fields
Sort by Index
Render in Order
Field1: index=0
Field2: index=1
Field3: index=2
Field4: index=10
Field1, Field2, Field3, Field4
核心代码分析:
int index = 0;
for (Field field : allCtFields) {
    fieldTasks.add(new InitFieldTask<>(field, index, this));
    index++;
}

// BridgeBaseField.java
this.index = index;

@Override
public int compareTo(BridgeField o) {
    if (index == null) {
        return -1;
    }

    if (index != null && o.getIndex() != null) {
        return this.index - o.getIndex();
    }

    return 0;
}
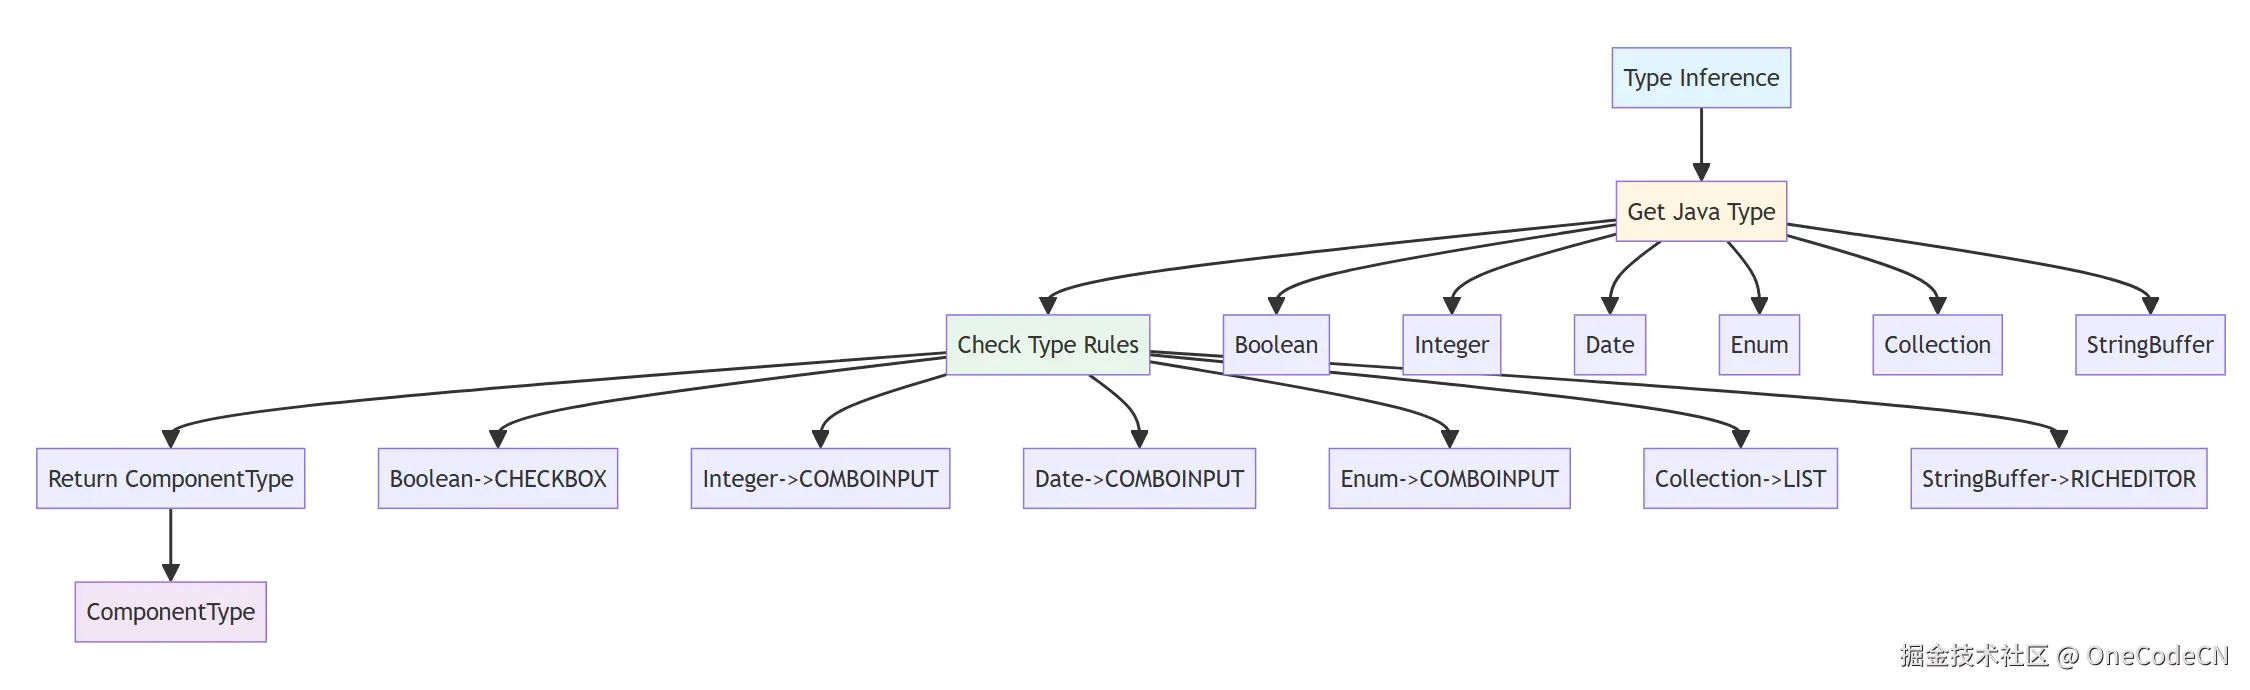
类型推断原则是指根据Java类型推断UI组件类型。
核心代码分析:
public static ComponentType getComponentType(Class typeClass, Type type) {
    Class clazz = JSONGenUtil.getInnerType(type);

    if (Enumstype.class.isAssignableFrom(clazz) || clazz.isEnum()) {
        return ComponentType.COMBOINPUT;
    }

    if (typeClass != null && (typeClass.isArray() || Collection.class.isAssignableFrom(typeClass))) {
        if (Arrays.asList(customClass).contains(clazz) || typeClass.equals(clazz)) {
            return ComponentType.LIST;
        }
    }

    if (clazz.equals(boolean.class) || clazz.equals(Boolean.class)) {
        return ComponentType.CHECKBOX;
    }

    if (clazz.equals(int.class) || clazz.equals(Integer.class)) {
        return ComponentType.COMBOINPUT;
    }

    if (clazz.equals(Date.class)) {
        return ComponentType.COMBOINPUT;
    }

    if (clazz.equals(Reader.class)) {
        return ComponentType.RICHEDITOR;
    }

    if (clazz.equals(StringBuffer.class)) {
        return ComponentType.RICHEDITOR;
    }

    return ComponentType.INPUT;
}
组件映射原则是指将组件类型映射到具体的UI组件类。
核心代码分析:
public Class<UIComponent> getComponent(ComponentType componentType) {
    Class<UIComponent> componentClass = widgetComponentMap.get(componentType);
    return componentClass;
}

void initClass(Class beanClazz) {
    CustomClass customClass = (CustomClass) beanClazz.getAnnotation(CustomClass.class);
    if (CustomBean.class.isAssignableFrom(beanClazz) && customClass != null) {
        AnnotationType ann = (AnnotationType) beanClazz.getAnnotation(AnnotationType.class);
        viewTypeAnnMap.put(ann.clazz(), customClass);
        if (UIComponent.class.isAssignableFrom(customClass.clazz())) {
            switch (customClass.viewType()) {
                case COMPONENT:
                    WidgetMetaMap.put(customClass.componentType(), beanClazz);
                    widgetComponentMap.put(customClass.componentType(), customClass.clazz());
                    if (ann != null) {
                        widgetClass.add(ann.clazz());
                        widgetAnnMap.put(customClass.componentType(), ann.clazz());
                    }
                    break;
                case COMBOBOX:
                    if (ann != null) {
                        for (ComboInputType inputType : customClass.inputType()) {
                            comboBoxAnnMap.put(inputType, ann.clazz());
                            comboBoxComponentMap.put(inputType, customClass.clazz());
                        }
                        widgetClass.add(ann.clazz());
                        widgetAnnMap.put(customClass.componentType(), ann.clazz());
                    }

                    for (ComboInputType inputType : customClass.inputType()) {
                        comboBoxBeanMap.put(inputType, beanClazz);
                    }
                    break;
            }
        }
    }
}
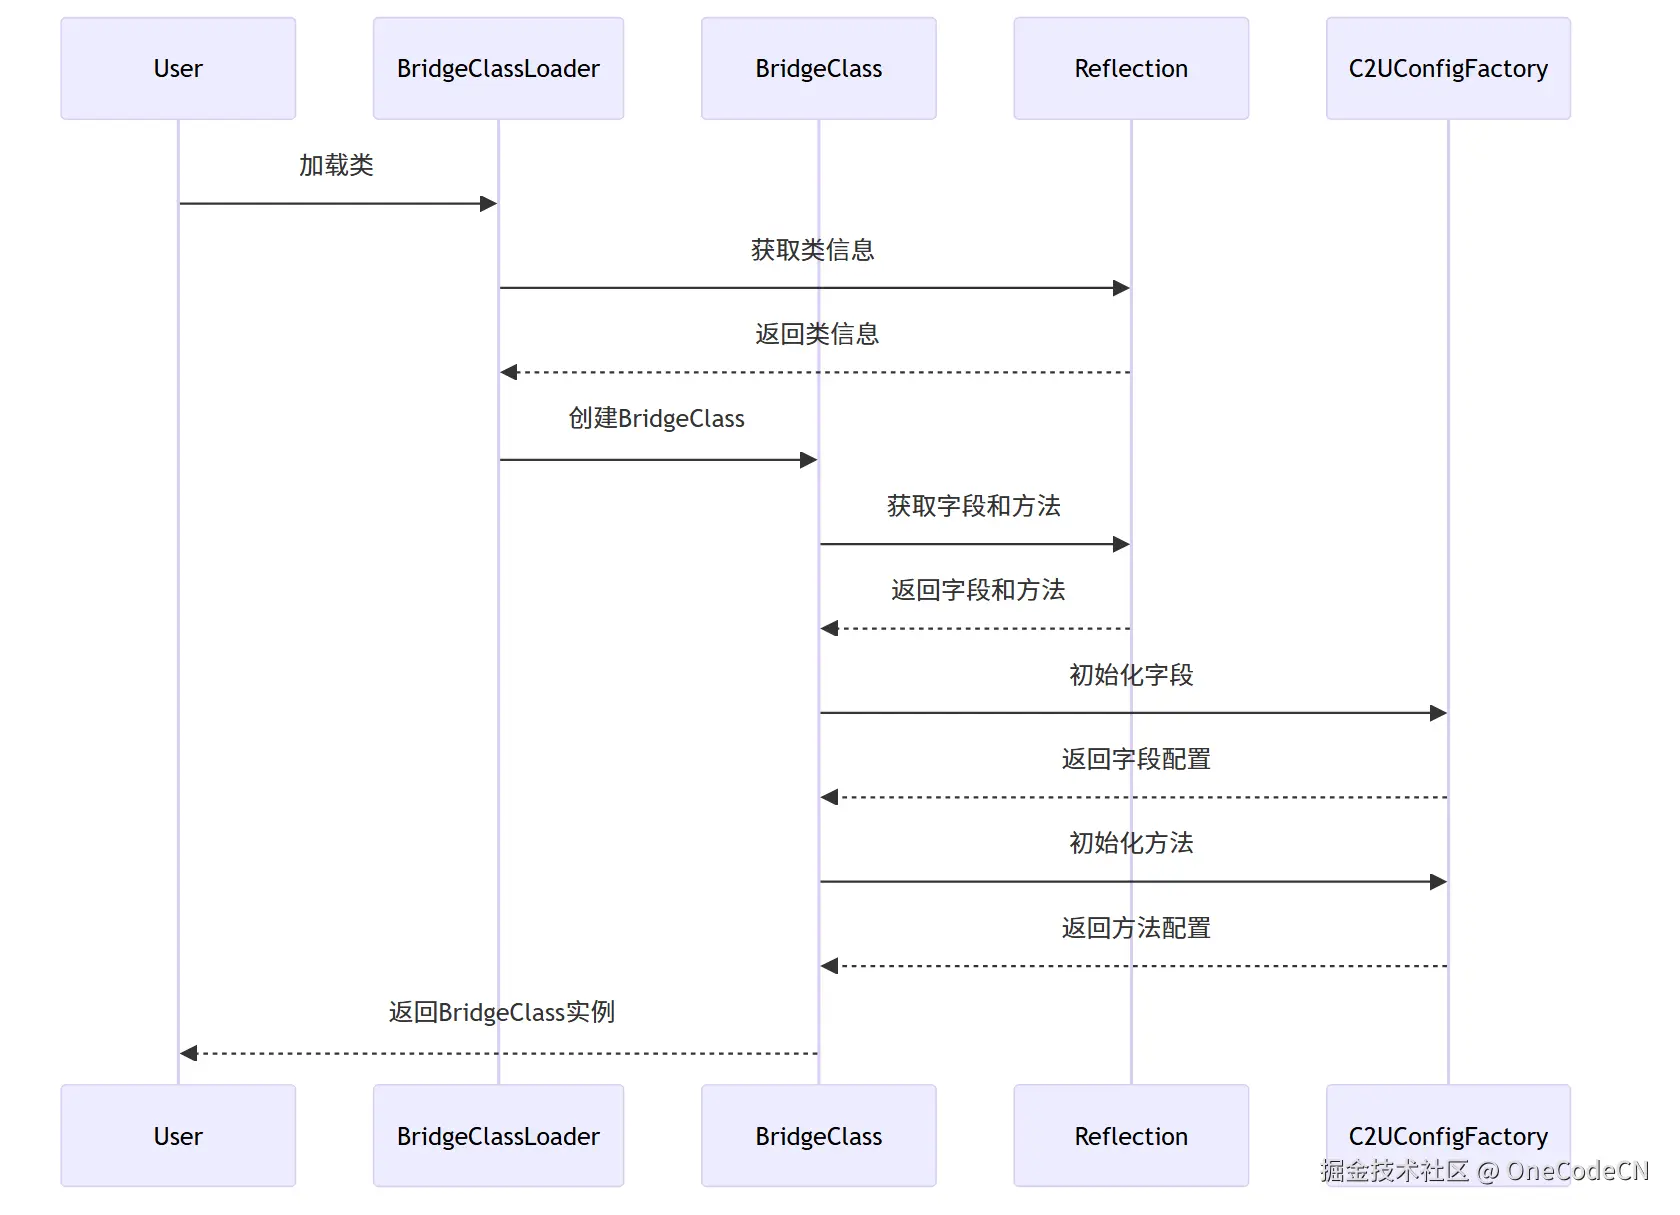
构建阶段是指将Java类加载到内存中,并创建BridgeClass实例。
C2UConfigFactoryReflectionBridgeClassBridgeClassLoaderUserC2UConfigFactoryReflectionBridgeClassBridgeClassLoaderUser加载类获取类信息返回类信息创建BridgeClass获取字段和方法返回字段和方法初始化字段返回字段配置初始化方法返回方法配置返回BridgeClass实例
核心代码分析:
void init(Class ctClass) {
    this.ctClass = ctClass;
    this.allCtFields = new ArrayList<>();

    // 获取所有字段
    for (Field field : ctClass.getDeclaredFields()) {
        if (!Modifier.isStatic(field.getModifiers())
                && !skipClassSet.contains(field.getDeclaringClass())
                && !field.getName().startsWith("this$")) {
            allCtFields.add(field);
        }
    }

    for (Field field : ctClass.getFields()) {
        if (field.getDeclaringClass().equals(ctClass)
                && !field.getName().startsWith("this$")
                && !skipClassSet.contains(field.getDeclaringClass())
                && !field.getDeclaringClass().equals(Object.class)) {
            allCtFields.add(field);
        }
    }

    // 获取所有方法
    this.allCtMethods = new ArrayList<>();
    List<String> methodNames = new ArrayList<>();
    for (Method method : ctClass.getDeclaredMethods()) {
        if (!Modifier.isStatic(method.getModifiers())
                && !skipClassSet.contains(method.getDeclaringClass())) {
            allCtMethods.add(method);
            methodNames.add(method.getName());
        }
    }

    for (Method method : ctClass.getMethods()) {
        if (!Modifier.isStatic(method.getModifiers())
                && !methodNames.contains(method.getName())
                && !skipClassSet.contains(method.getDeclaringClass())
                && !method.getDeclaringClass().equals(ctClass)
                && !method.getDeclaringClass().equals(Enum.class)
                && !method.getDeclaringClass().equals(Object.class)) {
            allCtMethods.add(method);
        }
    }

    // 解析类级别注解
    MethodChinaName chinaName = AnnotationUtil.getClassAnnotation(ctClass, MethodChinaName.class);
    if (chinaName != null) {
        this.methodChinaBean = new MethodChinaMeta(chinaName);
    }

    RepositoryAnnotation repository = AnnotationUtil.getClassAnnotation(ctClass, RepositoryAnnotation.class);
    if (repository != null) {
        repositoryBean = new RepositoryMeta(repository);
    }

    Aggregation aggregationClass = AnnotationUtil.getClassAnnotation(ctClass, Aggregation.class);
    if (aggregationClass != null) {
        aggregationBean = new AggregationBean(aggregationClass);
    }

    // ...
}
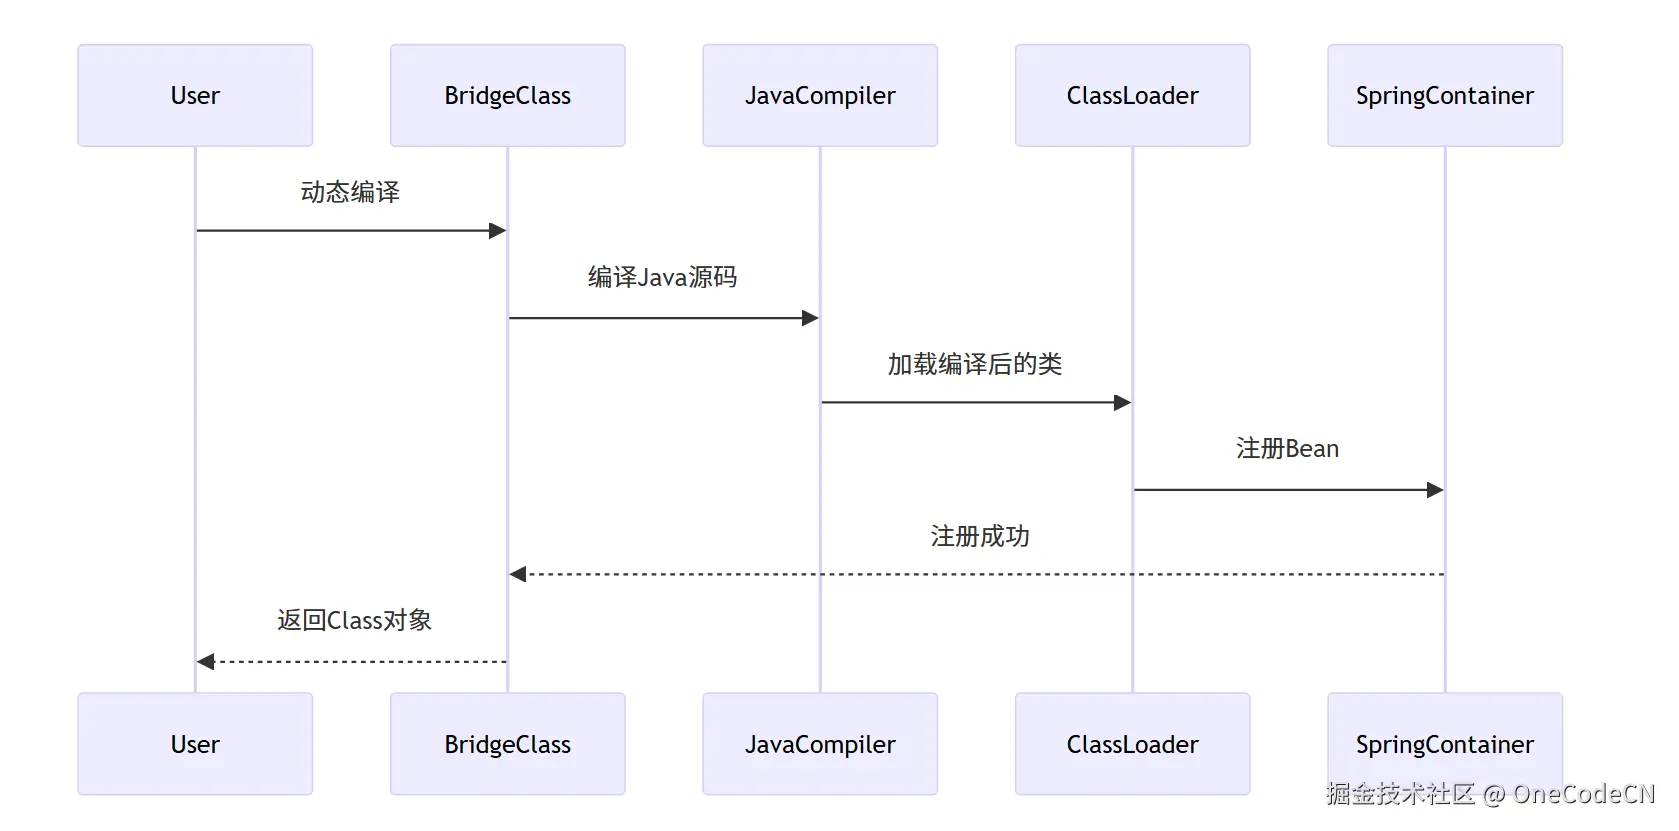
编译阶段是指动态编译Java类,并注册到Spring容器。
SpringContainerClassLoaderJavaCompilerBridgeClassUserSpringContainerClassLoaderJavaCompilerBridgeClassUser动态编译编译Java源码加载编译后的类注册Bean注册成功返回Class对象
核心代码分析:
public void compileJavaSrc(List<JavaSrcMeta> srcBeanList, String projectName, ChromeProxy chrome) {
    D2CGenerator javaGen = D2CGenerator.getInstance(projectName);
    try {
        javaGen.compileJavaSrc(srcBeanList, chrome);
    } catch (JDSException e) {
        e.printStackTrace();
    }

    Set<Class?>> classSet = new HashSet<>();
    // 更新服务注册
    for (JavaSrcMeta srcBean : srcBeanList) {
        Class clazz = null;
        try {
            clazz = ClassUtility.loadClass(srcBean.getClassName());
            classSet.add(clazz);
            registerClass(clazz);
        } catch (ClassNotFoundException e) {
            log.warn(e.getMessage());
        }
    }
    APIConfigFactory.getInstance().dyReload(classSet);
}

public void registerClass(Class clazz) {
    if (clazz != null) {
        if (AnnotationUtil.getClassAnnotation(clazz, Aggregation.class) != null
                || AnnotationUtil.getClassAnnotation(clazz, EsbBeanAnnotation.class) != null) {
            EsbBeanFactory.getInstance().registerService(clazz);
        }
        String className = clazz.getName();
        try {
            classManager.clear(className);
            APIConfigFactory.getInstance().reload(className);
            APIFactory.getInstance().loadApiConfig(className);
            ClassUtility.loadClass(className);

        } catch (Exception e) {
        }
    }
}
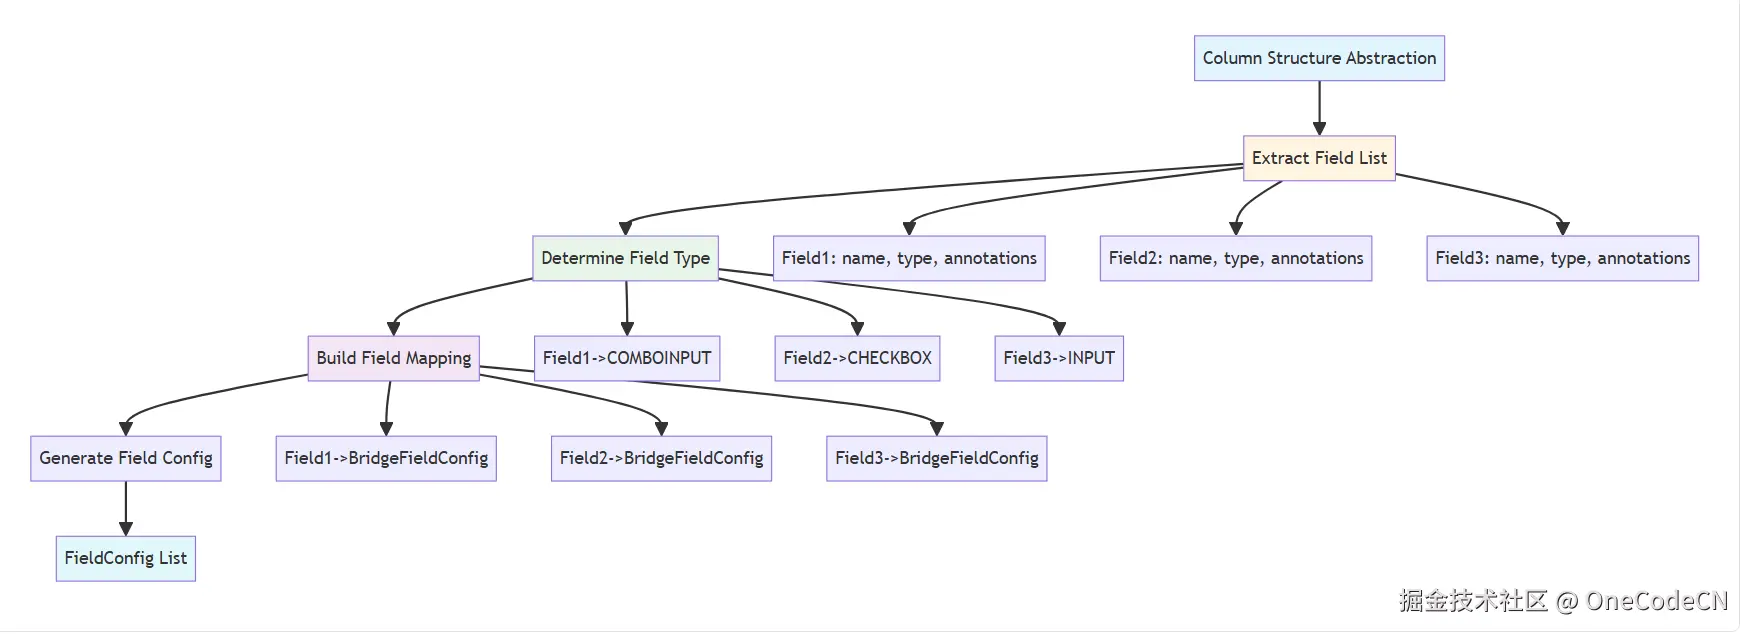
列结构抽象阶段是指提取字段列表,确定字段类型,建立字段映射关系。
核心代码分析:
void initField() {
    Map<String, BridgeField> fieldMap = new LinkedHashMap<>();
    Map<String, BridgeField> disableFieldMap = new LinkedHashMap<>();
    Map<String, CustomAnnotation> customAnnotationMap = new LinkedHashMap<>();
    int index = 0;

    // 并行处理字段初始化
    List<Callable<BridgeFieldConfig>> fieldTasks = new ArrayList<>();
    for (Field field : allCtFields) {
        fieldTasks.add(new InitFieldTask<>(field, index, this));
        index++;
    }
    List<BridgeFieldConfig> fields = this.invokFieldTasks(className, fieldTasks);

    for (BridgeFieldConfig fieldInfo : fields) {
        Field field = fieldInfo.field;
        if (fieldInfo.isSerialize()) {
            fieldMap.put(field.getName().toLowerCase(), fieldInfo);
            esdFieldMap.put(fieldInfo.getFieldName(), fieldInfo);
            fieldNameList.add(fieldInfo.getFieldName());
        } else {
            disableFieldMap.put(field.getName().toLowerCase(), fieldInfo);
            disableFieldList.add(fieldInfo);
        }

        if (fieldInfo.isUid()) {
            this.uid = field.getName();
        }

        if (fieldInfo.isCaptionField()) {
            this.captionField = fieldInfo;
        }
    }
}
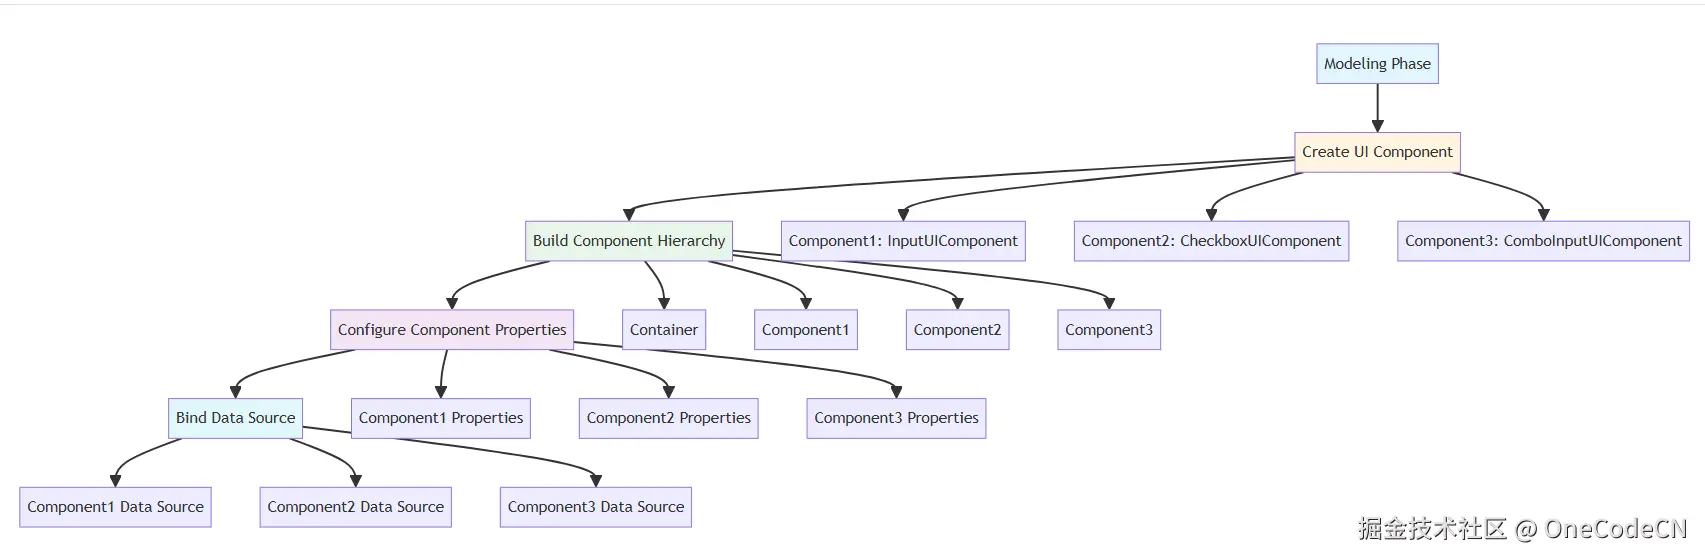
建模阶段是指创建UI组件,建立组件层次结构,配置组件属性,绑定数据源。
核心代码分析:
public void initWidget() {
    Class? clazz = null;
    ComponentType[] skipComs = new ComponentType[]{ComponentType.TOOLBAR, ComponentType.APICALLER, ComponentType.COMBOINPUT, ComponentType.INPUT, ComponentType.LIST};
    Class<? extends Annotation>[] skipAnnotations = new Class[]{ComboInputAnnotation.class, ToolBarMenu.class, ListAnnotation.class, InputAnnotation.class, APIEventAnnotation.class};

    if (componentType == null || Arrays.asList(skipComs).contains(componentType)) {
        CustomClass customClass = C2UConfigFactory.getInstance().getWidgetCustomAnnotation(this.getAllAnnotation().toArray(new Annotation[]{}));
        if (customClass != null) {
            componentType = customClass.componentType();
        }

        if (componentType == null || componentType.equals(ComponentType.INPUT)) {
            if (this.getAnnotation(InputAnnotation.class) != null) {
                componentType = ComponentType.INPUT;
            } else if (this.getAnnotation(ListAnnotation.class) != null) {
                componentType = ComponentType.LIST;
            } else if (this.getAnnotation(ToolBarMenu.class) != null) {
                componentType = ComponentType.TOOLBAR;
            } else if (this.getAnnotation(APIEventAnnotation.class) != null) {
                componentType = ComponentType.APICALLER;
            }
        }
    }

    try {
        clazz = C2UConfigFactory.getInstance().getDefaultWidgetClass(componentType);
        Constructor constructor = null;
        try {
            constructor = clazz.getConstructor(new Class[]{BridgeField.class, Set.class});
            widgetConfig = (M) constructor.newInstance(new Object[]{this, this.getAllAnnotation()});
        } catch (NoSuchMethodException e) {
            constructor = clazz.getConstructor(new Class[]{Set.class});
            widgetConfig = (M) constructor.newInstance(new Object[]{this.getAllAnnotation()});
        }
    } catch (Throwable e) {
        e.printStackTrace();
    }
}
A2UI架构具有以下优势:
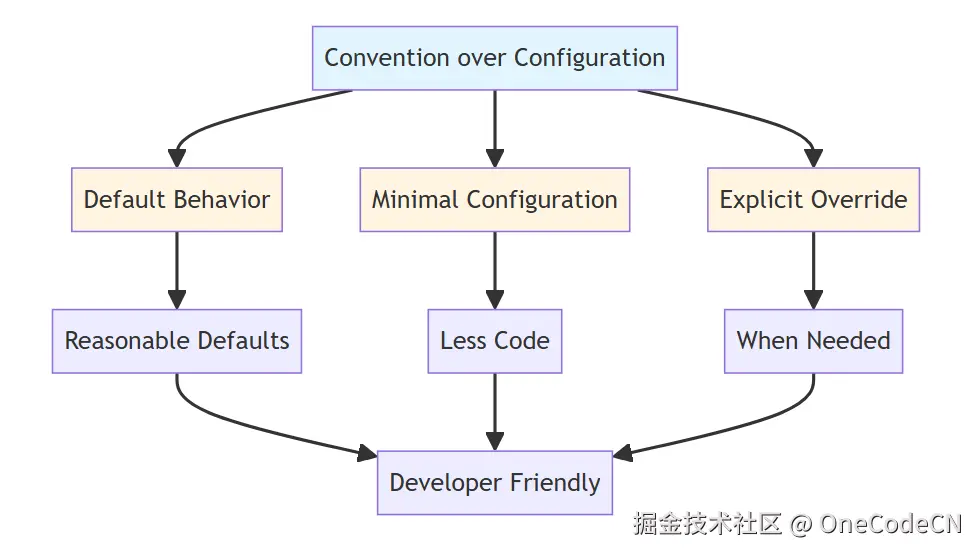
A2UI的设计哲学体现了以下原则:
A2UI(Annotation to UI)是Ooder框架的核心组件,通过注解驱动的反射分析,将Java类自动转换为UI组件。其核心逻辑包括:
A2UI通过这些机制和原则,实现了从Java类到UI组件的自动化转换,为Ooder框架提供了强大的"配置即代码"能力。这一设计不仅提高了开发效率,也保证了系统的可维护性和可扩展性。
© 2024 Ooder Framework. All rights reserved.

