弗兰的悲惨之旅
99.73M · 2026-04-04

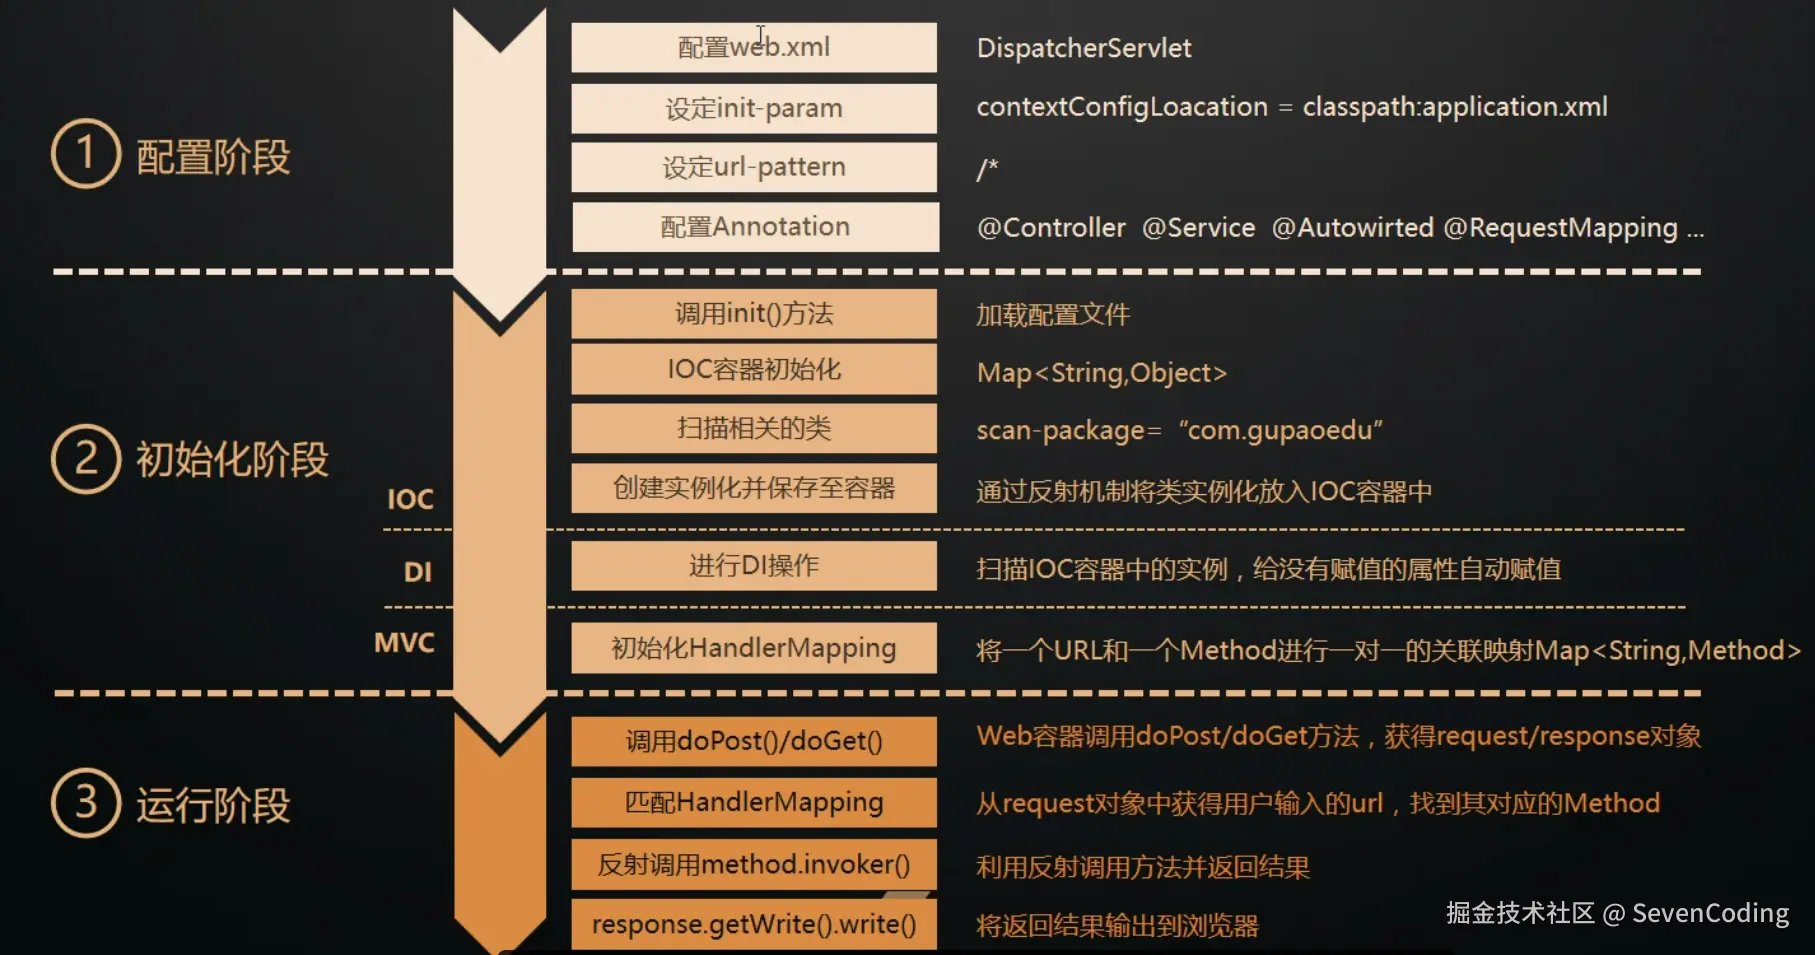
本文将带你深入了解Spring框架的核心原理,通过300行代码的迷你版本来展示Spring最核心的特性:IoC(控制反转)、DI(依赖注入)和MVC(模型-视图-控制器)模式的实现。
在Spring框架中,注解是非常重要的组成部分。我们的迷你版也实现了几个关键注解
// 控制器注解,标记控制器类
@Target({ElementType.TYPE})
@Retention(RetentionPolicy.RUNTIME)
@Documented
public @interface SevenController {
    String value() default "";
}

// 服务注解,标记服务类
@Target({ElementType.TYPE})
@Retention(RetentionPolicy.RUNTIME)
@Documented
public @interface SevenService {
    String value() default "";
}

// 请求映射注解,可用于类或方法
@Target({ElementType.TYPE,ElementType.METHOD})
@Retention(RetentionPolicy.RUNTIME)
@Documented
public @interface SevenRequestMapping {
    String value() default "";
}

// 参数映射注解,用于方法参数
@Target({ElementType.PARAMETER})
@Retention(RetentionPolicy.RUNTIME)
@Documented
public @interface SevenRequestParam {
    String value() default "";
}

// 自动装配注解,用于依赖注入
@Target({ElementType.FIELD})
@Retention(RetentionPolicy.RUNTIME)
@Documented
public @interface SevenAutowired {
    String value() default "";
}
这些注解的实现非常简单,但它们构成了整个框架的基础。通过运行时保留策略,我们可以在运行时通过反射机制来识别这些注解并执行相应的操作。
这些自定义注解的设计思路完全模仿了Spring框架中的标准注解,如@Controller、@Service、@Autowired、@RequestMapping
IoC(控制反转)和DI(依赖注入)是Spring框架的核心特性。
IoC容器的初始化过程:IoC容器本质上是一个Map集合,用来存储所有被管理的对象实例。在SevenDispatcherServlet中,我们定义了一个简单的IoC容器:
//传说中的IOC容器,我们来揭开它的神秘面纱
//为了简化程序,暂时不考虑ConcurrentHashMap
// 主要还是关注设计思想和原理
private Map<String,Object> ioc = new HashMap<String,Object>();
IoC容器的初始化分为四个关键步骤:
//加载配置文件
private void doLoadConfig(String contextConfigLocation) {
    //直接从类路径下找到Spring主配置文件所在的路径
    //并且将其读取出来放到Properties对象中
    InputStream is = this.getClass().getClassLoader().getResourceAsStream(contextConfigLocation);
    try {
        contextConfig.load(is);
    } catch (IOException e) {
        e.printStackTrace();
    } finally {
        if(null != is){
            try {
                is.close();
            } catch (IOException e) {
                e.printStackTrace();
            }
        }
    }
}
//扫描出相关的类
private void doScanner(String scanPackage) {
    //scanPackage = com.seven.minispringsourcecod.demo ,存储的是包路径
    URL url = this.getClass().getClassLoader().getResource("/" + scanPackage.replaceAll("\.","/"));

    //转换为文件路径,实际上就是把.替换为/就OK了
    File classPath = new File(url.getFile());

    for (File file : classPath.listFiles()) {
        if(file.isDirectory()){
            doScanner(scanPackage + "." + file.getName());
        } else {
            //变成包名.类名
            if (!file.getName().endsWith(".class")) {  continue; }
            classNames.add(scanPackage + "." + file.getName().replace(".class", ""));
        }
    }
}
private void doInstance() {
    if(classNames.isEmpty()){return;}

    try {
        for (String className : classNames) {
            Class<?> clazz = Class.forName(className);

            //什么样的类才需要初始化呢?
            //加了注解的类,才初始化
            if(clazz.isAnnotationPresent(SevenController.class)){
                Object instance = clazz.newInstance();
                String beanName = toLowerFirstCase(clazz.getSimpleName());
                //key-value
                //class类名的首字母小写
                ioc.put(beanName,instance);
            } else if(clazz.isAnnotationPresent(SevenService.class)) {
                //1、默认就根据beanName类名首字母小写
                String beanName = toLowerFirstCase(clazz.getSimpleName());

                //2、使用自定义的beanName
                SevenService service = clazz.getAnnotation(SevenService.class);
                if(!"".equals(service.value())){
                    beanName = service.value();
                }

                Object instance = clazz.newInstance();
                ioc.put(beanName,instance);

                //3、根据包名.类名作为beanName
                for (Class<?> i : clazz.getInterfaces()) {
                    if(ioc.containsKey(i.getName())){
                        throw new Exception("The beanName is exists!!");
                    }
                    //把接口的类型直接当成key了
                    ioc.put(i.getName(),instance);
                }
            } else {
                continue;
            }
        }
    } catch (Exception e){
        e.printStackTrace();
    }
}

//工具方法:将类名首字母转为小写
private String toLowerFirstCase(String simpleName) {
    char [] chars = simpleName.toCharArray();
    //之所以加,是因为大小写字母的ASCII码相差32,
    // 而且大写字母的ASCII码要小于小写字母的ASCII码
    //在Java中,对char做算学运算,实际上就是对ASCII码做算学运算
    chars[0] += 32;
    return String.valueOf(chars);
}
private void doAutowired() {
    if(ioc.isEmpty()){return;}

    for (Map.Entry<String,Object> entry : ioc.entrySet()) {
        //拿到实例的所有的字段
        Field[] fields = entry.getValue().getClass().getDeclaredFields();
        for (Field field : fields) {
            if(!field.isAnnotationPresent(SevenAutowired.class)){
                continue;
            }
            SevenAutowired autowired = field.getAnnotation(SevenAutowired.class);
            //如果用户没有自定义beanName,默认就根据类型注入
            String beanName = autowired.value().trim();
            if("".equals(beanName)){
                //获得接口的类型,作为key待会拿这个key到ioc容器中去取值
                beanName = field.getType().getName();
            }

            //如果是public以外的修饰符,只要加了@Autowired注解,都要强制赋值
            //反射中叫做暴力访问
            field.setAccessible(true);

            //反射调用的方式
            //给entry.getValue()这个对象的field字段,赋ioc.get(beanName)这个值
            try {
                field.set(entry.getValue(),ioc.get(beanName));
            } catch (IllegalAccessException e) {
                e.printStackTrace();
                continue;
            }
        }
    }
}
依赖注入的过程:
通过这种方式,我们就实现了控制反转——对象不再需要手动创建依赖,而是由容器负责创建和注入。
MVC(Model-View-Controller)模式是Web开发中的经典架构模式。在我们的迷你版Spring框架中,MVC的实现主要体现在HandlerMapping的建立和请求处理两个方面。
HandlerMapping是MVC模式中的核心组件,它建立了URL请求与控制器方法之间的映射关系:
//初始化url和Method的一对一对应关系
private void doInitHandlerMapping() {
    if(ioc.isEmpty()){return;}

    for (Map.Entry<String,Object> entry : ioc.entrySet()) {
       Class<?> clazz = entry.getValue().getClass();
       if(!clazz.isAnnotationPresent(SevenController.class)){ continue; }

        //保存写在类上面的@SevenRequestMapping("/demo")
       String baseUrl = "";
       if(clazz.isAnnotationPresent(SevenRequestMapping.class)){
           SevenRequestMapping requestMapping = clazz.getAnnotation(SevenRequestMapping.class);
           baseUrl = requestMapping.value();
       }

        //默认获取所有的public方法
        for (Method method : clazz.getMethods()) {
            if(!method.isAnnotationPresent(SevenRequestMapping.class)){continue;}

            SevenRequestMapping requestMapping = method.getAnnotation(SevenRequestMapping.class);

            //  无斜杠:demoquery
            //  多个斜杠://demo//query
            String url = ("/" + baseUrl + "/" + requestMapping.value()).replaceAll("/+","/");
            handlerMapping.put(url,method);

            System.out.println("Mapped " + url + "," + method);
        }
    }
}
这段代码的执行逻辑如下:
当HTTP请求到达时,系统会根据URL找到对应的方法并执行:
private void doDispatch(HttpServletRequest req, HttpServletResponse resp) throws Exception {
    String url = req.getRequestURI();
    String contextPath = req.getContextPath();
    url = url.replaceAll(contextPath,"").replaceAll("/+","/");

    if(!this.handlerMapping.containsKey(url)){
        resp.getWriter().write("404 Not Found!!");
        return;
    }

    Method method = this.handlerMapping.get(url);

    Map<String,String[]> paramsMap = req.getParameterMap();

    //实参列表
    //实参列表要根据形参列表才能决定,首先得拿到形参列表
    Class<?> [] paramterTypes = method.getParameterTypes();

    Object [] parameValues = new Object[paramterTypes.length];
    for (int i = 0; i <paramterTypes.length; i ++){
        Class paramterType = paramterTypes[i];
        if(paramterType == HttpServletRequest.class){
            parameValues[i] = req;
            continue;
        } else if(paramterType == HttpServletResponse.class){
            parameValues[i] = resp;
            continue;
        } else if(paramterType == String.class){
            Annotation[][] pa = method.getParameterAnnotations();
            for (int j = 0; j < pa.length; j ++){
                for (Annotation a : pa[i]) {
                    if(a instanceof SevenRequestParam){
                        String paramName = ((SevenRequestParam) a).value();
                        if(!"".equals(paramName.trim())){
                            String value = Arrays.toString(paramsMap.get(paramName))
                                    .replaceAll("\[|\]","")
                                    .replaceAll("\s",",");
                            parameValues[i] = value;
                        }
                    }
                }
            }
        }
    }

    String beanName = toLowerFirstCase(method.getDeclaringClass().getSimpleName());
    method.invoke(ioc.get(beanName),parameValues);
}
这个请求处理过程包含了以下几个重要步骤:
参数解析是其中比较复杂的部分,需要处理三种情况:
这种设计充分体现了Spring MVC的灵活性和易用性,开发者只需要通过注解就能轻松地处理各种请求。
整个迷你版Spring框架的核心是SevenDispatcherServlet,它继承自HttpServlet,实现了Spring MVC的前端控制器模式。让我们来看看它的完整实现
public class SevenDispatcherServlet extends HttpServlet {

    //保存application.properties配置文件中的内容
    private Properties contextConfig = new Properties();

    //保存扫描的所有的类名
    private List<String> classNames = new ArrayList<String>();

    //传说中的IOC容器,我们来揭开它的神秘面纱
    //为了简化程序,暂时不考虑ConcurrentHashMap
    // 主要还是关注设计思想和原理
    private Map<String,Object> ioc = new HashMap<String,Object>();

    //保存url和Method的对应关系
    private Map<String,Method> handlerMapping = new HashMap<String,Method>();

    @Override
    protected void doGet(HttpServletRequest req, HttpServletResponse resp) throws ServletException, IOException {
       this.doPost(req,resp);
    }

    @Override
    protected void doPost(HttpServletRequest req, HttpServletResponse resp) throws ServletException, IOException {
        //6、根据url调用method
        try {
            doDispatch(req,resp);
        } catch (Exception e) {
            e.printStackTrace();
            resp.getWriter().write("500 Exception,Detail: " + Arrays.toString(e.getStackTrace()));
        }
    }

    @Override
    public void init(ServletConfig config) throws ServletException {
        //工厂类  GPApplicationContext  IOC、DI

        //=========== IOC ===========

        //1、加载配置文件
        doLoadConfig(config.getInitParameter("contextConfigLocation"));

        //2、扫描相关的类
        doScanner(contextConfig.getProperty("scanPackage"));

        //3、初始化扫描到的类,并且放入到IOC容器之中
        doInstance();

        //=========  DI =========

        //4、完成自动化的依赖注入
        doAutowired();

        //======= MVC =============

        //5、初始化HandlerMapping
        doInitHandlerMapping();

        System.out.println("GP Spring framework is init.");
    }
}
SevenDispatcherServlet的初始化过程严格按照以下顺序执行:
这个顺序非常重要,因为每一步都依赖于前一步的结果:
通过这个迷你版的实现,我们可以清楚地看到Spring框架的核心机制并不神秘,而是基于Java的基本特性(反射、注解、动态代理等)实现的。
通过这个300行代码的迷你版Spring框架,我们成功实现了Spring的三大核心特性之二
核心设计思想
实现亮点
通过手写这个迷你版Spring框架,我们不仅掌握了Spring的核心原理,更重要的是学会了如何运用设计模式和编程技巧来解决实际问题。这种从简到繁的学习方式有助于我们更深入地理解复杂框架的设计思想,为我们进一步学习和使用Spring框架奠定了坚实的基础。
实际上,真正的Spring框架比这复杂得多,包含了更多高级特性如AOP、事务管理、缓存、安全等,但其核心思想与这个迷你版是一致的。掌握这些基本原理后,再学习完整的Spring框架就会事半功倍。

