弗兰的悲惨之旅
99.73M · 2026-04-04

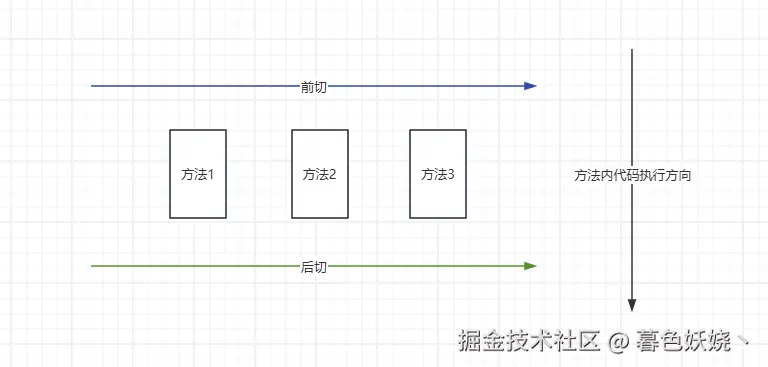
AOP 的全称是 Aspect-Oriented Programming 面向切面编程,通常在我们日常开发中的模式都是方法直接实现完整功能。但有时候我们希望在某一个或多个功能方法中加入一些通用的其他逻辑,但是又不希望修改这一批方法的源代码,也不希望修改调用这批方法的方法的源代码,导致一大堆重复代码。于是 AOP 就诞生了。AOP 的作用可以理解为下图
在执行目标方法前后添加一些额外的逻辑。最经典的实现是 AspectJ 框架
在 Java 领域中, AspectJ 是最早、最完整、功能最强大的一个 AOP 框架。前面我们说了 AOP 的思想是在方法执行前后加入一些自定义逻辑,那么到底怎么加呢?AspectJ 提供了两种方式:编译期织入和运行时织入。下面我们先看代码示例,使用 AspectJ 如何实现 AOP 编程
示例源码已分享到 Github
目标类
public class UserService {
    public void test1(){
        System.out.println("test1 started!");
    }
}
切面类
@Aspect
public class UserServiceAspect {
    @Before("execution(* com.example.UserService.test1())")
    public void before(){
        System.out.println("before test1!");
    }
}
这里 @Before 注解的值叫做 切点表达式,它描述了我们将要拦截哪些目标方法执行当前的增强逻辑
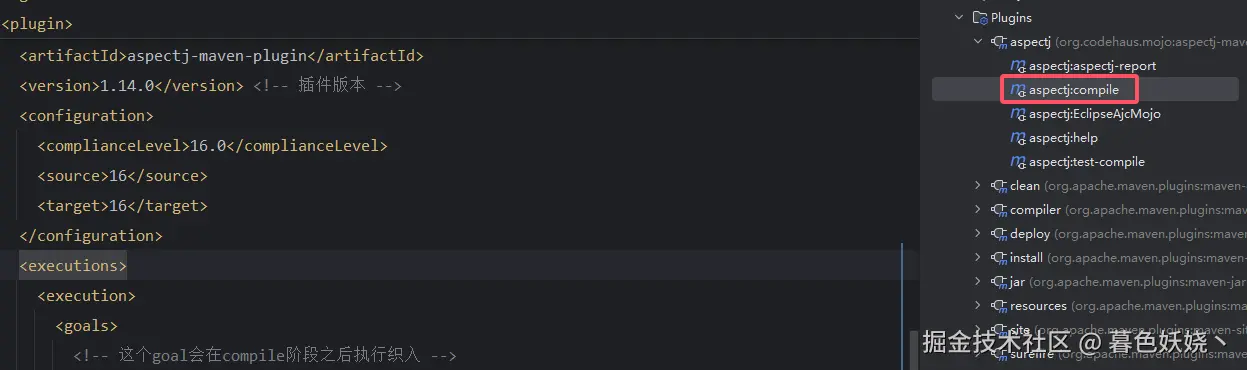
编译期织入需要特定的编译插件。在 pom.xml 中添加下面这个插件
<plugin>
  <groupId>org.codehaus.mojo</groupId>
  <artifactId>aspectj-maven-plugin</artifactId>
  <version>1.14.0</version>
  <configuration>
    <complianceLevel>16.0</complianceLevel>
    <source>16</source>
    <target>16</target>
  </configuration>
  <executions>
    <execution>
      <goals>
        <goal>compile</goal>
      </goals>
    </execution>
  </executions>
</plugin>
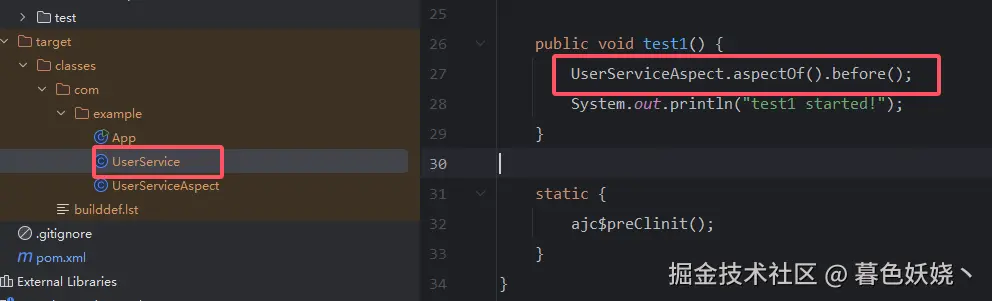
有了这个插件之后,maven 工具栏里面就会多一个工具
运行它之后,我们可以直观的看到 target/classes 文件夹下目标类的方法已经变了
实际业务中这种方式使用很少,这里只是为了后续理解 Spring AOP 。
运行时织入是基于 Java agent 技术。它允许在 JVM 启动时或运行时 动态修改已加载或即将加载的类的字节码。对于上面的示例,也就是说运行时把 UserService 的 class 文件改了,其实就是改成了上面编译织入后的 class 文件一样。只不过这是基于 Java agent 技术 运行时 实现的
在 JVM 启动参数添加下面内容,aspectjweaver-1.9.25.jar 的路径换成自己实际的地址即可
-javaagent:C:Users14812.m2repositoryorgaspectjaspectjweaver1.9.25aspectjweaver-1.9.25.jar
有了上面的案例,我们再来理解 AOP 思想中核心的几个概念,这对于我们后续理解 Spring AOP 非常重要。
这四个概念是 AOP 思想的重中之重。
| 概念 | demo示例 | 代码角色 | 说明 |
|---|---|---|---|
| 切面 | UserServiceAspect 类 | @Aspect 类 | 容器,组织切点、通知和其他 AOP 元素 |
| 连接点 | UserService.test1() 方法 | 目标类中所有的内容,包括方法、字段赋值、对象初始化 | 客观存在的可执行点 |
| 切点 | @Before("execution(* com.example.UserService.test1())") | @Pointcut 定义 @Before、@After、@Around 的表达式 | 筛选器,选择哪些连接点要处理 |
| 通知 | public void before(){System.out.println("before test1!");} | @Before、@After、@Around标注的方法 | 拦截行为,前置、后置、环绕,在连接点执行的代码 |
正如我们上面对连接点的描述。AspectJ 不仅能拦截方法,甚至还能拦截字段的设置、字段的访问、对象初始化等等。都是通过切点表达式来实现,切点表达式的写法非常丰富。demo 示例中演示了字段访问的拦截,由于工作中几乎用不到,所以其他内容这里就不一一介绍了,有兴趣可以自己探索。
// 1. 拦截 User.name 字段的读取
@Before("get(private String com.example.UserService.name)")
public void beforeReadName(JoinPoint jp) {
    System.out.println("【字段读】正在读取 User.name 字段");
    System.out.println("  目标对象: " + jp.getTarget());
    System.out.println("  在类中: " + jp.getSourceLocation());
}

// 1. 拦截 User.name 字段的赋值
@Before("set(private String com.example.UserService.name)")
public void beforeSetName(JoinPoint jp) {
    System.out.println("【字段读】正在设置 User.name 字段");
    System.out.println("  目标对象: " + jp.getTarget());
    System.out.println("  在类中: " + jp.getSourceLocation());
}
在 Spring 中,集成了 AspectJ 框架,Spring AOP 官网描述 有一段是这么说的:
可以自行翻译。Spring 保留了原生 AspectJ 的编程用法,但是实现原理不同,AspectJ 运行时增强通过 Java agent 实现,Spring AOP 是通过动态代理实现。关于动态代理可以参考这篇文章 学习 Java 动态代理 。
和上一段的非 Spring 项目 Aspect 示例完全相同,只要在 UserService 和 UserServiceAspect 类上面加上 @Component 注解,交给 Spring 管理即可。如果使用非 SpringBoot 项目,还需要一个配置类,启用注解 @EnableAspectJAutoProxy 。如果是 SpringBoot 项目,我们引入 aop-starter 即可
<dependency>
    <groupId>org.springframework.boot</groupId>
    <artifactId>spring-boot-starter-aop</artifactId>
    <scope>compile</scope>
</dependency>
AopAutoConfiguration 会自动配置启用@EnableAspectJAutoProxy,那么只需要把我们两个类 UserService 和 UserServiceAspect 交给 Sping 管理即可实现。
Spring 中对于代理中的几个概念例如 通知、切点、连接的、切面做了一些抽象设计。
| 概念 | 接口 | 描述 | 主要实现类 |
|---|---|---|---|
| 切点 | org.springframework.aop.Pointcut | 在哪里应用通知,具体拦截行为发生在哪里,仅支持方法切点 | AspectJExpressionPointcut |
| 通知 | org.aopalliance.aop.Advice | 增强行为的统一抽象,表示具体增强逻辑是什么 | BeforeAdvice、MethodInterceptor |
| 切面 | org.springframework.aop.Advisor | 在 Spring AOP 中通常是包含切点和通知的封装 | InstantiationModelAwarePointcutAdvisor |
| 连接点 | org.aopalliance.intercept.Joinpoint | 可访问对象(方法)的访问的具体化 | ReflectiveMethodInvocation |
这里需要类比前面我们在 AspectJ 那段关于这几个概念的表格,在 Spring AOP 中这些概念都有统一的抽象和具体的实现。
根据我们前面的文章 Bean 的创建过程源码分析 我们知道,代理类的创建发生在 BeanPostProcessor.postProcessAfterInitialization()。这里有一个重要的实现类 AnnotationAwareAspectJAutoProxyCreator 。它调用父类 AbstractAutoProxyCreator.wrapIfNecessary() 的创建代理逻辑
protected Object wrapIfNecessary(Object bean, String beanName, Object cacheKey) {
    //......
    // 获取这个类所有的切面
    Object[] specificInterceptors = getAdvicesAndAdvisorsForBean(bean.getClass(), beanName, null);
    if (specificInterceptors != DO_NOT_PROXY) {
       this.advisedBeans.put(cacheKey, Boolean.TRUE);
       //创建代理
       Object proxy = createProxy(bean.getClass(), beanName, specificInterceptors, new SingletonTargetSource(bean));
       this.proxyTypes.put(cacheKey, proxy.getClass());
       return proxy;
    }

    this.advisedBeans.put(cacheKey, Boolean.FALSE);
    return bean;
}
这里会获取所有该类的增强逻辑,示例中也就是 UserServiceAspect,如果有切面就创建代理对象返回。
一路跟踪源码 getAdvicesAndAdvisorsForBean() 源码进去,最后发现会在 org.springframework.aop.aspectj.annotation.BeanFactoryAspectJAdvisorsBuilder#buildAspectJAdvisors 方法中遍历所有的 beanName 过滤出我们的切面类,源码中扫描 @Aspect 判断是否是一个切面,然后根据切点表达式匹配对应的目标类。然后遍历切点,为每一个切点都创建一个 Advisor,具体类型是 InstantiationModelAwarePointcutAdvisorImpl,随后缓存起来。
InstantiationModelAwarePointcutAdvisorImpl 的主要作用是根据其内部的切面工厂获取具体的切点拦截行为。
在 AbstractAutoProxyCreator#buildProxy() 中先构建代理工厂 ProxyFactory,然后调用 ProxyFactory.getProxy()。内部最终会根据代理工厂的配置来决定使用 CGLIB 还是 JDK 代理
@Override
public AopProxy createAopProxy(AdvisedSupport config) throws AopConfigException {
    // config.isProxyTargetClass() 在 SpringBoot 中是默认为 true 的
    if (config.isOptimize() || config.isProxyTargetClass() || !config.hasUserSuppliedInterfaces()) {
       Class<?> targetClass = config.getTargetClass();
       //...
       if (targetClass == null || targetClass.isInterface() ||
             Proxy.isProxyClass(targetClass) || ClassUtils.isLambdaClass(targetClass)) {
          return new JdkDynamicAopProxy(config);
       }
       return new ObjenesisCglibAopProxy(config);
    }
    else {
       return new JdkDynamicAopProxy(config);
    }
}
上一段在实例化代理工厂的时候会执行一个复制方法,把当前对象 AnnotationAwareAspectJAutoProxyCreator 的 proxyTargetClass 属性拿过来,赋值给代理工厂,而这个属性默认是 true,后面会介绍
//org.springframework.aop.framework.autoproxy.AbstractAutoProxyCreator#buildProxy
private Object buildProxy(Class<?> beanClass, @Nullable String beanName,@Nullable Object[] specificInterceptors, TargetSource targetSource, boolean classOnly) {
    //......
    ProxyFactory proxyFactory = new ProxyFactory();
    proxyFactory.copyFrom(this);
    //......
}

//赋值方法
public void copyFrom(ProxyConfig other) {
    Assert.notNull(other, "Other ProxyConfig object must not be null");
    this.proxyTargetClass = other.proxyTargetClass;
    this.optimize = other.optimize;
    this.exposeProxy = other.exposeProxy;
    this.frozen = other.frozen;
    this.opaque = other.opaque;
}
所以当执行到 org.springframework.aop.framework.DefaultAopProxyFactory#createAopProxy 方法时,不管目标类是否实现接口,只要它本身不是接口,就一定会走 CGLIB 代理,这一点与原生 Spring 不同。SpringBoot 默认强制走 CGLIB 代理
和我们之前在 学习 Java 动态代理 中提到的一样,先构造 Enhancer 实例,然后设置它的回调列表,
这里有一个代理对象方法调用入口的拦截器 DynamicAdvisedInterceptor
private Callback[] getCallbacks(Class<?> rootClass) throws Exception {
    // Choose an "aop" interceptor (used for AOP calls).
    //调用目标方法前会先调用这个拦截器,构造时传入当前 Bean 的所有切面
    Callback aopInterceptor = new DynamicAdvisedInterceptor(this.advised);

    //......
    Callback[] mainCallbacks = new Callback[] {
          aopInterceptor,  // for normal advice
          targetInterceptor,  // invoke target without considering advice, if optimized
          new SerializableNoOp(),  // no override for methods mapped to this
          targetDispatcher, this.advisedDispatcher,
          new EqualsInterceptor(this.advised),
          new HashCodeInterceptor(this.advised)
    };
    //......
       return mainCallbacks;
    }
----------------------------分隔线-----------------------------
//设置回调列表
enhancer.setCallbacks(callbacks);
当代理类创建完毕之后,我们获取它的 class 全名,然后使用 arthas 工具获取代理类的源码,代码很多,这里我们只看我们增强的方法 test1()
public final void test1() {
    try {
        MethodInterceptor methodInterceptor = this.CGLIB$CALLBACK_0;
        if (methodInterceptor == null) {
            UserService$$SpringCGLIB$$0.CGLIB$BIND_CALLBACKS(this);
            methodInterceptor = this.CGLIB$CALLBACK_0;
        }
        if (methodInterceptor != null) {
            Object object = methodInterceptor.intercept(this, CGLIB$test1$0$Method, CGLIB$emptyArgs, CGLIB$test1$0$Proxy);
            return;
        }
        //调用原始类的方法,这也说明当前代理类是原始类的一个子类
        super.test1();
        return;
    }
    //......
}
我们发现执行 super.test1() 也就是调用原始对象的方法时,会先调用这个 CGLIB$CALLBACK_0 的 intercept() 方法,而这个 CGLIB$CALLBACK_0 就是上一段我们设置的 DynamicAdvisedInterceptor 实例。
前面我们介绍了这个类是创建代理的入口类,查看类的继承结构,发现它是 AbstractAutoProxyCreator 的子类,并且是一个 BeanPostProcessor,它是被 AspectJAutoProxyRegistrar#registerBeanDefinitions 注册到 Spring 容器的,AspectJAutoProxyRegistrar 是被 @EnableAspectJAutoProxy 导入的,在 AopAutoConfiguration 自动配置中启用了该注解
@AutoConfiguration
@ConditionalOnProperty(prefix = "spring.aop", name = "auto", havingValue = "true", matchIfMissing = true)
public class AopAutoConfiguration {

    @Configuration(proxyBeanMethods = false)
    //有 AspectJ 时生效
    @ConditionalOnClass(Advice.class)
    static class AspectJAutoProxyingConfiguration {

       @Configuration(proxyBeanMethods = false)
       //启用 Aspect 自动代理,matchIfMissing = true 默认使用 CGLIB 代理
       //proxyTargetClass = true
       @EnableAspectJAutoProxy(proxyTargetClass = true)
       @ConditionalOnProperty(prefix = "spring.aop", name = "proxy-target-class", havingValue = "true",matchIfMissing = true)
       static class CglibAutoProxyConfiguration {}
    }

    @Configuration(proxyBeanMethods = false)
    //当没有 AspectJ 时生效,下一篇说事务的时候会介绍
    @ConditionalOnMissingClass("org.aspectj.weaver.Advice")
    @ConditionalOnProperty(prefix = "spring.aop", name = "proxy-target-class", havingValue = "true",matchIfMissing = true)
    static class ClassProxyingConfiguration {
       @Bean
       static BeanFactoryPostProcessor forceAutoProxyCreatorToUseClassProxying() {
          return (beanFactory) -> {
             if (beanFactory instanceof BeanDefinitionRegistry registry) {
                AopConfigUtils.registerAutoProxyCreatorIfNecessary(registry);
                AopConfigUtils.forceAutoProxyCreatorToUseClassProxying(registry);
             }
          };
       }
    }
}
总结 AnnotationAwareAspectJAutoProxyCreator 这个 Bean 的来源如下
AopAutoConfiguration → AspectJAutoProxyingConfiguration → @EnableAspectJAutoProxy → AspectJAutoProxyRegistrar
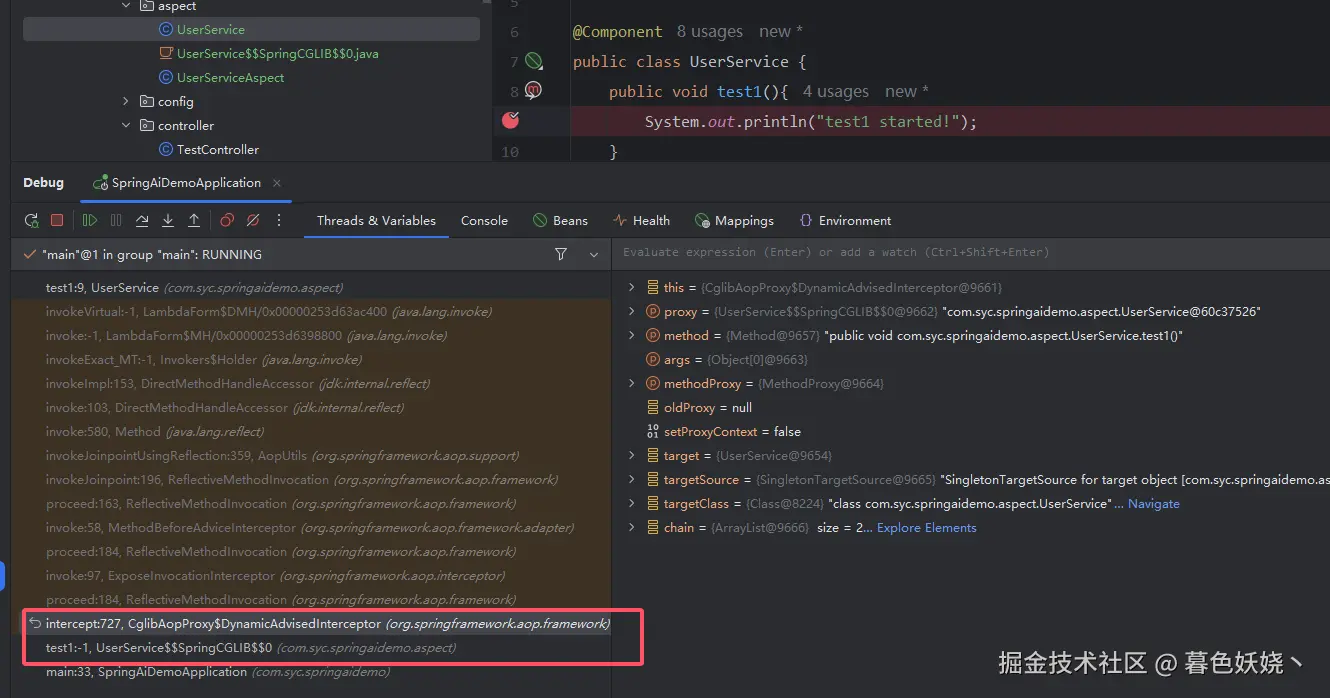
debug UserService.test1() 我们发现在实际调用这个方法前有一系列的调用
最早的入口是一个代理类的 UserService$$SpringCGLIB$$0.test1(),紧接着是我们上一段在创建代理对象是提到的,DynamicAdvisedInterceptor#intercept 入口回调函数。然后就是一系列的 invoke 最终到达我们原生的 UserService.test1() 。
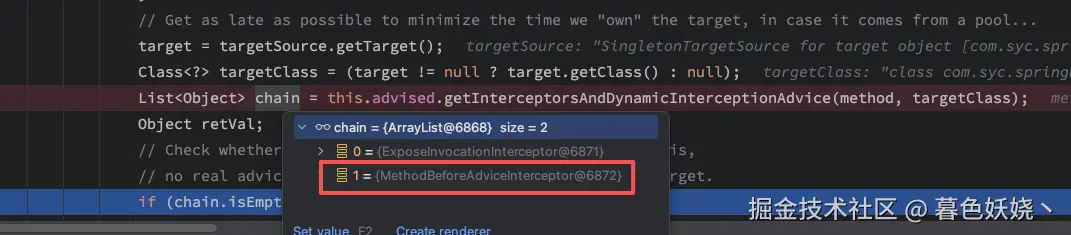
上一段我们说了,代理对象调用目标对象方法之前会调用 DynamicAdvisedInterceptor.intercept(),这里是代理对象增强逻辑处理的入口 我们看一下它的源码
public Object intercept(Object proxy, Method method, Object[] args, MethodProxy methodProxy) throws Throwable {
   //......
   //根据当前 Bean 的切面获取一个 chain 列表
   List<Object> chain = this.advised.getInterceptorsAndDynamicInterceptionAdvice(method, targetClass);
   Object retVal;
   if (chain.isEmpty()) {......}
   else {
      // We need to create a method invocation...
      retVal = new ReflectiveMethodInvocation(proxy, target, method, args, targetClass, chain).proceed();
   }
   return processReturnType(proxy, target, method, args, retVal);
    //......
}
只看关键部分,获取了一个 chain 列表,然后构造 ReflectiveMethodInvocation 调用 proceed(),这个 chain 就是我们的包含增强逻辑的拦截器
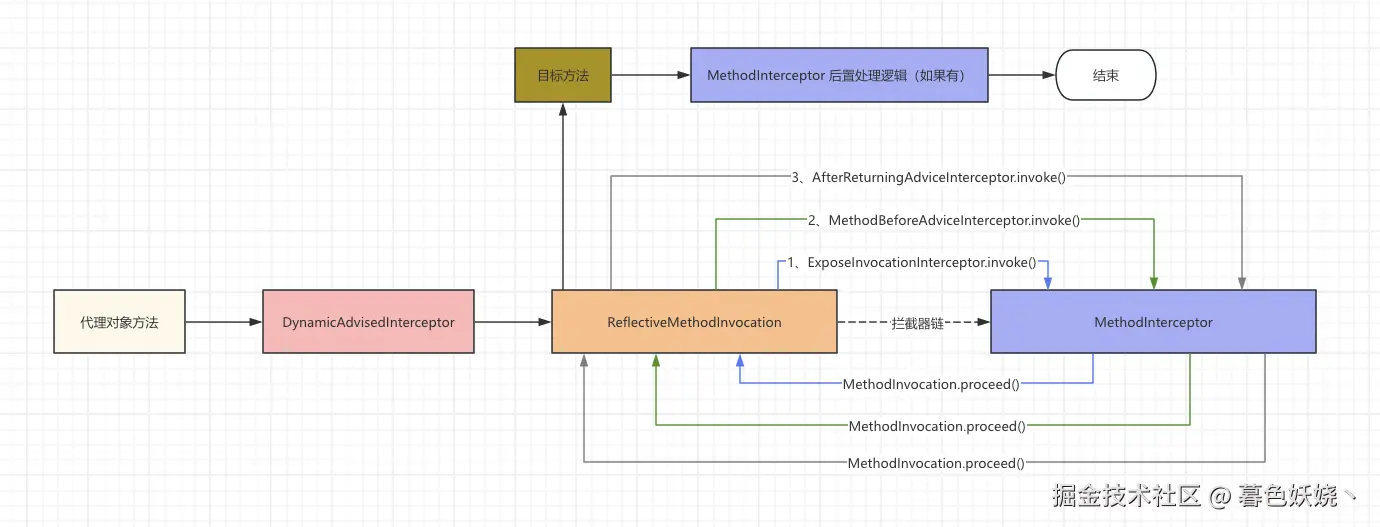
因为我们测试案例使用的是 @Before 注解实现的前置增强,所以这里是 MethodBeforeAdviceInterceptor,同理 @AfterReturning、@Around 等都有对应的拦截器,除了第一个 ExposeInvocationInterceptor 之外,定义几个切点这里就会有几个 chain。
ExposeInvocationInterceptor 是一个特殊的拦截器,用来充当上下文的,内部有一个 ThreadLocal 存储入口 ReflectiveMethodInvocation 对象,
private static final ThreadLocal<MethodInvocation> invocation = new NamedThreadLocal<>("Current AOP method invocation");
这可以便于后续 AspectJ 内部或者我们自己在增强代码块中使用它,例如
@Around("pointcut()")
public Object around(ProceedingJoinPoint joinPoint) throws Throwable {
    //获取当前 MethodInvocation,现在你知道为什么 ExposeInvocationInterceptor 在 List<chain> 的第一个了吧?
    MethodInvocation methodInvocation = ExposeInvocationInterceptor.currentInvocation();
    //......
    return null;
}
现在你知道为什么 ExposeInvocationInterceptor 在 List<chain> 的第一个了吧?因为后续每一个拦截器都可能会用到它绑定到 ThreadLocal 的 MethodInvocation 。
这是代理方法增强逻辑的核心,拦截器链会在 ReflectiveMethodInvocation.proceed() 里面遍历执行,就像我们以前学过的 Servlet 过滤器链,查看源码
// ReflectiveMethodInvocation
public Object proceed() throws Throwable {
    // 如果当前拦截器列表全部执行完,就调用原始方法
    if (this.currentInterceptorIndex == this.interceptorsAndDynamicMethodMatchers.size() - 1) {
       //调用原始方法(被代理的对象的方法)
       return invokeJoinpoint();
    }
    //每次都索引自增,获取下一个拦截器
    Object interceptorOrInterceptionAdvice = this.interceptorsAndDynamicMethodMatchers.get(++this.currentInterceptorIndex);
    if (interceptorOrInterceptionAdvice instanceof InterceptorAndDynamicMethodMatcher dm) {
       //......
    }
    else {
       //调用拦截器
       return ((MethodInterceptor) interceptorOrInterceptionAdvice).invoke(this);
    }
}
注意这里 MethodInterceptor.invoke(this),传递了当前 ReflectiveMethodInvocation 对象,每个拦截器内部处理完都会再执行一遍 ReflectiveMethodInvocation.proceed(),所以程序又会回到,ReflectiveMethodInvocation.proceed() 内部,进而开始执行下一个拦截器,直接到拦截器列表执行完毕,会调用 invokeJoinpoint() 执行原始方法。
| 对比维度 | Spring AOP | AspectJ 原生 AOP | 区别 |
|---|---|---|---|
| 核心实现机制 | 动态代理(JDK动态代理或CGLIB字节码生成) | 字节码织入(编译时、加载时、编译后) | Spring AOP 在运行时创建代理包装目标对象;AspectJ 直接修改 .class 文件字节码 |
| 织入时机 | 运行时(应用启动时创建代理) | 编译时、加载时(类加载期)或编译后 | AspectJ 的编译时织入性能最优,无运行时开销;Spring AOP 每次方法调用都有代理转发开销 |
| 拦截能力(连接点) | 仅方法执行(主要是 public 方法) | 很多种连接点:方法执行/调用、构造器执行/调用、字段读/写、异常处理、类初始化、静态初始化、建议执行 | Spring AOP 无法拦截字段访问、构造器调用、静态初始化等 |
| 目标对象限制 | 仅 Spring 容器管理的 Bean | 任何Java对象(包括第三方库、自己 new 的对象) | Spring AOP 只能拦截通过 Spring 容器获取的 Bean;AspectJ 可拦截任何类的实例 |
| 内部调用问题 | 无法拦截(同类内的方法A调用方法B) | 可以拦截 | Spring AOP 由于代理机制限制,内部调用不经过代理;AspectJ 直接修改字节码,无此限制 |
| 性能影响 | 有运行时开销(代理调用链、反射) | 编译时织入零运行时开销;加载时织入有初次加载开销 | 对性能敏感场景,AspectJ 编译时织入是首选 |
| 依赖关系 | 轻量,只依赖 Spring 核心 | 需要 AspectJ 编译器(ajc)或 织入器 agent | Spring 项目可轻易集成 Spring AOP;AspectJ 需要构建工具配合 |
| 适用场景 | 典型的 Spring 应用,横切关注点简单(日志、事务、安全等) | 复杂 AOP 需求、高性能要求、拦截非 Spring 对象、系统级监控 | 根据需求复杂度选择:简单用 Spring AOP ,复杂用 AspectJ |
掌握了 Spring AOP 的实现原理,对于后续我们理解 Spring 事务的支持会有极大的帮助。

