月圆之夜小米版
1.29GB · 2025-10-18

这是屏保联动时,从屏保图片中动态获取主色,同步到氛围灯,切换时跟氛围灯联动效果
解析图片动态取色,耗时较长,需要预加载处理,所以在每次变更主题时便要开始取色,然后切换时同步到氛围灯
而氛围灯并不支持所有的颜色,只能支持256色,所以在取到图片颜色后需要根据结果颜色去跟氛围灯所支持的256色对比,取最接近的结果色,然后同步到氛围灯显示
取色需要用到原生 Palette.from(bitmap).generate() 方法,通过量化算法分析位图的像素颜色分布,提取最具代表性的颜色组合,也有异步获取方法,下面方法都处于子线程,所以这里直接使用同步方法
查看 androidx.palette.graphics.Palette 源码可以得知,该方法默认提取16种颜色样本

需要确保取色精准度,16可能错过次要但视觉显著的颜色,过高又会导致耗时,所以这里使用24
针对原图还需要缩放处理,但是不宜过度,否则对准确度会有影响,这里对2560分辨率的图片缩小三分之一处理


private val mWidth = ScreenUtils.getScreenWidth() / 2private val mHeight = ScreenUtils.getScreenHeight() / 2Glide.with(Utils.getApp()) .asBitmap() .load(new File(path)) .override(width, height) .centerCrop() .skipMemoryCache(true) .diskCacheStrategy(DiskCacheStrategy.NONE) .submit(width, height) .get();
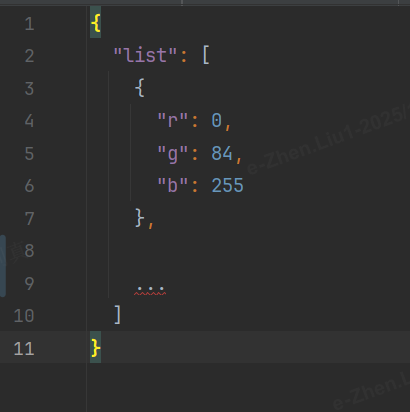
对氛围灯的256色进行缓存处理,先新建 color_rgb_256.json 文件,将rgb色值保存,用于后续转换对比
初始化时解析成hsv缓存到本地集合中
private fun saveHsvColor(): MutableList<HsvColor> { log("saveHsvColor") val hsvList = mutableListOf<HsvColor>() runCatching { val assetManager = Utils.getApp().assets val file = assetManager.open("color_rgb_256.json") val jsonStr = file.bufferedReader().readText() file.close() val bean = Gson().fromJson(jsonStr, AmbientLightList::class.java) val hsvColors = FloatArray(3) for (i in 0 until bean.list.size) { bean.list[i].apply { val myColor = Color.rgb(r, g, b) Color.colorToHSV(myColor, hsvColors) hsvList.add(HsvColor(hsvColors[0], hsvColors[1], hsvColors[2])) } } val json = Gson().toJson(hsvList) log("saveHsvColor hsvListSize=${hsvList.size}") SharedPreferencesUtils.setRGB256HsvColor(Utils.getApp(), json) }.getOrElse { Log.e(TAG, "saveHsvColor Exception ${it.message}") } return hsvList }
此文件颜色不会变,所以不用重复操作,判断首次转换就行
private fun initHsvColor() { if (hsvTableList.isEmpty()) { runCatching { val json = SharedPreferencesUtils.getRGB256HsvColor(Utils.getApp()) val listType = object : TypeToken<MutableList<HsvColor>>() {}.type Gson().fromJson<MutableList<HsvColor>>(json, listType)?.let { hsvTableList.addAll(it) log("initHsvColor xml list size=${hsvTableList.size}") } }.getOrElse { Log.e(TAG, "initHsvColor Exception ${it.message}") } } if (hsvTableList.isEmpty()) { saveHsvColor().let { if (it.isNotEmpty()) { hsvTableList.addAll(it) } } log("initHsvColor json list size=${hsvTableList.size}") } }
耗时操作需要放在子线程
@JvmStatic fun init() { log("$TAG init") scope.launch(Dispatchers.IO) { hsvTableList.clear() initHsvColor() } }
后面对图片进行取色,见下面方案
取色后,跟256色进行就近查找,所以需要转换成hsv,取 hue 进行对比
private fun findColor(bgHue: Float): ColorTipBean { if (hsvTableList.isEmpty()) { Log.w(TAG, "findColor hsvList is null") return ColorTipBean(Color.WHITE) } var result = hsvTableList[0] var minDiff = abs(result.hue - bgHue) for (i in 0 until hsvTableList.size) { val currentDiff = abs(hsvTableList[i].hue - bgHue) if (currentDiff < minDiff) { minDiff = currentDiff result = hsvTableList[i] } } log("findColor bgHue=$bgHue,result=$result") return ColorTipBean( Color.HSVToColor(floatArrayOf(result.hue, result.saturation, result.value)) ) }
拿到结果后,通过信号下设到氛围灯显示
想要达到联动效果,需要确保取色结果的准确度,原生方案使用 getDominantColor 直接获取主色,但是大部分结果差异较大,下面提供了几种方案对比
通过原生提供的方法直接获取图片主色
Palette.from(newMap).generate().apply { val dominantColor = getDominantColor(Color.WHITE) val hsvColorArray = FloatArray(3) val hsv = colorToHSV(dominantColor, hsvColorArray) Log.d(TAG, "dominantColor $dominantColor hsv $hsv") result.fill(hsv)}
getDominantColor 方法直接取的 mDominantSwatch.getRgb
/** * Returns the color of the dominant swatch from the palette, as an RGB packed int. * * @param defaultColor value to return if the swatch isn't available * @see #getDominantSwatch() */ @ColorInt public int getDominantColor(@ColorInt int defaultColor) { return mDominantSwatch != null ? mDominantSwatch.getRgb() : defaultColor; }
而 mDominantSwatch 则根据色块 population 排序的结果
Palette(List<Swatch> swatches, List<Target> targets) { mSwatches = swatches; mTargets = targets; mUsedColors = new SparseBooleanArray(); mSelectedSwatches = new ArrayMap<>(); mDominantSwatch = findDominantSwatch(); }@Nullable private Swatch findDominantSwatch() { int maxPop = Integer.MIN_VALUE; Swatch maxSwatch = null; for (int i = 0, count = mSwatches.size(); i < count; i++) { Swatch swatch = mSwatches.get(i); if (swatch.getPopulation() > maxPop) { maxSwatch = swatch; maxPop = swatch.getPopulation(); } } return maxSwatch; }
假设氛围灯需要多个取色,可以直接从 mSwatches 颜色集合中按 population 排序获取
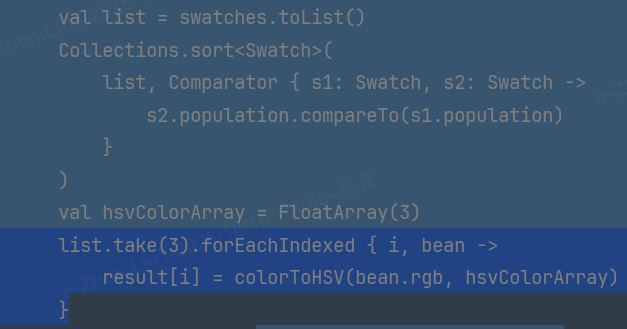
Swatch 代表的颜色在图片中的权重占比(多个小红点可能被聚类到同一个红色 Swatch)
经自测验证,改方案准确度不够,偏差较大,特别是在氛围灯所支持的256色中,查找出的相近结果出入较大,整体准确度不够
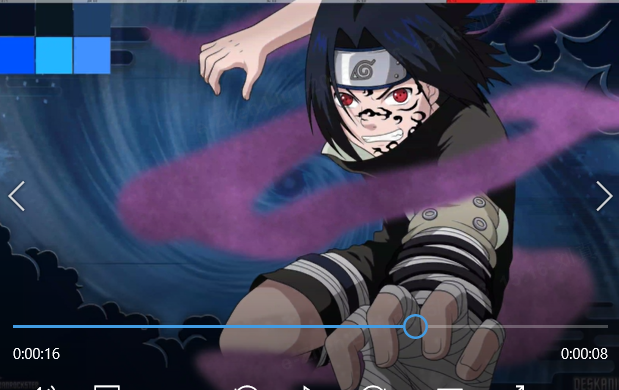
因为实际环境中无法看到氛围灯(车机上效果),所以在左上角显示测试结果,方便查看
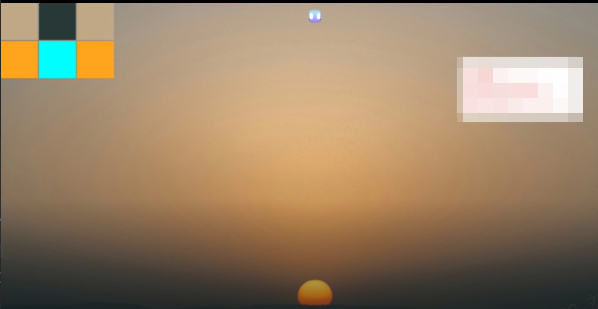
图片中,左上角测试区域,中间上面是图片主色,下面是通过主色映射的氛围灯颜色,很显然跟图片差异较大
在原生基础上使用饱和度跟亮度参与计算,避免过暗或过亮的颜色
fun getPerceptuallyDominantColor(bitmap: Bitmap): Int { val palette = Palette.from(bitmap).maximumColorCount(24).clearFilters().generate() val swatches = palette.swatches if (swatches.isEmpty()) return Color.WHITE var bestSwatch: Swatch? = null var maxScore = 0f for (swatch in swatches) { val hsl = swatch.getHsl() val saturation = hsl[1] // 饱和度 (0-1) val luminance = hsl[2] // 亮度 (0-1) val population = swatch.population // 评分公式:人口占比 * 饱和度 * 亮度因子 // 亮度因子确保避免过暗或过亮的颜色(0.1-0.9为理想范围) val luminanceFactor = 1f - abs(luminance - 0.5f) * 1.8f val score = population * saturation * luminanceFactor if (score > maxScore) { maxScore = score bestSwatch = swatch } } return bestSwatch?.rgb ?: palette.getDominantColor(Color.WHITE) }
该方案将纯黑白色过滤(实际图片中纯黑白色占比很少,但是很印象色块,容易出现误差),同时避免了过亮的颜色,更突出我们肉眼看到的颜色
1、在方案二的基础上,加入色相,改进计算公式
2、调整图片,缩小区域,针对中心区域进行取色
3、自定义过滤器,针对业务情况单独处理某些图片
比如,可以针对纯黑白占比大于30%的进行过滤,否则不过滤
private fun isClear(bitmap: Bitmap): Boolean { val totalPixels = bitmap.width * bitmap.height var blackCount = 0.0 var whiteCount = 0.0 for (x in 0 until bitmap.width) { for (y in 0 until bitmap.height) { val pixel = bitmap[x, y] if (pixel == Color.BLACK) { blackCount++ } if (pixel == Color.WHITE) { whiteCount++ } } } val blackRatio = blackCount / totalPixels val whiteRatio = whiteCount / totalPixels val isClear = blackRatio > 0.3 || whiteRatio > 0.3 Log.d(TAG, "isClear=$isClear totalPixels=$totalPixels,blackCount=$blackCount, blackRatio=${String.format("%.2f", blackRatio)},whiteRatio=${String.format("%.2f", whiteRatio)}") return isClear }
但需要慎重,会提高计算耗时
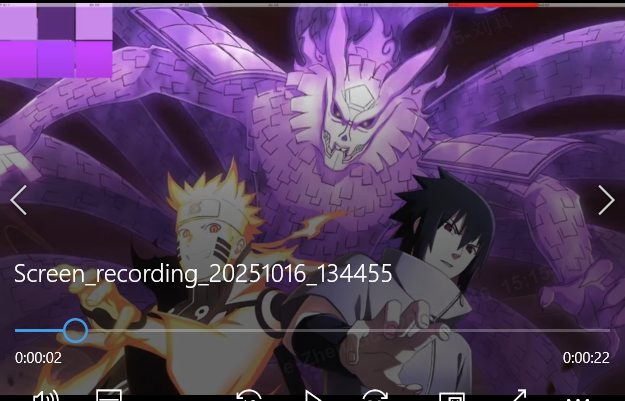
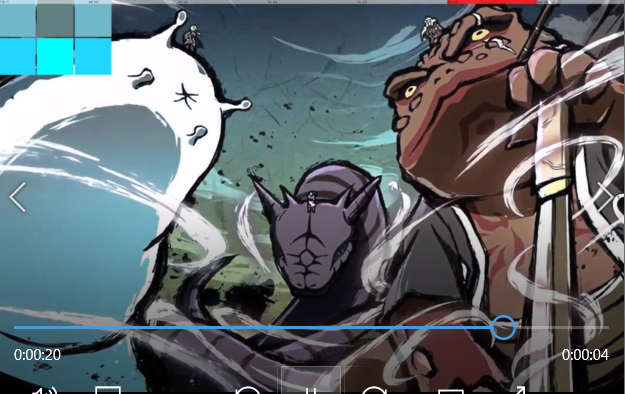
左上角,上面的方格代表直接从图片中读取的色值,下面的方格是映射后的色值,最左边的是方案二,中间的是方案一,右边的是替补方案
结论图片不多展示,经过大量图片验证,准确度最高的是方案二
import android.graphics.Bitmapimport android.graphics.Colorimport android.util.Logimport androidx.palette.graphics.Paletteimport androidx.palette.graphics.Palette.Swatchimport com.blankj.utilcode.util.GsonUtilsimport com.blankj.utilcode.util.ScreenUtilsimport com.blankj.utilcode.util.Utilsimport com.google.gson.Gsonimport com.google.gson.annotations.SerializedNameimport com.google.gson.reflect.TypeTokenimport kotlinx.coroutines.Dispatchersimport kotlinx.coroutines.MainScopeimport kotlinx.coroutines.launchimport java.util.Collectionsimport java.util.concurrent.CopyOnWriteArrayListimport kotlin.math.absimport kotlin.math.sqrtimport androidx.core.graphics.getobject AmbientLightColorPickManager { private const val TAG = "AmbientLightColorPickManager" private var scope = MainScope() private val mWidth = ScreenUtils.getScreenWidth() / 2 private val mHeight = ScreenUtils.getScreenHeight() / 2 private val hsvTableList = mutableListOf<HsvColor>() private val hueList = CopyOnWriteArrayList<FloatArray>() private val test1List = CopyOnWriteArrayList<FloatArray>() private val test2List = CopyOnWriteArrayList<FloatArray>() private val test3List = CopyOnWriteArrayList<FloatArray>() var test1Listener: ((Int, Int, Int) -> Unit)? = null var test2Listener: ((Int, Int, Int) -> Unit)? = null @JvmStatic fun init() { log("$TAG init") scope.launch(Dispatchers.IO) { hsvTableList.clear() initHsvColor() } } private fun initHsvColor() { if (hsvTableList.isEmpty()) { runCatching { val json = SharedPreferencesUtils.getRGB256HsvColor(Utils.getApp()) val listType = object : TypeToken<MutableList<HsvColor>>() {}.type Gson().fromJson<MutableList<HsvColor>>(json, listType)?.let { hsvTableList.addAll(it) log("initHsvColor xml list size=${hsvTableList.size}") } }.getOrElse { Log.e(TAG, "initHsvColor Exception ${it.message}") } } if (hsvTableList.isEmpty()) { saveHsvColor().let { if (it.isNotEmpty()) { hsvTableList.addAll(it) } } log("initHsvColor json list size=${hsvTableList.size}") } } /** 将本地rgb色值转换成hsv保存到本地 */ private fun saveHsvColor(): MutableList<HsvColor> { log("saveHsvColor") val hsvList = mutableListOf<HsvColor>() runCatching { val assetManager = Utils.getApp().assets val file = assetManager.open("color_rgb_256.json") val jsonStr = file.bufferedReader().readText() file.close() val bean = Gson().fromJson(jsonStr, AmbientLightList::class.java) val hsvColors = FloatArray(3) for (i in 0 until bean.list.size) { bean.list[i].apply { val myColor = Color.rgb(r, g, b) Color.colorToHSV(myColor, hsvColors) hsvList.add(HsvColor(hsvColors[0], hsvColors[1], hsvColors[2])) } } val json = Gson().toJson(hsvList) log("saveHsvColor hsvListSize=${hsvList.size}") SharedPreferencesUtils.setRGB256HsvColor(Utils.getApp(), json) }.getOrElse { Log.e(TAG, "saveHsvColor Exception ${it.message}") } return hsvList } /** 设置氛围灯 */ @JvmStatic fun setAmbientLight(displayId: Int, index: Int) { if (displayId != DisplayParameter.DISPLAY_CSD.displayId) return log("setAmbientLight displayId=$displayId") scope.launch(Dispatchers.IO) { if (hueList.isEmpty()) { Log.w(TAG, "setAmbientLight hueList is null") return@launch } if (index < 0 || index >= hueList.size) { Log.w(TAG, "setAmbientLight 索引异常") return@launch } // 氛围灯取色 setBytesFunctionValue(index) } } @JvmStatic fun switchLight(isOn: Boolean) { log("switchLight isOn=$isOn") } private fun findColor(bgHue: Float): ColorTipBean { if (hsvTableList.isEmpty()) { Log.w(TAG, "findColor hsvList is null") return ColorTipBean(Color.WHITE) } var result = hsvTableList[0] var minDiff = abs(result.hue - bgHue) for (i in 0 until hsvTableList.size) { val currentDiff = abs(hsvTableList[i].hue - bgHue) if (currentDiff < minDiff) { minDiff = currentDiff result = hsvTableList[i] } } log("findColor bgHue=$bgHue,result=$result") return ColorTipBean( Color.HSVToColor(floatArrayOf(result.hue, result.saturation, result.value)) ) } /** 初始化资源 */ @JvmStatic fun loadData(displayId: Int, pictures: List<String>) { if (displayId != DisplayParameter.DISPLAY_CSD.displayId) return log("loadData pictures size=${pictures.size} pictures $pictures") hueList.clear() test1List.clear() test2List.clear() test3List.clear() for ((index, picture) in pictures.withIndex()) { runCatching { val bitmap = GlideCacheUtils.loadImageAsBitmap(picture, mWidth, mHeight) testGenerate(bitmap) val result = generate(bitmap) hueList.add(result) log("loadData add index=$index,colors=${GsonUtils.toJson(result)}") }.getOrElse { Log.e(TAG, "loadData exception ${it.message}") } } log("loadData hueList size=${hueList.size}") } private fun setFunctionValue(functionId: Int, value: Int, zone: Int) { try { AdapterCarManager.iCarFunction.setFunctionValue(functionId, zone, value) } catch (e: Exception) { Log.e(TAG, "setFunctionValue Exception $e") } } private fun setBytesFunctionValue(index: Int) { try { test1Listener?.invoke( Color.HSVToColor(test1List[index]), Color.HSVToColor(test2List[index]), Color.HSVToColor(test3List[index]), ) test2Listener?.invoke( findColor(test1List[index][0]).colorTip, findColor(test2List[index][0]).colorTip, findColor(test3List[index][0]).colorTip, ) } catch (e: Exception) { Log.e(TAG, "setBytesFunctionValue Exception $e") } } private fun getColors(list: FloatArray): ByteArray { val result = mutableListOf<ColorTipBean>() list.forEach { result.add(findColor(it)) } val json = GsonUtils.toJson(LightColorBean(result).list) log("setBytesFunctionValue json=$json") return json.toByteArray() } private fun generate(newMap: Bitmap): FloatArray { val result = FloatArray(3) Log.w(TAG, "------generate start") val dominantColor = getPerceptuallyDominantColor(newMap) val hsvColorArray = FloatArray(3) val hsv = colorToHSV(dominantColor, hsvColorArray) result.fill(hsv) Log.d(TAG, "dominantColor $dominantColor, hsv ${GsonUtils.toJson(hsvColorArray)}") return result } private fun testGenerate(newMap: Bitmap) { // 评分公式 val dominantColor1 = getPerceptuallyDominantColor(newMap) val hsvColorArray1 = FloatArray(3) colorToHSV(dominantColor1, hsvColorArray1) test1List.add(hsvColorArray1) // 主色 Palette.from(newMap).maximumColorCount(24).clearFilters().generate().apply { val hsvColorArray2 = FloatArray(3) val dominantColor2 = getDominantColor(Color.WHITE) colorToHSV(dominantColor2, hsvColorArray2) test2List.add(hsvColorArray2) } // 评分优化公式 val dominantColor3 = getPerceptuallyDominantColor1(newMap) val hsvColorArray3 = FloatArray(3) colorToHSV(dominantColor3, hsvColorArray3) test3List.add(hsvColorArray3) } fun getPerceptuallyDominantColor(bitmap: Bitmap): Int { val palette = Palette.from(bitmap).maximumColorCount(24).clearFilters().generate() val swatches = palette.swatches if (swatches.isEmpty()) return Color.WHITE var bestSwatch: Swatch? = null var maxScore = 0f for (swatch in swatches) { val hsl = swatch.getHsl() val saturation = hsl[1] // 饱和度 (0-1) val luminance = hsl[2] // 亮度 (0-1) val population = swatch.population // 评分公式:人口占比 * 饱和度 * 亮度因子 // 亮度因子确保避免过暗或过亮的颜色(0.1-0.9为理想范围) val luminanceFactor = 1f - abs(luminance - 0.5f) * 1.8f val score = population * saturation * luminanceFactor if (score > maxScore) { maxScore = score bestSwatch = swatch } } return bestSwatch?.rgb ?: palette.getDominantColor(Color.WHITE) } private fun isClear(bitmap: Bitmap): Boolean { val totalPixels = bitmap.width * bitmap.height var blackCount = 0.0 var whiteCount = 0.0 for (x in 0 until bitmap.width) { for (y in 0 until bitmap.height) { val pixel = bitmap[x, y] if (pixel == Color.BLACK) { blackCount++ } if (pixel == Color.WHITE) { whiteCount++ } } } val blackRatio = blackCount / totalPixels val whiteRatio = whiteCount / totalPixels val isClear = blackRatio > 0.3 || whiteRatio > 0.3 Log.d(TAG, "isClear=$isClear totalPixels=$totalPixels,blackCount=$blackCount, blackRatio=${String.format("%.2f", blackRatio)},whiteRatio=${String.format("%.2f", whiteRatio)}") return isClear } private fun calculateSwatchScore( hue: Float, saturation: Float, luminance: Float, population: Float ): Float { // 1. 人口权重 (标准化) val populationWeight = population / 1000000f // 2. 饱和度权重 - 适度重视但不过度 val saturationWeight = sqrt(saturation) // 使用平方根降低过高饱和度的优势 // 3. 亮度权重 - 偏好中等亮度范围 val luminanceWeight = when { luminance < 0.15f -> 0.2f // 太暗的惩罚 luminance > 0.85f -> 0.3f // 太亮的惩罚 else -> 1.0f - abs(luminance - 0.5f) * 1.5f } // 4. 色相权重 - 可选:降低过于鲜艳的红色/蓝色的优势 val hueWeight = when { // 红色范围 (330-30度) (hue >= 330f || hue <= 30f) -> 0.8f // 蓝色范围 (210-270度) hue in 210f..270f -> 0.9f else -> 1.0f } return populationWeight * saturationWeight * luminanceWeight * hueWeight } fun getPerceptuallyDominantColor1(bitmap: Bitmap): Int { val palette = Palette.from(bitmap) .maximumColorCount(24) .clearFilters() .generate() val swatches = palette.swatches if (swatches.isEmpty()) return Color.WHITE var bestSwatch: Swatch? = null var maxScore = 0f for (swatch in swatches) { val hsl = swatch.hsl val hue = hsl[0] // 色相 (0-360) val saturation = hsl[1] // 饱和度 (0-1) val luminance = hsl[2] // 亮度 (0-1) val population = swatch.population.toFloat() // 改进的评分公式 val score = calculateSwatchScore(hue, saturation, luminance, population) if (score > maxScore) { maxScore = score bestSwatch = swatch } } return bestSwatch?.rgb ?: palette.getDominantColor(Color.WHITE) } private fun colorToHSV(rgb: Int, hsvColorArray: FloatArray): Float { Color.colorToHSV(rgb, hsvColorArray) return hsvColorArray[0] } private fun log(str: String) = Log.d(TAG, str) data class LightColorBean( val list: List<ColorTipBean> ) data class ColorTipBean( @SerializedName("ColorTip") var colorTip: Int, )}